 Did we miss anything in this section? Is there something we didn't discover?
Let us know!
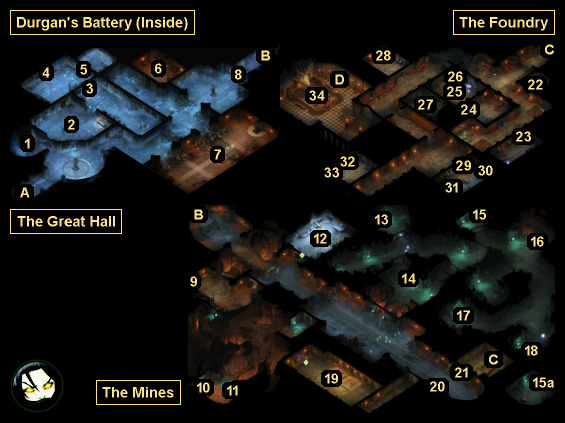
Overview
1 - Staircase to the Ramparts
Did we miss anything in this section? Is there something we didn't discover?
Let us know!
Overview
1 - Staircase to the Ramparts
On the ramparts you'll find a couple of urns that you can loot for
Minor Gauntlets of Accuracy and a
Potion of Flame Shield.
2 - Table
On the table here you'll find a
Record of Production. In two containers nearby you'll find
Boots of Stability and a
Ring of Unshackling.
3 - Small Chest
Inside the small chest here, you'll find a
Letter to Zoltun.
4 - Bookcase
In the bookcase here, you'll find a
Bill of Sale. In the chest just beneath it, you'll find a
Cloak of Minor Missiles.
5 - Secret Door
To open this door, you'll need to detect the brick right next to it. Inside the room, you'll discover a frozen dwarf with a satchel. You'll be given lots of ways to free the satchel: a
Torch, a
Hammer and Chisel, Fan of Flames, Ray of Fire, Burst of Summer Flame, Swift Strikes, or Barbaric Blow. Inside the satchel you'll find a
Rolled Parchment and a Guard's Key. You might need the key to unlock the armory (#6).
6 - Armory
To enter the armory, you'll either need to pick its difficulty 10 lock, or you'll need to acquire the Guard Key (#5). Inside you'll find
Badgradr's Barricade (in a trapped chest),
Camping Supplies and a
Durgan Iron Ingot (in a locked chest), a
Girdle of the Driving Wave (in an armor rack), and a
Battered Helm (in a shelf). You'll need the helm for the task
Garodh's Chorus.
7 - Feasthall
If you loot the containers in this chamber, then you'll find an
Exceptional Sabre and
Gauntlets of Puissant Melee (both on skeletons).
8 - Door
When you attempt to open this door, you'll be stopped by the spirit or Armswarden Marunn. To get past her, you'll either need to fight her or convince her that you should be allowed inside. For the latter, you'll have a few options:
- You can mention the Leaden Key and claim that Zoltun invited them.
- You can claim that Exandru invited you to pray to Abydon with him.
- You can claim that you're just looking around and then pass a Lore 7 check.
If you're not convincing, then you'll have to fight Marunn plus a handful of spirits. None of them will drop anything interesting.
9 - Locked Wooden Box
Inside the box here you'll find a random magical item.
10 - Mine Cart
If you can detect the hidden load in the mine cart here, then inside it you'll find two
Diamonds and eight
Durgan Iron Ingots.
11 - Crate
Inside this crate you'll find
Camping Supplies.
12 - Workshop
To open the way into this workshop, you'll either need to pick its difficulty 12 lock, or you'll need to grab the Workshop Key (#17). Inside the workshop, you'll have to battle some ice trolls, including a giant ice troll. After the battle, you'll find the
Sigil of the Sword (hidden in a shelf);
Camping Supplies, a
Durgan Iron Ingot, and a
Tempered Helm (in a chest); and a
Stone Dial (on a table).
13 - Crate
Inside this crate you'll find
Glanfathan Stalking Boots.
14 - Skeleton
You'll find the
Sigil of the Helm on the skeleton here.
15 - Mine Cart
If you get into the mine cart here (#15) and pull the lever, then it will start speeding along the mine tracks. When you reach the fork, if you just ride along, then you'll end up where you started. But if you lean right, or if you look around and then pull the lever (which requires Athletics 5 or Dexterity 16), then you'll end up in a cavern to the southeast (#15a). Inside that cavern in a chest you'll find the
Sigil of the Shield and two
Durgan Iron Ingots.
16 - Skeleton
On a skeleton here, you'll find
Erazmur's Letter.
17 - Corpse
You'll discover a dwarven corpse here. If you read its soul, then you'll learn that the dwarf was a miner who died of a heart attack. If you take the corpse's Workshop Key, then all of the spirits in the Mines will turn hostile. You might need the key to get into the workshop (#12).
18 - Skeleton
On the skeleton here you'll find a
Girdle of Eotun Constitution.
19 - Hall of Remembrance
The Hall of Remembrance will start out locked. To get into it, you'll either need to pick its difficulty 6 lock, or you'll need to grab the Rune-Engraved Copper Key (#20).
On the altar at the end of the hall, you'll find the mace
Nightshroud. It's a soulbound weapon, which means that it will improve as you complete tasks for it. However, after looting the weapon, powerful traps will activate in the hall, and Exandru's spirit will show up to guard the exit. To disarm the traps, you can either use the Mechanics skill (or more likely, just walk through them to set them off), or you can place sigils in the circular depressions along the wall. From left to right (west to east) you should insert the
Sigil of the Sword (#12), the
Sigil of the Shield (#15), and then the
Sigil of the Helm (#14). For Exandru and his helpers, you'll just have to fight them.
20 - Skeleton
On this skeleton you'll find a Rune-Engraved Copper Key. It'll unlock the door to the Hall of Remembrance (#19).
21 - Locked Door
This door will start out locked. To open it, you'll first need to insert the
Stone Dial (#12) into the socket next to it. Then you'll need to solve a puzzle by rotating the arrow on the dial.
The clues for the puzzle can be found on the markings flanking the door. You'll see four passages, each mentioning a direction. What you'll need to do is form the passages into a complete sentence. There's only one way to do this: "A cold wind from the south reached Old Vailia in the west and bore our parents east to seek the White Forge in the north." In other words, to solve the puzzle you'll need to rotate the dial so it points south, west, east and then north, pressing it each time you have it pointing in the right direction. After doing this correctly, the door will open.
22 - Armory
To enter this armory, you'll either need to pick its difficulty 13 lock, or you'll need to grab the Armory Key (#31). Inside, you'll find some "fine" and "exceptional" armor, plus
Camping Supplies,
Gauntlets of Swift Action, and a
Girdle of the Driving Wave.
23 - Locked Chest
You'll find a
Shimmering Cloak inside this chest.
24 - Bookcase
You'll find a random magical item in this bookcase.
25 - Globe
If you press the sapphires for Old Vailia, the Living Lands, and Rauatai in that order, then the door leading to the nearby treasure chamber (#27) will open.
26 - Locked Chest
You'll find a
Ring of Overseeing inside this chest.
27 - Treasure Chamber
Inside this chamber, you'll find
Boots of Evasion,
Bracers of Spiritual Power, a
Girdle of Eotun Constitution, and the unique battle axe
Wodewys.
28 - Chest
Inside this chest you'll find an
Adra Sphere and a
Durgan Iron Ingot.
29 - Hidden Crate
If you can detect the crate here, then inside it you'll find some
Camping Supplies.
30 - Locked and Trapped Chest
Inside the chest here you'll find an
Adra Sphere.
31 - Table
On the table here you'll find the Armory Key. It'll grant you access to the armory (#22).
32 - Vat
Inside this vat you'll find an
Adra Disc, but if you take it then just outside the chamber, three traps will activate and several spirits will attempt to ambush you.
33 - Table
On the table here you'll find a
Durgan Iron Ingot.
34 - White Forge
To wake up the forge, you'll need to insert two
Adra Spheres (#28, #30) and an
Adra Disc (#32). However, when you do, you'll get attacked by four Forge Guardians plus the spirits of Exandru, Marunn, and Zoltun. Zoltun is the only spellcaster in the group, so we'd recommend you start your party right next to the forge, and then jump Zoltun as soon as the battle starts. After that, you'll just need to try and keep your DPS characters safe while you wear down the remaining foes.
After the battle, when you click on the forge, you'll begin talking with Exandru, Marunn, and Zoltun, and you'll learn about the giant, eyeless creatures who killed the dwarves. At the end of your conversation, you'll have to make a choice: to bind the souls of the dwarves to the forge (which will reduce by 1 the number of
Durgan Iron Ingots required to form
Refined Durgan Iron Ingots), to bind the souls to the cannons protecting the Battery, or to release the souls to the Wheel. Only the first choice will give you a benefit in Part 1.
After you've made your decision, you'll be allowed to use the White Forge. It'll take 4 (or 3)
Durgan Iron Ingots to create a
Refined Durgan Iron Ingot. You'll then be able to use the
Refined Durgan Iron Ingots to add enchantments to your equipment. You'll be able to enchant armor, shields and weapons, and these enchantments won't count towards each item's 12-point enchanting limit:
- Armor: +15% of incoming crits converted to hits, -15% armor speed penalty
- Shields: 10% of ranged attacks reflected to attacker, +15% of incoming hits converted to grazes, -15% single-weapon speed penalty
- Weapons: +15% attack speed, +0.3 to crit damage multiplier, +20% of hits converted to crits
Also in the room you should notice two tables and a locked chest. When you loot them you'll find
Camping Supplies, two
Durgan Iron Ingots, and a
Ring of Searing Flames.
Exits
- Exit to
Durgan's Battery (Outside).
- Stairs between the Great Hall and the Mines.
- Stairs between the Mines and the Foundry.
- Exit to
Durgan's Battery (Outside). From this exit you'll be able to jump to the watch tower next to the Battery, which will give you an easy route to return to
Stalwart Village.


