 Did we miss anything in this section? Is there something we didn't discover?
Let us know!
Overview
1 - Long Bosc
Did we miss anything in this section? Is there something we didn't discover?
Let us know!
Overview
1 - Long Bosc
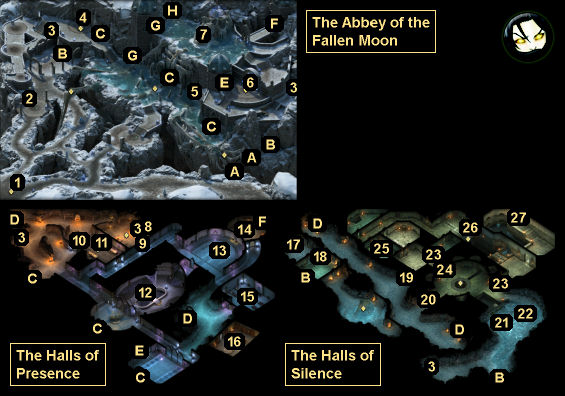
Long Bosc will give you some background information about the abbey, including that the Ondrites staying there are "none too friendly but to their own." In other words, this is yet another map where you'll have to sneak past or kill the guardians.
2 - Chest
Inside this chest you'll find a
Girdle of Mortal Protection.
3 - Camping Supplies
You'll find
Camping Supplies inside these containers.
4 - Mural
This mural will give you information for the panel puzzle (#26), which you'll have to solve during the quest
The Rising Tide.
5 - Locked Chest
Inside this chest you'll find a Grimoire of the Tides, which will give you several level 1-7 spells, including all of Ninagauth's spells.
6 - The Veil of Tears
To make this water barrier disappear, you'll need to approach it while carrying
Ondra's Witness (#27).
7 - Reliquary
You'll need to visit this reliquary during the quest
The Rising Tide. Inside it you'll find a
Fragment of Abydon's Hammer.
8 - Hidden Vase
If you can detect the vase here, then inside it you'll find an Ondrite Quarters' Key. It'll get you through a nearby locked door (#9).
9 - Locked Door
To open this door, you'll need to pick its Difficulty 9 lock, or you'll need to grab one of the Ondrite Quarters' Keys in the abbey (#8, #11).
10 - Locked Chest
You'll find
Boots of Speed and a
Spellward Amulet inside this chest.
11 - Wooden Box
You'll find
Healing Hands and an Ondrite Quarters' Key inside this box. The key will get you through a nearby locked door (#9).
12 - Giftbearer Beasca
Beasca is involved in the quest
The Rising Tide.
13 - The Hall of the Tidal Wave
In this hall you'll meet High Abbot Kaoto, who is involved in the quest
The Rising Tide. He'll start out friendly, but if you've been killing the Ondrites in the abbey, then he'll turn hostile and attack you. Either way, you'll learn the Sign of the Tide from him, which you'll need for the panel puzzle in The Halls of Silence (#26).
One way or another, you'll receive several things from Kaoto: a
Ring of Deflection,
Robes of the Tidebringer, a
Spellward Amulet, a Steel-Banded Key (which will open the way into the Vault of Forgotten Thoughts, #15), and possibly a Wave Crested Key (which will open the door at #20). You can also loot the High Abbot's Key (which will get you into the Abbot's Quarters, #14) from a vase right next to the abbot.
14 - The Abbot's Quarters
To open the door to this room, you'll need to pick its Difficulty 10 lock, or you'll need to acquire the High Abbot's Key from the Hall of the Tidal Wave (#13). In a locked chest in this room, you'll find the
Journal of the High Abbot, which you might need for the quest
The Rising Tide.
15 - The Vault of Forgotten Thoughts
To open the door to this vault, you'll need to pick its Difficulty 10 lock, or you'll need to receive the Steel-Banded Key from High Abbot Kaoto (#13). Inside the vault, you'll find
Gwyn's Band of Union and a
Ring of Unshackling (in a hidden urn), plus
St. Wygelt's Cudgel (in a locked chest).
The vault is also the home of the abbey's Salt Well, where people can gift their memories to Ondra. You'll need to visit the well for the quest
The Burden of Memory.
16 - Library
Inside the library in a shelf you'll find the book The Giftbearer's Pilgrimage, which you might need to read for the quest
The Rising Tide.
17 - Crates
Inside the two crates here, you'll find
Boots of Speed and
Camping Supplies.
18 - Hidden Crate
If you can detect the crate here, then inside it you'll find an
Amulet of Health.
19 - Table
On this table you'll find a Wave Crested Key. It'll unlock a nearby door (#20).
20 - Locked Door
To open this door, you'll need to pick its Difficulty 6 lock, or you'll need to grab a Wave Crested Key (#13, #19).
21 - Skeleton
You'll find a
Ring of Deflection on the skeleton here.
22 - Skeleton
If you read the soul clinging to the skeleton here, then you'll experience the final moments of one of the Low Tide Ondrites who died in the Halls. Afterwards, if you loot the skeleton, then you'll find
Arthek's Cord.
23 - Gates
To open these gates, you'll need to pull the lever on their eastern side.
24 - Noisy Gate
When you open this gate (by pulling the lever right next to it), all of the Low Tide Ondrites in the nearby cells will storm out and complain about the noise. If you immediately move your party out of sight, then the Ondrites will go back to their cells when the gate finishes moving, and you'll avoid the fight. Otherwise, they'll attack you.
25 - Farentis
Farentis is involved in the quest
The Rising Tide. After talking to him, he'll give you a Cracked Ornate Key, which will unlock the Difficulty 13 door behind him.
26 - Panel Puzzle
You'll see four panels set into the wall here. This is a puzzle, and you'll find information for it on the mural outside the abbey (#4). To solve the puzzle, you should select "city in flames," "tidal wave," "barren shore," and then "flourishing city." This represents the Rising cycle of the abbey. However, to complete the puzzle, you'll also need to learn the Sign of the Tide from High Abbot Kaoto (#13) or from his journal (#14). Once you've completed both parts of the puzzle, a water bridge will appear and allow you to continue your journey.
27 - Ondra's Witness
At this spot you'll find
Ondra's Witness, which will allow you to open the Veil of Tears outside the abbey (#6). However, before you can take the artifact, you'll have to point it towards a "rising tide" or an "open gate." The former will flood the area and kill off the remaining Low Tide Ondrites. The latter will allow the Low Tide Ondrites to flee.
Exits
- Chasm crossing. If you have at least Dexterity 18, then you'll be able to throw a
Rope and Grappling Hook here and use it to swing across the chasm.
- Entrance to the Halls of Silence.
- Entrance to the Halls of Presence.
- Stairway between the Halls of Presence and the Halls of Silence.
- Stairway between the Halls of Presence and the abbey ramparts.
- Staircase between the Halls of Presence (Abbot's Quarters) and the abbey ramparts. You won't be able to use this exit until you've reached the reliquary (#7).
- Tower staircase. You won't be able to use this exit until you've reached the reliquary (#7).
- Staircase. After completing the quest
The Rising Tide, this staircase will allow you to travel directly to the White Forge in
Durgan's Battery.


