 Did we miss anything on this map? Is there something we didn't discover? Let us know!
You'll start out the module on the Midnight Rose (#1). As you talk to Captain Allendry there, you'll
learn that you're on your way to Calimshan, and that you're a passenger on his ship. However, you'll
further learn that you're not exactly a paying passenger, and that to earn your passage you'll have to
perform some odd jobs for the captain.
That sets up the first quest in the module, where Captain Allendry will send you off to the Silver
Sails Trading Company (#5) to pick up a crewmember named Martins and a mage named Rahman Madani.
Nisar Zayid, the ship's first mate (not to mention a multi-classed sorcerer and barbarian), will
accompany you.
At the Silver Sails Trading Company, you'll find Rahman Madani, a "mysterious statue," two
dockhands -- but no Martins. When you talk to the dockhands, you'll learn that something "passin'
strange" happened to Martins when he touched the statue, and that he wasted no time rushing off to
the Seedy Tavern (#8) to gather in a few drinks. The dockhands will then inform you that they won't
deliver the statue to the Midnight Rose until they've learned what happened to Martins.
If you talk to Rahman Madani, he'll tell you a little bit about the statue, that it came from Netheril
and that it is a "figure so clearly dedicated to the sea," but he won't give you any clue about what
caused Martins' reaction. However, Madani will mention that somebody recently tried to buy the statue
from him, and that he refused to sell. You'll meet that somebody later.
Note: If you take this opportunity to update Captain Allendry on the situation, you might be able to
convince him to give you 250 gp. You'll just need to pass a DC 15 persuade check.
To find out what happened to Martins, you'll need to go to the Seedy Tavern (#8). However, when you
get there you'll be accosted by Bradley and Honeypea Blackriver. They'll demand money from you, but
you'll be given a few different ways to deal with them. If you pacify or coerce them, then you'll be
able to steal their money (1000 gp), and they'll leave. If you provoke or attack them, then they'll
fight you.
Regardless of what you do with Bradley and Honeypea, immediately after talking to them a fight will
spring up between the Bloodsailors and the Blackriver Bandits. If you handled Bradley and Honeypea
non-violently, then the Bloodsailors will decide that you're with the Blackriver Bandits, and they'll
attack you. Otherwise, they'll assume that you're with them, and you'll have to fight the Blackriver
Bandits. It doesn't make much of a difference which side you support, although fighter classes are
probably better off supporting the Bloodsailors, while rogue classes are probably better off with the
Blackriver Bandits (see #9).
The battle in front of the Seedy Tavern can be difficult -- especially if you decide to fight the
Blackriver Bandits, because then it'll be a 6-on-6 fight (inlcuidng two bosses) rather than a 6-on-4
fight. If you have problems with the battle, then realize that you can go into a building (such as
the Seedy Tavern) and rest there, and then exit and continue the fight later. With enough breaks
in the action, you should be able to persevere.
Note: If you attack the Blackriver Bandits, then you'll find a
ring of fortitude +1 and an
amulet of natural armor +1 on Bradley Blackriver's corpse.
Inside the Seedy Tavern, you'll finally meet up with Martins. He won't really want to talk to you, so
you'll either have to provoke him or persuade him into talking, or, at worst, spend 25 gp to buy him
a drink. Martins will tell you that he "saw things no man should ever have to bear witness to,"
including a woman of "uncanny beauty," and he'll refuse to return to the Midnight Rose.
With the Martins mystery solved, when you return to the Silver Sails Trading Company (#5), you'll
finally be able to convince the two dockhands there to transfer Madani's statue onto the Midnight
Rose (#1). There are a whole slew of ways to do this, including bribery. If your method fails,
then you'll have to fetch Madani's spellbook from his quarters aboard the Midnight Rose, and then
he'll transfer the statue himself.
Back on the Midnight Rose, Captain Allendry will give you one more task. He'll tell you that a "crazy
lass" named Tasina paid him 3000 gp to book passage on the Midnight Rose, and he'll ask you to escort
her from her room at the Golden Apple Inn (#7) to the ship.
When you enter the Golden Apple Inn, Gilda (on the main floor) will seem surprised to see you, and
she'll tell you that Tasina's escort has already arrived. Uh oh. Then when you go upstairs to find
out what's going on, a pair of thugs will stop you. It's possible to get these thugs to leave
(although the bluff option seems to be broken), but it won't make much of a difference. More thugs,
including a thug boss, are located down the hall, and you'll have to defeat them to reach Tasina.
When you talk to Tasina, you'll learn that the thugs you killed were actually her escort to the city,
but that she used what was supposed to be their wages when she paid Captain Allendry (thus engendering
their ire). Tasina will
also mention that she was just in the Anauroch Desert, where Rahman Madani found his statue, but
she'll claim not to know who Madani is. Finally, Tasani will also seem to be unaware of the Midnight
Rose's next destination, which is strange for someone who just overpaid to be on board.
But Tasina at least will make things easy on you. You won't actually have to escort her to the
Midnight Rose. She'll make her way there on her own. Once she arrives, talking to Captain Allendry
on board will finally allow you to set sail away from Neverwinter.
Note: You and Nisar will lose all of your possessions in the ensuing voyage. You'll eventually get
your possessions back, but Nisar won't, so you should confiscate Nisar's equipment before embarking.
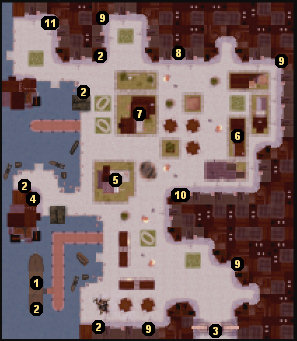
1 - Midnight Rose
Besides Captain Allendry, you'll also encounter Poly the Parrot on deck. However, Poly won't say
much of anything useful until you reach the tropical island.
You can also visit the crew and passenger quarters below deck, but there isn't much to see there. You
won't be able to enter the captain's quarters, and you'll only be able to open Rahman Madani's chest
if he gives you his key.
2 - Chests
You'll find random loot in the chests.
3 - Gate
You won't be able to go through this gate. (It's just there to be consistent with the original
Neverwinter Nights campaign.)
4 - Rusty Al's Tattoo and Pawn Shop
Rusty Al will offer you one of four tattoos: rope and anchor (+2 will saves), heart and arrow (+2
fortitude saves), eye and tears (+1 deflection AC), and the gnaked gnome (+2 reflex saves). You
and Nisar will both be able to buy tattoos, and it'll only cost you 100 gp.
5 - Silver Sails Trading Company
Besides finding Rahman Madani and his strange statue here, you'll also encounter Doisin Kivna, who
is a shopkeeper.
6 - Twenty in a Quiver Merchant House
When you approach the merchant house, Nisar will mention that the house is closed but that there's a
light on in the upstairs window. That's a hint that you can break into the house if you want, provided
that you can pick open the lock on the front door.
Inside, you'll have to defeat a night watchman and a pair of dogs, but if you can do that then you'll
be able to loot several containers of random equipment.
7 - The Golden Apple Inn
You won't be able to go upstairs in the inn until Captain Allendry (#1) sends you there.
8 - The Seedy Tavern
Besides Martins, you'll also find a woman named Dela Nereth in the tavern. If you sided with the
Bloodsailors, then Dela will act as a shopkeeper. If you sided with the Blackriver Bandits, then
Dela will lure you to her shop (#11) and ambush you there. If you can kill Dela, then you'll find
Dela's rapier on her corpse.
9 - Hideouts
In each hideout you'll find a few gang members and a gang boss. The gang bosses can be tough to kill, but when they die they'll drop lots of useful items. If you side with the Blackriver Bandits, then you're guaranteed to find a
Bloodsailor shield, a
Bloodsailor mace, a
Bloodsailor blade, a
Bloodsailor morningstar, and a
Bloodsailor crossbow. If you side with the Bloodsailors, then you're guaranteed to find a
Blackriver dagger, a
Blackriver shield, a
Blackriver mace, a
Blackriver axe, a set of
Blackriver plate, and a
Blackriver bastard sword.
10 - Gang Safe House
After the Bloodsailors and the Blackriver Bandits have started their war, this building will turn into
a safe house for whichever side you picked. Inside, you'll find some containers to loot, and you'll
also meet four bosses (including Bradley and Honeypea if you sided with the Blackriver Bandits). The
bosses will heal you, buff you, act as a store, and ask you to clear out the hideouts of the rival
gang (#9). If you do that for them, then they'll give you a Bloodsailor item or a Blackriver item,
depending on which side you're fighting against.
11 - Deela's Ambush
This is where Dela (#8) will ambush you if you sided with the Blackriver Bandits.


