 Did we miss anything in this section? Is there something we didn't discover?
Let us know!
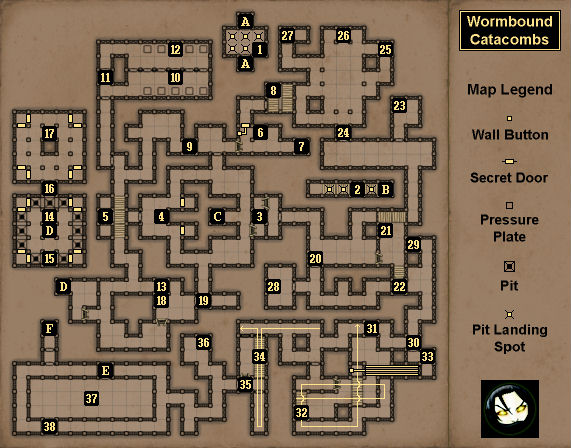
Map Summary
Did we miss anything in this section? Is there something we didn't discover?
Let us know!
Map Summary
- Secrets: #8 (Hardstone Bracelet),
#17 (Bane),
#22 (Tome of Water)
- Epic Items: #17 (Bane),
#27 (Meteor Greaves),
#33 (Crystal Helmet)
- Power Gems: #38
- Enemies: Fire Elementals (275 xp), Ghouls (200 xp), Skeletons
(Ancient Helm,
Ancient Shield,
Skullcleave,
99-133 xp), Summon Stones
(Rock, 375 xp), Xeleroids (250 xp)
Overview
1 - Cheese
You'll find a piece of
Cheese here.
2 - Lock Picks
You'll find a set of
Lock Picks under the bridge here.
3 - The Bridge
To figure out what to do for this puzzle, you'll need to explore the catacombs for a while until you come to a shelf with a Scroll inside (#18). The scroll contains the words:
Under and under and over
and all over again
and over
So what you'll need to do is go under the bridge twice, then go over it, then repeat the sequence (under, under, over), and then go over it again. If you do all of that, then the door to the east will open.
4 - Sign
This sign will give you some background information on the Wormbound brothers, Orul and Xarant.
5 - Crystal of Life (upper level) / Flail (lower level)
When you approach the Crystal of Life here, the two secret doors to the east will open, releasing four skeletons to attack you. After defeating the skeletons, you'll find
Mudwort and two
Lightning Bombs in one of the secret rooms. Underneath the Crystal of Life, you'll find a
Flail in a shelf.
6 - Shelf
You'll find a
Leg Plate in the shelf here.
7 - Pellets
You'll find 10
Pellets here.
8 - Secret Chest
This chest is one of the secrets in the game. In it you'll find two
Blooddrop Caps and a
Hardstone Bracelet. Next to the chest you'll find a
Tribal Spear.
9 - Lock Picks
Under the bridge here you'll find a set of
Lock Picks.
10 - Mirror Image Puzzle
For this puzzle, you'll have access to five pressure plates. To the north, you'll see five pressure plates that you can't get to (#12). Three of those pressure plates will have objects on them. What you'll need to do is turn your pressure plates into a mirror image of those other pressure plates. That is, if you're facing your pressure plates, then you'll need to put items on the first, second and fourth ones (counting from left to right). When you do this, a nearby door (#10) will open, granting you access to the other pressure plates -- but more importantly, to the objects sitting on top of them.
11 - Closed Door
This door will open when the nearby sets of pressure plates (#10, #12) mirror each other.
12 - Pressure Plates
On top of these pressure plates you'll find a
Crossbow, a
Frost Bomb, and a
Full Helmet.
13 - Plate Gauntlets
You'll find
Plate Gauntlets here.
14 - Clock Puzzle
The 12 pits in this puzzle represent a clock face. 11 of the pits will start out open, and one of the pits -- representing the time -- will start out closed. So to loot the shelf to the south (#15, 6 o'clock) or to head north to the next room (#16, 12 o'clock) you'll just have to rest until the right time of day.
15 - Shelf
Inside the shelf here you'll find a Gear Key, which will allow you to open the door to the north (#16). You'll only be able to access the shelf during the 6 o'clock hour.
16 - Locked Gate
You'll need a Gear Key (#15) to unlock this gate. You'll only be able to reach the gate at the 12 o'clock hour.
17 - Shelf
The room with this shelf is one of the secrets in the game. Inside the shelf you'll find the epic weapon
Bane. However, when you pick it up, the secret doors in this room and the Clock puzzle room (#14) will open up, releasing four Summon Stones and four Fire Elementals to attack you. The Summon Stones shouldn't pose much of a problem, but the Fire Elementals will sacrifice themselves and blow up in your face, and four explosions in rapid succession will probably kill most if not all of your party. If you don't want to use up a bunch of Healing Potions to fight them, then your best bet for survival is to use the windgate in the Clock puzzle room (Exit D) to attack and retreat as necessary.
18 - Shelf
In this shelf you'll find a Scroll that will give you a clue for the Bridge puzzle (#3). When you pick up the scroll, the gate and door to the east will open up.
19 - Gate and Door
The gate and door here will start out closed. They'll both open up when you take the Scroll from the shelf to the west (#18).
20 - Locked Door
You'll need a Skull Key (#26) to unlock this door.
21 - Loot
On the ground here you'll find a
Huntsman Cloak. In the shelf just to the north, you'll find two
Throwing Axes.
22 - Shelves / With Icicles from Beneath
Under the bridge here you'll discover an empty shelf. Next to the shelf you'll see a sign that reads, "With icicles from beneath, I strike at thee." You probably won't be able to do anything with the shelf when you first encounter it, but later you'll pick up an
Ice Guardian Figurine (#33), and when you place the figurine in the shelf, the magical barrier beneath your feet will disappear, dropping you down to another shelf. This new shelf is one of the secrets in the game, and in it you'll find a
Tome of Water.
23 - Blooddrop Caps
At this spot you'll find a Sack containing three
Blooddrop Caps. Right next to the Sack you'll find a
Greater Healing Potion.
24 - Chamber of Xarant Wormbound
When you step onto the pressure plate here, the gate in front of you will open, but the door behind you will close, locking you into the chamber to face Xarant Wormbound. Xarat will immediately summon three ghouls to help him out, so it's a good idea to move to a location where you can't get surrounded. Other than the initial summoning, Xarat is a standard melee boss, so you should be able to go toe-to-toe with him. Xarant will drop two
Longswords and an
Amulet of Nergal when he dies. The exit door will re-open at the end of the battle.
25 - Crystal Shard of Healing
You'll find a
Crystal Shard of Healing here.
26 - Altar
On the altar here you'll find a Skull Key. You'll need the key to unlock a door to the south (#20).
27 - Gold Key Cache
If you spend a
Gold Key here, then inside the cache you'll find
Meteor Greaves and 10
Pellets.
28 - Shelf
The sign outside this room will reference the
Silver Scepter of Isochronos, but in the shelf here you'll only find a
Shovel and a Note. However, the Note will tell you where to look for the scepter -- in the
Barren Desert, "where there is nowhere to hide from sunlight." Near the shelf in the room, you'll also find an
Energy Potion.
29 - Cheese
You'll find a piece of
Cheese here.
30 - Closed Gate
You'll only be able to open this gate by pulling the lever on its southern side.
31 - Fireball Chamber
You'll have to dodge shooting fireballs in this chamber. They'll follow the path indicated on the map above. Your goal in the chamber is to reach a button, which will create a temporary bridge, which will grant you access to an
Ice Guardian Figurine and the
Crystal Helmet (#33).
32 - Crossbow Quarrels
You'll find three
Crossbow Quarrels under the bridge here.
33 - Shelf
In the shelf here you'll find an
Ice Guardian Figurine, which you'll need in another part of the catacombs (#22). On the floor near the shelf you'll find a
Crystal Helmet.
34 - Bouncing Bolt Puzzle
If you're standing on the bridge here, then on the eastern wall you'll see a button. Beneath the bridge on the eastern wall, you'll see a lever. Pressing the button will cause a nearby demon mouth to shoot a bolt. Pulling the lever will toggle the two gates on either side of the bridge (closing one and opening the other). Your goal is to have the bolt make it past both doors twice, so it ends up hitting a receptacle. The route the bolt will take is shown on the map above.
To start out, you should make sure that the northern gate is open. Then you should climb onto the bridge and face the button. Next, you should press the button, back up once (to fall down to the lower level), move forward once, and pull the lever to open the southern gate (possibly waiting for a second so the bolt makes it past the northern door first). Then you should wait for a couple of seconds (so the bolt passes the southern gate twice) and pull the lever again. If you get the timing right, then the bolt will hit the receptacle, which will cause the door to the west (#35) to open.
35 - Bouncing Bolt Exit Door
36 - Crystal Flower
You'll find a
Crystal Flower here.
37 - Ghoul Arena
When you drop down to the lower ground here, you'll get attacked by several Ghouls. If you're not careful then they'll surround you, so it's a good idea to head to a corner so only two can attack you at once. But regardless, you'll take a lot of damage, so you should have some
Healing Potions ready.
After the battle, you'll need to pull the four levers on the walls of the arena. This will open the gates leading to the arena exit windgate (Exit E), a
Power Gem (#38), and the stairs down to
Orul's Crypt (Exit F). You can also loot a few things from the floor of the arena, including five
Cannon Balls, a
Crossbow Quarrel, a
Full Helmet, and a
Tattered Shirt.
38 - Power Gem
You'll find a
Power Gem underneath the bridge here.
Exits
- Windgates to the Six Pits puzzle in the
Cemetery. Only one of these windgates will be accessible at once, depending on the lever from the puzzle above.
- Windgate to the Pottery puzzle in the
Cemetery.
- Stairs up to the
Cemetery.
- Two-way windgate.
- Elevator windgate. This windgate will transport you from the Ghoul Arena back up to the upper ground.
- Stairs down to
Orul's Crypt.


