 Did we miss anything in this section? Is there something we didn't discover?
Let us know!
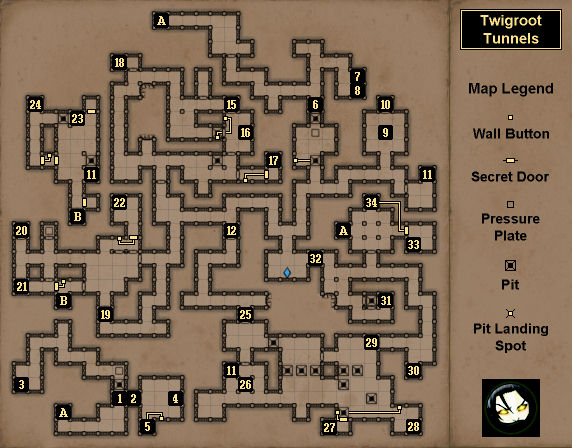
Map Summary
Did we miss anything in this section? Is there something we didn't discover?
Let us know!
Map Summary
- Secrets: #5 (Whitewood Wand),
#10 (Potion of Willpower,
Spidersilk Cloak),
#17 (Rogue Vest),
#21 (Potion of Vitality),
#22 (Leather Brigandine),
#24 (Reed Helmet),
#27 (Potion of Dexterity),
#33 (Reed Cuirass)
- Power Gems: #16, #26
- Enemies: Mummies (90 xp), Ratlings
(Throwing Knife, 150 xp), Skeletons
(Ancient Helm,
Ancient Shield,
Skullcleave, 100 xp),
Turtles (Turtle Steak, 60 xp),
Wargs (Warg Meat, 80 xp)
Overview
1 - Pit Puzzle
To cross the pit to the north, you'll need to throw an object over the pit and onto the pressure plate just beyond it.
2 - Locked Gate
You'll need an Iron Key (#3) to open this gate.
3 - Loot
In this room you'll find an Iron Key, which will unlock an Iron Door to the east (#2). Next to the key you'll find a
Tattered Cloak.
4 - Chest
Inside this chest you'll find a
Frost Bomb, a Round Key, and a Scroll of Ice Shards. You'll need the key for a gate in
Twigroot Forest.
5 - Secret Room
This room is one of the secrets in the game. You'll find a
Whitewood Wand here.
6 - Gate
As you approach this gate, you'll catch a glimpse of the Island Master, but then he'll teleport away before you can get to him. At the gate itself you might notice a sign that says, "There is no turning back." The sign isn't kidding; when you step on the pressure plate to the south, the pit by the door will open, and you won't have any way to escape for a while. In other words, this is a good place to save.
7 - Shelf
In this shelf you'll find a Scroll of Shield.
8 - Shelf
You'll have to destroy some debris to reach this shelf. In it you'll find a
Leather Cap.
9 - The Four Plagues Room
In this chamber you'll find four shelves with a sign next to each one. Each sign-shelf combination is a riddle. What you'll need to do is put the right items into the shelves so the gate to the north opens up, giving you access to the secret cache in the room beyond (#10). The solution is as follows:
- Battle - any weapon
- Cold - any armor
- Disease - any potion
- Famine - any food
After looting the secret cache, you can take back your riddle answers.
10 - Secret Cache
This cache is a secret. To access it, you'll have to solve the Four Plagues riddle to the south (#9). Looting the cache will give you a
Potion of Willpower and a
Spidersilk Cloak.
11 - Pellets
You'll find 10
Pellets here.
12 - Locked Gate
When you approach this gate you'll spot the Trickster (aka the Leprechaun), but he'll run through the gate and lock it behind him. To follow him, you'll need to pick up a Brass Key (#23).
13 - The Nest
The Nest is the home to several ratlings. When you open the door here, you'll probably get attacked by two or three of them. The easiest way to deal with the battle(s) is to fight at the doorway and then close the door and rest whenever you've taken too much damage.
14 - Cudgel
You'll find a
Cudgel here.
15 - Energy Potion
You'll find an
Energy Potion here.
16 - Be Quick Room / Power Gem
If you read the sign next to the door leading to this room, it will warn you to "be quick." When you press the button next to the door, the door will open, but after a second a pit will open beneath your feet, and the demon face at the other end of the hall will shoot poison at you. What you should do is press the button, then move off the pit and out of the way of the poison, then wait for the pit to close again so you can access the room, and then enter the room and claim a
Power Gem. To exit the room, you'll just need to press the button inside the room, and then wait for the pit to close and the poison to shoot by again. But be careful! After entering the room, the three warg cages in the Nest will open, and you'll have to battle a few wargs.
Note: If you fall through the pit just outside the room, then you'll drop down into a warg den, where you'll have to fight four wargs.
17 - Shelf
You'll find a
Rogue Vest in the shelf here. This is one of the secrets in the game.
18 - Turtle Egg
You'll find a
Turtle Egg here.
19 - Philosopher's Stone Puzzle
For the Philosopher's Stone puzzle, you'll have to push the stone to the right location. But first you'll have to turn the puzzle on. To do this, you'll need to place an object on the pressure plate to the west of the puzzle (by dropping the object through the grate). When the puzzle is lit up, the stone will move when you click on it, and you'll need to push it onto the orange square. You can do this in three moves: pushing it east, then south (by clicking on the stone through the grate), and then west. When you do this correctly, the gate leading to the nearby windgate (Exit B) will open up.
20 - Machete
On the ground here you'll find a
Machete. You can grab it through the bars of the grate.
21 - Secret Cache
This cache is one of the secrets in the game. You'll find an
Energy Potion and a
Potion of Vitality here.
22 - Secret Room
This room is one of the secrets in the game. Inside it you'll find
Leather Brigandine and
Lock Picks.
23 - Shelf
In this shelf you'll find a Brass Key, which will unlock a gate elsewhere in the tunnels (#12). However, when you take the key, the gate leading to the windgate will shut, and the secret doors in the room will open, releasing four skeletons to attack you. After the battle, if you examine the secret rooms the skeletons were in, then you'll find a
Blowpipe with three
Darts,
Leather Pants, and a Sack containing
Bread, a
Compass,
Lock Picks, and a Note. The Note will give you a clue to a treasure chest in
Twigroot Forest. In the southern skeleton room, you'll also find the lever that will re-open the exit gate.
24 - Secret Cache
This cache is one of the secrets in the game. You can pick up a
Reed Helmet and a
Torch here.
25 - Gate
When you go through this gate, it will close behind you, locking you into the southeastern part of the tunnels. You'll have your first battle against the Trickster here. He'll dance around and throw
Rocks at you, and he'll also open doors releasing Turtles. The Trickster is tougher than he looks. If you have trouble with the battle, then just retreat back towards the entrance gate. The Trickster will almost never follow you, so you should be able to rest there and then return to fight again. Once you've done enough damage to the Trickster, he'll disappear in a puff of smoke, and he'll leave behind a Note and a Brass Key. The Note will just taunt you, but the key will open up the exit door (#29).
26 - Power Gem
You'll find a
Power Gem here.
27 - Secret Room
This room is one of the secrets in the game. Inside you'll find a
Potion of Dexterity and 10
Pellets.
28 - Quarterstaff
You'll find a
Quarterstaff here.
29 - Locked Door
You'll need to pick up the Brass Key from the Trickster to open this door.
30 - Loot
On the floor here you'll find a
Lizard on a Stick and two
Shuriken.
31 - Loot
At this spot you'll find a
Blooddrop Cap,
Bread, and a Note. The Note won't lead you to anything.
32 - Lever
The lever here will open up a secret door to the west, giving you another route to the Crystal of Life in the room beyond.
33 - Secret Room
This room is one of the secrets in the game. In the room at this spot you'll find a
Reed Cuirass. Next to the cuirass you'll find 10
Pellets.
34 - Shelf
In and near the shelf here you'll find a Scroll of Force Field and the recipe for
Shield Potions. On the wall to the right of the shelf, you'll also find a button that will open a secret door to the east.
Exits
- Stairs up to
Twigroot Forest.
- Windgate.


