 Did we miss anything in this section? Is there something we didn't discover?
Let us know!
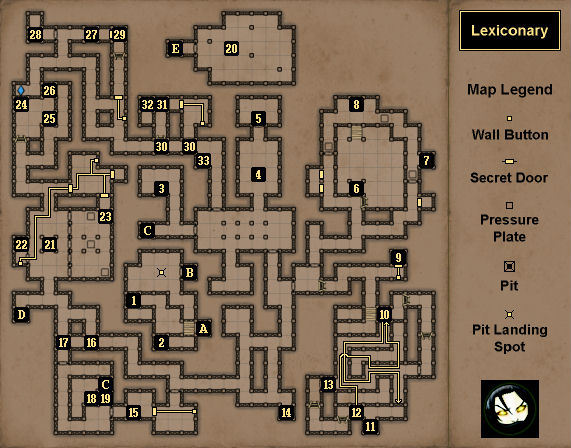
Map Summary
Did we miss anything in this section? Is there something we didn't discover?
Let us know!
Map Summary
- Secrets: #9 (Cheese),
#15 (Mirror Chestplate),
#23 (Morning Star),
#29 (Crystal Shard of Protection),
#32 (Tome of Fire)
- Power Gems: #5
- Enemies: Crabs (450 xp), Green Slimes (250 xp), Ice Guardians (500 xp), Mimics (400 xp), Ratlings
(Throwing Knife,
150-165 xp), Shrakk Torr Insects (195 xp), Skeletons
(Ancient Helm,
Ancient Shield,
Skullcleave, 99-110 xp), Wyverns (250 xp)
Overview
1 - Lever
Under the bridge here you'll find a lever. Pulling it will open the gate to the exit windgate (Exit B).
2 - Crystal Shard of Healing
You'll find a
Crystal Shard of Healing here.
3 - Shelves
In this room you'll find two shelves: one with three
Shuriken, and another with a Wooden Box containing
Bread,
Cheese, a
Lizard on a Stick, and
Pitroot Bread. On the floor between the shelves you'll find 10
Pellets.
4 - Figurine Puzzle
In this room you'll find four shelves with the following labels: "I'm alive," "I can't fly," "I'm the strongest," and "I can walk." This probably won't make a whole lot of sense the first time you enter the room, but as you solve puzzles in the Lexiconary, you'll find four figurines: a
Skeleton Figurine (#8), a
Snail Figurine (#11), a
Crowern Figurine (#22), and an
Ogre Figurine (#28). So what you'll need to do for the puzzle is put the right figurine in the right shelf:
- The Crowern is alive.
- The Ogre is the strongest.
- The Skeleton can walk.
- The Snail can't fly.
When your answers are correct, the doorway to the Lexiconary (#5) will open.
5 - Lexiconary
The doorway to this room will open once you've solved the Figurine puzzle to the south. Inside the room, you'll find a
Bear Pelt, a
Crystal Flower, a
Power Gem, and a Scroll. The Scroll will act as your "Rosetta Stone" for decoding some of the strange messages you might have noticed on the island, such as the signs in the Archives.
In particular, you should learn the following things from the Scroll:
- E means 1
- NA means 2
- UHU means Forward
- LAM means Backward
- AR means Strafe Left
- TE means Strafe Right
From examining untranslated signs, you'll also eventually discover that:
- KO means 3
- PALA means Turn Left
- FAAM means Turn Right
6 - The Crossing Puzzle
What you'll need to do in this puzzle is push the floating blocks (by clicking on them) so you can travel from the southern end of the room to the northern end, where you'll find the
Skeleton Figurine (#8). The trick to the puzzle is that one of the grid squares is "off," so you won't be able to move the block from it. To turn the grid square "on," you'll need to place items on the three pressure plates in the room. For the first two, you'll just need to drop an item through a grate. This will light up the third pressure plate on the northern side of the room. To give yourself a throwing lane to the third pressure plate, you'll need to push the two moveable blocks to the two grid squares to the east of the starting platform. You should then be able to launch an item north to land on the pressure plate.
7 - Great Axe
You'll find a
Great Axe here.
8 - Skeleton Figurine
When you pick up the
Skeleton Figurine, the secret doors in the room will open, releasing a trio of Shrakk Torr insects to attack you. To avoid getting surrounded, we'd recommend running to the Great Axe alcove (#7) and fighting from there.
9 - Secret Cache
This room is one of the secrets in the game. In it you'll find
Bread, two pieces of
Cheese, and a
Torch.
10 - The Path of the Eagle
To move from the northern end of the room to the southern end, you'll need to follow "the path of the eagle." That is, you should follow the path where the ground below you is as far away as possible. If you move to the right spot, then a magical bridge piece will appear below you. If you don't, then you'll fall down and have to start over. The correct path is shown on the map above.
11 - Snail Figurine
You'll find a
Snail Figurine in the shelf here.
12 - The Disguised Path
To return to the northern part of the room, you'll have to follow "the disguised path." This path will work just like the eagle path where a correct step will create a bridge piece beneath your feet, and a misstep will cause you to fall and have to start over. The correct path is shown on the map above.
13 - Closed Gate
This gate will open up once you've completed the Path of the Eagle (#10).
14 - Shuriken
You'll find two
Shuriken here.
15 - Secret Room
This room is one of the secrets in the game. Inside you'll find three
Crossbow Quarrels and a
Mirror Chestplate.
16 - Crab
Somewhere around here you'll get attacked by a Crab that will drop a Round Key when it dies. You'll need the key in the northern part of the map (#30).
17 - Fireball Puzzle
When you pull the lever here, the door to the south will open and fireballs will begin shooting at you. If you can withstand or evade the fireballs, then you'll find a chest in the puzzle that you can loot (#19). To make the trip slightly easier, you'll discover a second lever in the puzzle (#18), and pulling it will remove the windgate allowing the fireballs to turn the corner. However, you'll have to deal with a Crab guarding the second lever.
18 - Lever
19 - Locked Chest
Inside this chest you'll find three
Darts and
Plate Gauntlets.
20 - Mimic Den
You'll get sent to this den by pressing a wall button (Exit D). Inside, you'll get attacked by three Mimics. About the best you can do is move to a corner so you can protect your weakest character and only get attacked by two Mimics at once. When they die, the Mimics will drop two
Blooddrop Caps, a
Neck Chain, an Ornate Key, and a
Shield Potion. The Ornate Key will allow you to unlock the gate blocking access to the exit windgate (Exit E). If you explore the den, then you can also find a mixture of low-level loot, including an
Energy Potion, a
Fire Bomb, a
Healing Potion,
Lock Picks, a
Rock,
Shoes, a
Tattered Shirt, and a
Torch.
21 - Windgate Puzzle
This puzzle consists of two windgates, three pressure plates, and a button. One of the windgates and the button are located in your room; the other windgate and the pressure plates are in the other room. What you'll need to do is use the windgates to land objects on the pressure plates. The windgate in your room is fixed in its position, but the button will move the other windgate back and forth in an east-west direction. The windgates won't teleport you. They'll only teleport objects. If you throw an object at your windgate, then it will exit the other windgate going the same direction.
To solve the puzzle, you should move the other windgate to the center of its room. Then you should drop an object onto your windgate so it lands on the central pressure plate in the other room. Then you should stand to the south of your windgate and throw an object at it. This will cause the object to fly north out of the other windgate and land on the northern pressure plate. Then you should move the other windgate so it's at the eastern wall of the other room. Then you should stand to the north of your windgate and throw an object at it. This will cause the object to fly south out of the other windgate and land on the southern pressure plate.
When all three pressure plates are weighted down, a gate will open, allowing you to reach the
Crowern Figurine (#22).
22 - Crowern Figurine
You'll find a
Crowern Figurine in the shelf here.
23 - Secret Room
This room is one of the secrets in the game. In it you'll find a
Lizard on a Stick and a
Morning Star.
24 - Pellets
You'll find 10
Pellets here.
25 - Shelf
In the shelf here you'll find a
Lightning Rod, but to loot it, you'll have to step onto a pressure plate, which will cause a demon mouth to the north to shoot a lightning bolt at you. To avoid taking damage, drop something onto the pressure plate before standing on it.
26 - Longsword
Under the bridge here you'll find a
Longsword.
27 - Rock, Scroll, Sword Shelves
In this hallway you'll find three shelves: one labeled "Rock," one labeled "Scroll," and one labeled "Sword." Your goal is to play "Rock, Paper, Scissors" with the shelves. That is, you should place a scroll (or any other document) in the "Rock" shelf, you should place a sword in the "Scroll" shelf, and you should place a
Rock in the "Sword" shelf. You can find a
Rock (#20) and a sword (#26) in the Lexiconary, but for a scroll you'll have to head somewhere else (such as the
Archives, where you can find two scrolls). Completing the puzzle will open a door to the west, which will allow you to claim an
Ogre Figurine (#28).
28 - Ogre Figurine
You'll find an
Ogre Figurine in the shelf here. However, when you enter the room with the shelf (which will require you to solve the Rock, Scroll, Sword puzzle at #27), a secret door to the east will open, and you'll get attacked by a Shrakk Torr insect and an Ice Guardian.
29 - Secret Shelf
This shelf is one of the secrets in the game. In it, you'll find a
Crystal Shard of Protection.
30 - Locked Doors
You'll need to use the Round Key to open these doors. You'll find the key on a Crab to the south (#16).
31 - Lock Picks
You'll find
Lock Picks under the bridge here.
32 - Secret Shelf
This shelf is one of the secrets in the game. In it you'll find a
Tome of Fire. On the floor to the south you'll also find a
Crystal Shard of Recharging.
33 - Potions
You'll find an
Energy Potion and a
Healing Potion here.
Exits
- Elevator windgate. This windgate will move you between the high and low ground here.
- Windgate to the
Archives.
- Windgate. This windgate will transport you from the low ground to the high ground to the north.
- Wall button. When you press the button on the southern wall here, a windgate will appear on top of you, and you'll get teleported to the Mimic Den (#20), where you'll have to battle three Mimics. One of the Mimics will drop an Ornate Key, which will allow you to open the gate leading to the return windgate (Exit E).
- Windgate. This windgate will take you back to the wall button that teleported you to the Mimic Den (Exit D).


