 Did we miss anything in this section? Is there something we didn't discover?
Let us know!
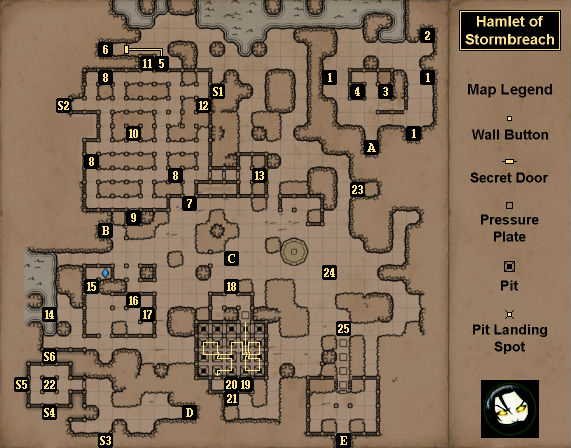
Map Summary
Overview
1 - Turtle Eggs
Did we miss anything in this section? Is there something we didn't discover?
Let us know!
Map Summary
Overview
1 - Turtle Eggs
You'll find one or more
Turtle Eggs at each of these locations.
2 - Healing Potion
You'll find a
Healing Potion here.
3 - Three Buttons Puzzle
You'll find three buttons here: one each to the north, south and east. Your goal in the puzzle is to press the buttons in the right sequence. When you get a button right, you'll hear a "click." When you get a button wrong, you won't hear anything. After some trial and error, you should be able to come up with the solution: SNEESNN. When you press the buttons in that sequence, the gate blocking access to the chest to the west (#4) will open.
4 - Locked Chest
This chest is one of the secrets in the game. You'll need to complete the nearby Three Buttons puzzle to gain access to it. Inside the chest you'll find a Map and a
Tome of Energy. The Map will give you a hint for the Tetris Islands puzzle in the
Sewers.
5 - Turtle Egg / Button
You'll find a
Turtle Egg on the ground here and a button on the western wall. When you press the button, you'll open the secret door to the west, which will release an Ogre to attack you.
6 - Secret Pedestal
The room with this pedestal is one of the secrets in the game. On the pedestal, you'll find a
Tome of Knowledge.
7 - House of Needles
Your goal in this puzzle is to avoid the spike traps and pull three levers (#10). Each lever will open a gate leading to the nearby
Power Gem (#12). There are some safe spots in the middle of the puzzle, and you should run from safe spot to safe spot when making your way to the levers.
8 - Levers
9 - Gold Key Cache
The lock for this cache can be found on the western side of the House of Needles (#7), between the two levers (#8) on that side of the puzzle. Inside the cache you'll find
Rogue Boots.
10 - Lock Picks
You'll find
Lock Picks here.
11 - Potion of Resurrection
You'll find a
Potion of Resurrection here.
12 - Pedestal
If you destroy the underbrush blocking access to the pedestal here, then on it you'll find a
Spirit Mirror Pendant.
13 - Power Gem
You'll find a
Power Gem here, plus a
Greater Energy Potion and a
Greater Healing Potion on the pedestals next to it. You'll only be able to reach this location by pulling the levers (#8) in the House of Needles (#7).
14 - Orb of Vilson
You'll find an
Orb of Vilson here. (If you can't tell, this is a reference to the movie Cast Away.)
15 - Pedestal
On the pedestal here, you'll find a Hub Key, which will unlock the Hub windgate (Exit C).
16 - Pedestal
On the pedestal here, you'll find 10
Pellets.
17 - Throwing Axes
You'll find two
Throwing Axes here.
18 - House of Braids
For this puzzle, you'll need to navigate a 4x5 grid of pits. Each time you step onto a closed pit, the four pits immediately adjacent will toggle their door, either opening it or closing it. That means to move around, you'll need to make sure you always move to a pit with at least one open pit adjacent to it.
Your goal in the puzzle is to pull the four levers on the sides of the puzzle, which will open the gate leading to a chest (#20). You might also want to pick up the Iron Key (#19), since it will give you an easy way to return to the puzzle if you end up falling down into the
Sewers. A solution for the puzzle is shown on the map above. You can also follow these directions (starting from the pressure plate): SSSS, grab Iron Key, EN, pull lever, WNE, pull lever, WNWSWW, pull lever, N, pull lever, ESESWS.
19 - Pedestal
On the pedestal here you'll find an Iron Key. The key will unlock the "shortcut" in the
Sewers, which will give you an easy way back to the House of Braids (#18).
20 - Chest
Inside this chest you'll find a
Maul, one of the epic weapons in the game.
21 - Loot
At this spot you'll find a
Gold Key and three
Broadhead Arrows.
22 - Shrine of Air
If you place four
Power Gems on the table in the center of the shrine, then you'll be granted an
Essence of Air.
23 - Kilhagan Sign
This sign will give you a clue for finding the Hidden Shrine.
24 - Locked Treasure Chest
You'll receive a clue for this treasure chest in the
Cemetery. When you dig it up, you'll find a
Crystal Shard of Protection and a
Jeweled Scepter of Ruling inside.
25 - Crystal Mines Entrance Puzzle
You'll get a clue for this puzzle from a stone head to the south (S3), which will tell you to follow the "way of the snail." That is, you should proceed slowly across the pressure plates before you, waiting a couple of seconds at each one before advancing to the next. At the last pressure plate, if you moved slowly enough, then the exit gate will open. If not, then the demon mouths at the gate will splash you with some poison gas, and you'll have to try again.
S1 - Stone Head
"For every force there is an opposing force. There are two sides to everything. This duality permeates the whole universe."
S2 - Stone Head
"I am the left eye. I saw where the meteor fell."
You'll find
Antivenom in front of this stone head.
S3 - Stone Head
"If you wish to enter Crystal Mines, you must take the Way of the Snail."
S4 - Stone Head
"This is the elemental shrine of air. Air is rune of dexterity, storms and flight. Northeast is whence the forces of air are strongest."
S5 - Stone Head
"Follow the footsteps of Kilhagan the Wise."
S6 - Stone Head
"Bring forth four power gems to fuse them into the essence of the element. Not all of the gems lie under skies; some of them are buried deep underground."
Exits
- Stairs down to the
Sewers (East).
- Stairs down to the
Sewers (West).
- Hub windgate. You'll need the Hub Key (#15) to unlock this windgate.
- Stairs down to the
Sewers (South).
- Passage to the
Crystal Mine Entrance.


