 Did we miss anything in this section? Is there something we didn't discover?
Let us know!
Map Summary
Did we miss anything in this section? Is there something we didn't discover?
Let us know!
Map Summary
- Secrets: #2 (Bronze Brace),
#11 (Leg Plate),
#15 (Serpent Bracer,
Tribal Spear),
#23 (Tome of Earth),
#30 (Zarchton Harpoon)
- Power Gems: #20
- Enemies: Crabs (450 xp), Green Slimes (250 xp), Ice Guardians (500 xp), Mummies (90 xp), Shrakk Torr Insects (195 xp),
Skeletons (Ancient Helm,
Ancient Shield,
Skullcleave, 99-121 xp)
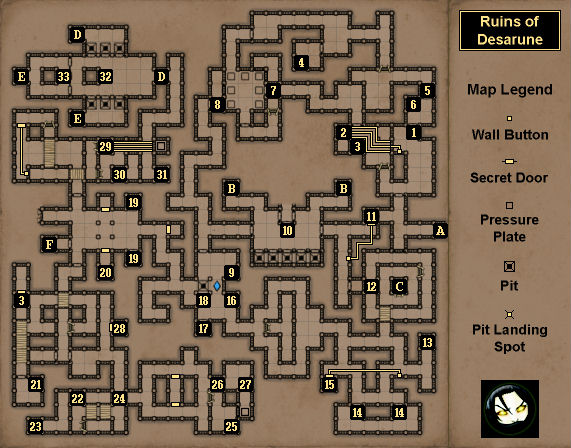
Overview
1 - Closed Gate
To open this gate, you'll need to circle around to the other side of the room and pull a lever (#5).
2 - Secret Shelves
The two shelves here are one of the game's secrets. In them you'll find a
Bronze Brace and a
Potion of Resurrection. To reach the shelves, you'll need to press the button to the east, which will create a temporary bridge.
3 - Pellets
You'll find 10
Pellets here.
4 - Shelf
In the shelf here you'll find a
Fist Dagger.
5 - Lever
This lever will open a gate to the south (#1).
6 - Shelf
In this shelf you'll find a Round Key and a Scroll of Fireball.
7 - Skyway Puzzle
The Skyway puzzle consists of seven pressure plates. If any of the plates are weighted down, then the gate to the south will remain closed, and so the first thing you'll need to do for the puzzle is pick up the
Fire Bomb and
Salted Sausage that start out on the plates. The gate to the south will lead you to a ladder, which will take you to higher ground looking down on the puzzle. From there you'll need to drop items onto the pressure plates, which will create magical bridge pieces for you to walk on. Doing this step-by-step will allow you to drop items on all of the pressure plates and make your way to a Round Lock, which you'll be able to unlock with a Round Key (#6). Unlocking the lock will open the door to the west (#8).
8 - Skyway Puzzle Exit Door
9 - Shelf
In the shelf here you'll find a Scroll of Light.
10 - Pit Puzzle
When you step onto the pressure plate here, three pits to the north will open up. This won't accomplish anything at first, but once you've used the stairs nearby (Exits B) to descend to the
Archives, you'll discover that there's a spider under the pressure plates, and that you can use a pressure plate down there to send him back up here. Your goal is to send the spider down the middle pit, which will put him on top of a pressure plate in the
Archives.
With the spider on the pressure plate, lights will turn on over some of the pressure plates beneath the pits to the south. Looking at the pressure plates from east to west, the first, second and fourth plates will be illuminated. That means you'll need to come back here and drop items onto the first, second and fourth pits so they land on the illuminated pressure plates below. When you do this, a secret door in the
Archives will open up, and the exit door to the east here will also open up.
11 - Secret Shelf
The room with this shelf is one of the secrets in the game. To open up the southern wall in the room, you'll need to press the wall button to the southwest. In the shelf in the room, you'll find a
Leg Plate. When you pick it up, the gate to the east will open up.
12 - Bombs
Under the bridge here you'll find two
Fire Bombs.
13 - Loot
At this spot you'll find a
Heavy Shield and three
Shuriken.
14 - Crabs
You'll encounter a pair of crabs in this chamber. If you can't convince them to attack you one at a time, then we'd recommend retreating to a nearby map exit (Exit A or B), and leaving the map and resting as necessary. After defeating the crabs, you'll find some
Pellets and
Broadhead Arrows in the chamber.
15 - Secret Cache
Pressing a wall button to the east will temporarily open the wall to this room, which is one of the secrets in the game. Inside the room you'll find a
Serpent Bracer and a
Tribal Spear. To escape the room, you'll just need to press the button on the eastern wall.
16 - Shelf
In the shelf here you'll find a Scroll of Darkness.
17 - Gold Key Cache
If you spend a
Gold Key here then you'll gain access to an
Ax.
18 - Lever
Pulling this lever will close the pit just to the east of it.
19 - Locked Gates / Levers
To open these gates, you'll need a pair of Iron Keys (#27, #33). In the rooms beyond, you'll find levers. Pulling both of the levers will cause the three secret doors around the chamber to open, releasing a few skeletons to attack you, and also open the gate leading to the
Lexiconary (Exit F). You'll find a
Bear Skull Helmet in one of the rooms and two
Throwing Knives in the other.
20 - Power Gem
You'll find a
Power Gem here.
21 - Loot
At this spot you'll find a
Jewel Pendant and a
Speed Potion.
22 - Button / Bridge
If you drop down to the low ground here, then you'll be able to press a button on the western wall. The button will create a magical bridge above you that will give you access to a secret cache (#23).
23 - Secret Cache
In this secret cache you'll find a
Tome of Earth and a set of
Lock Picks.
24 - Closed Gate
To open this gate, you'll need to pull the lever on the high ground just to the west.
25 - Cheese
You'll find Cheese here.
26 - Closed Gate
To open this gate, you'll need to press the button on the northern wall, and then quickly move south so you can throw an object onto the pressure plate to the east. However, along with the gate, the pressure plate will also open all four secret doors to the west, and you'll get attacked by Green Slimes from all sides.
27 - Shelf
You'll find an Iron Key in this shelf. You'll need it for the central chamber (#19).
28 - Healing Potions
You'll find two
Healing Potions in this room. The secret door to the room will open when you place an item on the pressure plate to the east (#26).
29 - Launch Point
If you launch an item from here to the east, then it'll land on a pressure plate, creating a magical bridge that will allow you to reach a nearby secret chest (#30).
30 - Secret Chest
This locked chest is one of the secrets in the game. Inside you'll find a
Rage Potion and a
Zarchton Harpoon.
31 - Minor Loot
At this spot you'll find two
Frost Bombs and a loaf of
Bread.
32 - Lever
This lever will toggle two windgates (Exits D and E) and it'll also toggle the gate to the west (#33). With the windgates active and the gate open, the skeletons in the side rooms will be able to reach you. With the windgates inactive and the gate closed, they won't be able to. So what you should do is pull the lever down, wait for a skeleton to appear, and then push it back up so you can fight the skeletons one or two at a time rather than all at once.
33 - Gate / Key
To open the gate here, you'll have to pull the lever to the east (#32). In the shelf here, you'll find an Iron Key. You'll need the key in the central chamber (#19).
Exits
- Stairs up to
Sleet Island.
- Stairs down to the
Archives.
- Meditation Spire. If you wait at the top of the spire for several seconds (or rest for a few seconds), then you'll get teleported to an almost identical spire in the
Archives (where you'll get attacked by three Ice Guardians). To return, you'll just need to wait or rest at the top of the
Archives spire.
- Two-way windgate. This windgate will only appear when the nearby lever (#32) is pulled.
- Two-way windgate. This windgate will only appear when the nearby lever (#32) is pulled.


