 Did we miss anything in this section? Is there something we didn't discover?
Let us know!
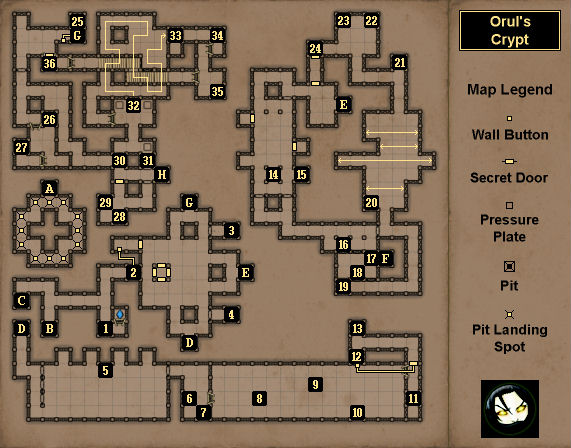
Map Summary
Overview
1 - Shelf
Did we miss anything in this section? Is there something we didn't discover?
Let us know!
Map Summary
Overview
1 - Shelf
In the shelf here you'll find a
Shield Potion.
2 - Orul's Crypt
Orul's crypt is the hub for this level. What you'll need to do is take the three windgates in the crypt to the laboratory (Exit D), the mausoleum (Exit E), and the sanctuary (Exit G), and solve the puzzles there. That should result in you receiving three Skull Keys (#11, #23, #34). When you use the Skull Keys to open the three Skull Locks in the crypt, the gate to a
Power Gem (#3) will open, the gate to a treasure chest (#4) will open, and multiple secret doors will open, releasing a Xeleroid and Orul Wormbound.
Orul is a melee boss, but he'll also cast Ice Shards and summon Ghouls. If you want, you can try dancing around the spells and Ghouls, but we�ve found that it's much easier just to go toe-to-toe with Orul and kill him as quickly as possible. Orul will drop two
Longswords when he dies.
3 - Power Gem
You'll find a
Power Gem here.
4 - Locked Chest
Inside this chest you'll find a
Brace of Fortitude and a
Potion of Willpower.
5 - I Differ Puzzle
At this spot you should notice a sign that reads, "I differ. Who am I?" You should also notice four compartments along the northern edge of the chamber, each one with an object inside of it and a chain beside it. Your goal is to play the Sesame Street game of "One of these things is not like the others." That is, you should pull the chain of the object that is different.
There are six stages to the game:
- Three gold items and a
Branch.
- Three food items and a
Potion of Strength.
- Three hand-held items and a
Full Helmet.
- Three usable items and an
Archmage's Cap.
- Three creatures that inflict debuffs and a Turtle.
- Three walking creatures and a Wyvern.
If you get an answer right, then you'll move on to the next stage. But if you get an answer wrong, then you'll get hit with some minor fire damage, and one or more of the enemies in the room (which you no doubt noticed when you walked in) will get released from their magical cages and attack you. You'll then have to guess again until you get the answer right. At the end of the game, the door to the east will open.
Note: Since you won't earn any xp for getting the answers right, you might want to get some of them wrong on purpose. Most of the enemies are on the wimpy side, and you shouldn't have much trouble battling two or more of them at once. Some of the enemies will also drop food, which never hurts.
6 - Leather Gloves
You'll find
Leather Gloves here.
7 - Lighted Spikes Puzzle
If you read the Letter in the shelf here, then you'll see the following riddle: "What can never be observed, but its presence prevents everything from being seen?" The answer is darkness. If you make the chamber dark by removing the two nearby
Torches, then you'll detect lighted safe squares amid the spike traps to the east. These safe squares will only be safe for one round, so you'll have to stay observant, and you'll have to keep moving in order to make it to the other side.
8 - Cheese
You'll find
Cheese here.
9 - Crossbow Quarrel
You'll find a
Crossbow Quarrel here.
10 - Lightning Bomb
You'll find a
Lightning Bomb here.
11 - Shelf
In this shelf you'll find a Skull Key. You'll need the key in the crypt (#2).
12 - Lock Picks
You'll find a set of
Lock Picks here.
13 - Chest
This chest is one of the secrets in the game. Inside it you'll find a
Fireblade and a
Fire Torc.
14 - Trickster / Pressure Plate
When you get close enough to the Trickster, he'll jump off of the pressure plate that he starts on, and the two doors to the south and three secret doors to the north will all open up, releasing several Skeletons and a Xeleroid to attack you. If you just stand in the main chamber and attack everything, then you'll probably get overwhelmed, so we'd recommend retreating back to the entrance windgate (Exit E) and fighting there. Then when you take too much damage, you can use the windgate to rest, and return to fight again. When the Trickster takes too much damage, he'll simply disappear (again).
15 - Lightning Bombs
You'll find two
Lightning Bombs here.
16 - Moving Barriers Puzzle
In this puzzle, two barriers will keep moving back and forth just beyond the three grates to the south, always leaving one square free. You'll need to do two things:
- First, you'll need to wait until there isn't a barrier blocking the pressure plate on the eastern side of the puzzle (#17), and drop something through the grate there so it lands on top of the pressure plate. If you get the timing right, then the grate on the western side of the puzzle will open, giving you line-of-sight to another pressure plate to the south (#19).
Note: The open grate will also give you access to the low ground to the south, where you'll find three
Crossbow Quarrels (#18). To return to the puzzle, you'll just need to enter the windgate attached to the lower ground (Exit F).
- Second, you'll need to throw something so it lands on the newly-available pressure plate (#19). This means you'll need to time the throw so you avoid the two moving barriers, and you'll also need to stand on the pressure plate on your side of the grates (#16) first, because it will briefly remove the barrier blocking the new pressure plate. If you get the riming right, then the door to the east will open up, allowing you to continue your explorations.
17 - Pressure Plate
18 - Crossbow Quarrels
You'll find three
Crossbow Quarrels here.
19 - Pressure Plate
20 - Dodge-Bolt Puzzle
For this puzzle, if you press the button on the western wall here, then bolts will start shooting back and forth as shown on the map above, and the four barriers blocking the exit and the chest to the north (#20) will disappear. As long as you can avoid the bolts, the barriers will remain down. But if a bolt hits you, then a barrier will return, and you'll have to hit the button again to re-start the puzzle.
It's easy to avoid the first bolt; the challenge is with the three northern bolts. For those bolts we'd recommend staying on the western side of the puzzle, and only heading north when the northern two bolts are synchronized and have just started traveling east.
21 - Locked Chest
Inside this chest you'll find a loaf of
Bread, a
Diviner's Cloak, and a
Horned Fruit.
22 - Shelf
Inside this shelf you'll find
Knuckles of Steel.
23 - Shelf
Inside this shelf you'll find a Skull Key.
24 - Lever
When you pull the lever here, you'll open the secret door just to the south.
25 - Secret Cache
This room is one of the secrets in the game. To open it, you'll first have to push the button to the west of the windgate (Exit G). This will turn off the windgate. Then you'll need to press the button on the eastern wall where the windgate was. This will open the door to the secret room. Inside the room you'll find a
Scythe.
26 - Shelves
In the shelves under the bridge here you'll find a
Greater Energy Potion and a Scroll of Fire Shield.
27 - Rage Potion
You'll find a
Rage Potion here.
28 - Loot
At this spot you'll find a
Horned Fruit and a Note. The Note will give you a hint about the
Great Axe (#31).
29 - Lever
Pulling this lever will open the secret door to the north.
30 - Closed Door
To open this door, you'll need to throw an object into the windgate to the east (Exit H).
31 - Great Axe
You'll find a
Great Axe here.
32 - Void of Light Puzzle
For this puzzle you'll see a bunch of magical bridge barriers in front of you. However, each time you step away from one, it will turn off. Your goal is to follow a route that will take you from the start to the end (#33) and turn off all of the bridge pieces. A solution is shown on the map above. If you make a mistake, then stepping on any of the pressure plates at the start of the puzzle will reset it.
33 - Puzzle Exit
34 - Shelf
You'll find a Skull Key in the shelf here.
35 - Sack
At this spot you'll find a Sack containing three
Blooddrop Caps,
Etherweed, and
Falconskyre.
36 - Lever
Pulling the lever here will open the secret door just to the north.
Exits
- Windgate back up to the
Wormbound Catacombs.
- Stairs up to the
Wormbound Catacombs.
- Windgate to the
Cemetery.
- Windgate between the crypt and the laboratory.
- Windgate between the crypt and the mausoleum.
- One-way windgate. Entering this windgate will transport you from the low ground to the high ground in the Moving Barriers puzzle.
- Windgate between the crypt and the sanctuary.
- One-way windgate. Stepping into this windgate will send you behind the grate to the southwest.


