 Did we miss anything in this location? Is there something we didn't discover?
Let us know!
Note
Did we miss anything in this location? Is there something we didn't discover?
Let us know!
Note
- Beholders just love to cast Disintegrate, so be sure to save and buff up before facing them.
Enemies
Notable Loot
- Crystal Hammer +2 (#13)
- Dragon Skin Armor +4 (#15)
- Halberd +2 (#13)
- Shield +3 (#13)
- Short Sword +2 (#15)
Annotations
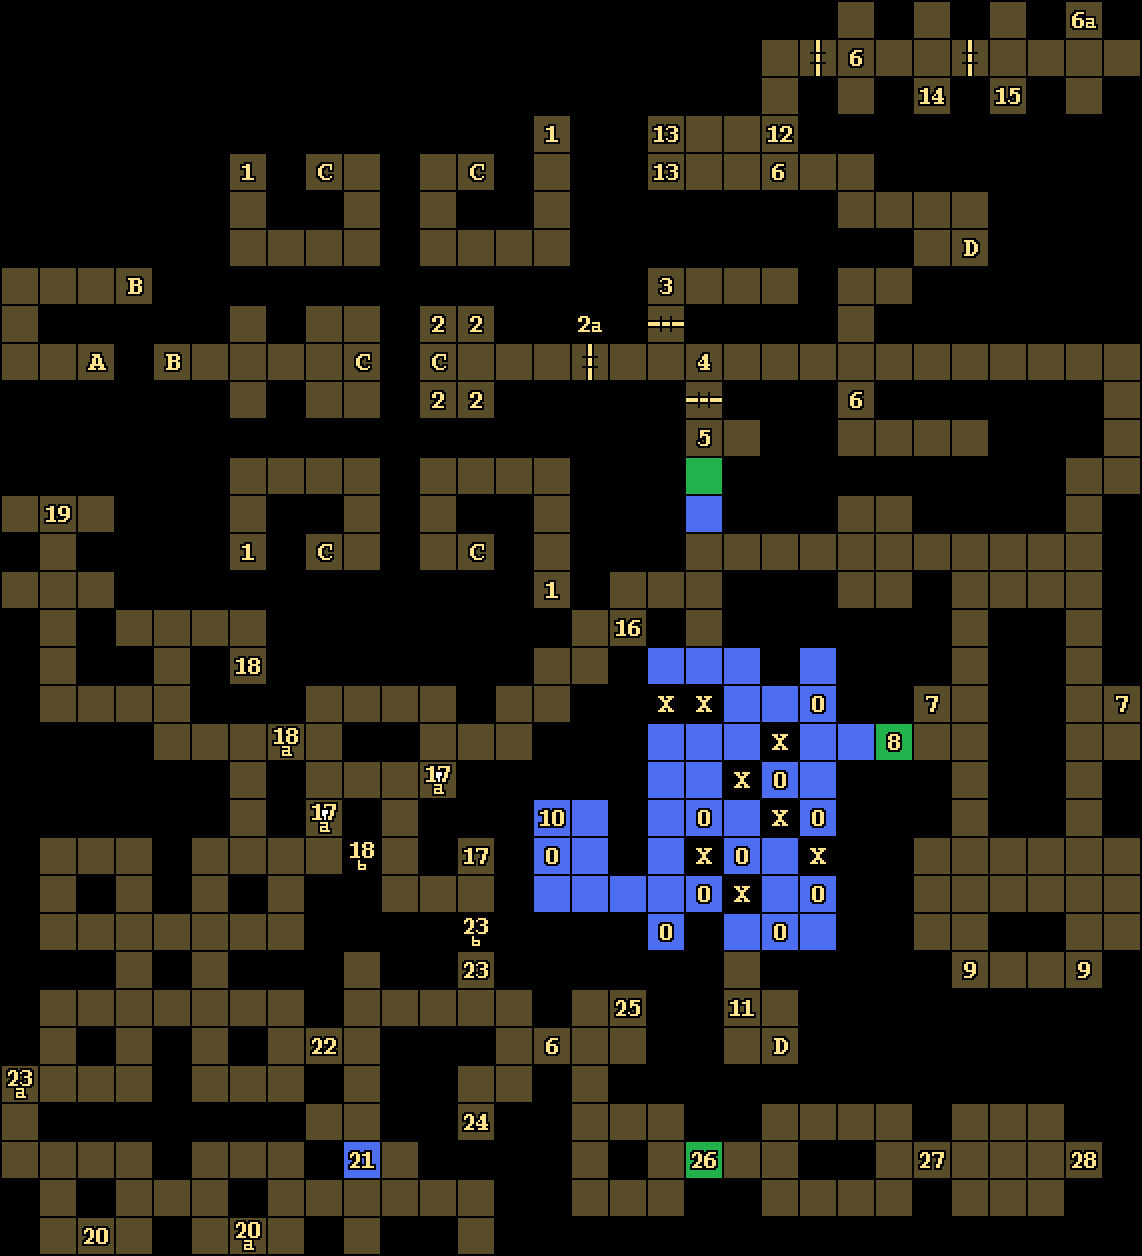
1 - Shelves / Dark Moon Keys
You'll find a Dark Moon Key on each of these four shelves.
2 - Door / Locks
You'll need Dark Moon Keys (#1) to open these four locks (#2). When you open all four, the door to the east (#2a) will open.
3 - Beholder
When you reach this spot, you'll get attacked by a beholder at the end of the hallway to the east. The safest way to handle this encounter is to immediately retreat back to the doorway to the south and make the beholder come to you.
4 - Door
When you reach this spot, the door to the south will open, and a beholder will attack you.
5 - Hidden Button / Potions of Healing
When you push the hidden button in the southern wall here, you'll remove the moveable wall behind it and reveal three Potions of Healing.
6 - Beholders
You'll encounter one or more beholders at each of these locations (#6). Beholders tend to wander around, so be prepared. One of the beholders (#6a) will drop a Wand of Dispel Magic when it dies.
7 - Safe Resting Spots
Plaques here indicate that these spots are safe for resting, but really, the entire level is safe.
8 - Moveable Wall
Pressing the hidden button on the eastern or western side of this wall will cause it to disappear.
9 - Pressure Plates
Stepping onto either of these pressure plates will cause a fireball to shoot out of an adjacent wall and hit you. There isn't any way to avoid this damage. Will o'wisps in the area will try to lure you into this trap, but you can ignore them and the trap if you want.
10 - Button
If you press the button on the western wall here, then the walls to the east marked X will turn into illusionary walls, and the walls marked O will turn into solid walls. However, this won't really change anything. You'll be able to reach everywhere both before and after pressing the button, so there isn't any particular reason to press it. For clarity, the initial configuration is shown on the map above, with the solid walls black and the illusionary walls purple.
11 - Stuck Beholder
When you step here, you'll spot a beholder stuck in the elevator to the southeast (Exit D). If you help the beholder, then it'll decide that you look like a tasty snack, and it'll attack you. If instead you attack the beholder, then it'll flee upwards, and it'll attack you the first time you use the elevator yourself. So either way, you'll have to fight the beholder.
12 - Loot
On the ground here, you'll find Cursed Bracers of Protection -2.
13 - Loot
On the ground here, you'll find a Crystal Hammer +2, two Daggers, a Halberd +2, (worthless) Leather Boots, a Potion of Healing, a Shield +3, and a Staff. You'll need the hammer inside the Silver Tower (Level 2).
14 - Mage Scroll
You'll find a Mage Scroll of Fireball on the ground here.
15 - Loot
On the ground here, you'll find Dragon Skin Armor +4 and a Short Sword +2.
16 - Khelben
At this spot, you'll receive another message from Khelben. He'll encourage you to stay away from Dran Draggore, and he'll warn you that a magical barrier has formed around the temple, interfering with his ability to contact you. Then your link to him will suddenly fail.
17 - Pressure Plate
Stepping onto this pressure plate (#17) will cause two walls to appear nearby (#17a). Since the newly-formed walls will restrict your movements without adding anything, there isn't any reason to step here. For clarity, the map above shows the two walls in their initial state (as non-walls).
18 - Pressure Plate
Stepping onto this pressure plate (#18) will cause one wall to appear (#18a) and one wall to disappear (#18b). This transaction won't gain you anything, so there isn't any reason to step here. For clarity, the map above shows the two walls in their initial state.
19 - Pressure Plate
Stepping onto this pressure plate will cause a will o'wisp to appear nearby.
20 - Invisible Teleporters
Stepping into the invisible teleporter here (#20) will send you to the east (#20a), and vice versa.
21 - Illusionary Wall
Every time you step into this illusionary wall, a will o'wisp will spawn to the south.
22 - Spinner
When you enter this square, you'll get rotated by 180 degrees.
23 - Pressure Plate
Stepping onto this pressure plate (#23) will cause one wall to appear (#23a) and one wall to disappear (#23b). This transaction won't gain you anything, so there isn't any reason to step here. For clarity, the map above shows the two walls in their initial state.
24 - Hidden Button
There's a hidden button on the southern wall here, but it doesn't do anything.
25 - Loot
On the ground here, you'll find Chainmail, Rations, and a Ring of Sustenance. The ring should prevent a character from becoming hungry, but it doesn't work.
26 - Moveable Wall
To remove this wall, you'll need to press the hidden button on its western side.
27 - Spirit
At this spot, you'll meet the female spirit from Level 2 -- only this time her reaction to you will be much different. She'll call you intruders, she'll sic two beholders on you, and she'll close the moveable wall to the west (#26), blocking your escape. The ensuing battle against the beholders can be rough, so be sure to save and buff up first.
We had the best luck attacking a beholder and then retreating around a corner to avoid its spells. If you can do this and kill one of the beholders quickly, then you should be able to run to the room where the beholders started, and attack and maneuver around the remaining beholder without getting hit in return. But dealing with the first beholder might take a few tries, so if you keep dying, just keep trying.
28 - Pedestal
When you click on this pedestal, you'll discover that it has the imprint of a hand on it. If you place your hand onto it, then you'll receive the Mark of Darkmoon, and you'll fall unconscious. A short time later, you'll wake up in
Darkmoon Temple (Level 1), at the spot where you might have met Ira. The Mark of Darkmoon will allow you to pass through the doorway guarded by the magic mouth in
Darkmoon Temple (Level 2).
Exits
- Stairs down to the
Silver Tower (Level 2).
- Stairs.
- Random teleporters. Each of these six teleporters will take you to one of the six teleporters, but it's random which one you'll go to.
- Elevator. To use this elevator, just press the "whirlwind" button on the southern wall.