 Did we miss anything in this location? Is there something we didn't discover?
Let us know!
Notes
Did we miss anything in this location? Is there something we didn't discover?
Let us know!
Notes
- Bulettes are simple melee creatures, but they can hit really hard -- over 60 damage sometimes! So avoid going toe-to-toe with them.
- Lesser basilisks are capable of petrifying you. This effect can only be cured by a Stone to Flesh spell, which mages don't get until level 12. So always be sure to save before facing basilisks.
Enemies
- Bulettes
- Greater Guardian Demon
- Lesser Basilisks
Notable Loot
- Eye of Talon (#26)
- Medusa Shields (#15, #24)
Annotations
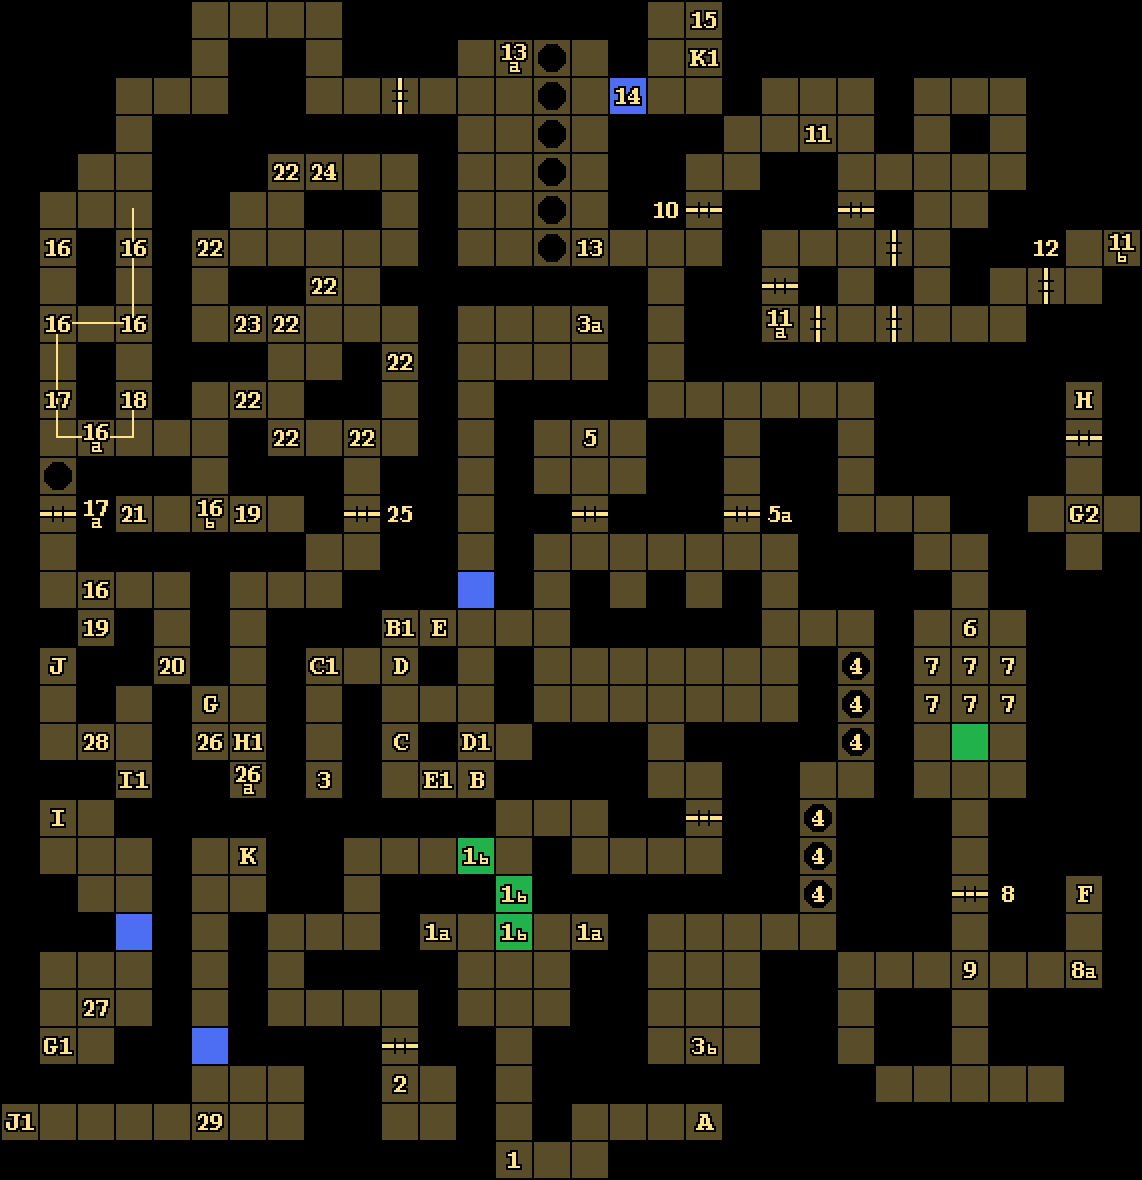
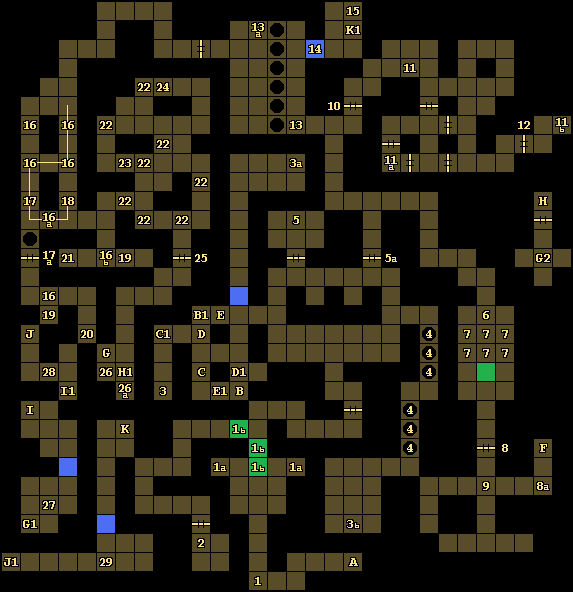
1 - Disperse Magic Puzzle
If you read the plaque here (#1), then it'll advise you to "disperse the magic." This will make more sense when you head north, where you'll find two stone carvings (#1a). When you visit the western one, a cleric or mage in your party will note that it's "a source of powerful magic." If you have a cleric or mage cast Dispel Magic on the carvings three times, then the three moveable walls to the north (#1c) will disappear.
Note: The pressure plates in front of the stone carvings don't do anything.
2 - Alain
When you enter this room, you'll meet an elf named Alain. He'll tell you that he came to this level to drain the magic from the bulettes, but that the dais he built for the task has drained him as well. He'll then ask you to free him from the dais. If you agree to do this, then the character who assists Alain will earn enough xp to gain a level, and Alain will fade away. If you decline, then Alain will disappear and you won't see him again.
Note: There isn't any rush to help Alain, so check your party before visiting him, and make sure that the character you want to advance isn't close to leveling anyway.
3 - Gems
At these three places, you'll find a Body Gem (#3a), a Heart Gem (#3), and a Soul Gem (#3b).
4 - Pits
You'll encounter one open pit over these six squares, but every few seconds it will move one square to the south, skipping the two squares in the middle of the hallway, before eventually returning to the northernmost square and starting over. When traveling from north to south along the hallway, you can just follow along behind the open pit. When traveling from south to north, you'll need to wait for the open pit to move to the northern part of the hallway, quickly run to the safe middle part of the hallway, and then continue on when the open pit passes you on its way south.
Note: If you fall into the pit, then you'll land in the main part of
Level 1.
5 - Gem Display
If you place the Body Gem (#3a), Heart Gem (#3), and Soul Gem (#3b) into the ornamental display here, then the door to the east (#5a) will open.
6 - Sentry Bulette / Crystal Key
You'll encounter a single bulette here. It won't attack you unless you attack it. So buff up first, and then retreat as necessary during the fight to prevent the bulette from hitting you. The bulette will drop a Crystal Key when it dies.
7 - Pressure Plate Puzzle
When you step onto any of these six pressure plates, the moveable wall to the south will slide one square to the left or right towards your "column" to block you from reaching the southern end of the room. To beat the puzzle, you'll need to stand on the western (or eastern) side of the northern row of pressure plates, and throw an object to the opposite side. The object will hit the wall and land on a pressure plate, and the wall will move in that direction. If you immediately move south after throwing the object, then you'll be able to move south again with the moveable wall one square out of position. You can also throw two objects at the opposite pressure plate to move the moveable wall two squares out of position, and then take your time moving south.
8 - Locked Door
To open this door (#8) from the north, you'll need to place the Eye of Talon (#29) into the nearby depression in the wall, and then take the eye back out. To open the door from the south, you'll just need to press a button (#8a).
9 - Pressure Plate
When you step onto the pressure plate here, the door behind you (#8) will close, and you'll get attacked by three bulettes, one from each side. So immediately back up a space so you only have to face the bulettes one at a time.
10 - Locked Door
You'll need a Crystal Key (#6) to open this door.
11 - Lever Puzzle / Amulet of Life
In this room (#11), you'll find three levers on the northern wall and a button on the southern wall. Moving the levers and then pressing the button will change the walls and doors in the area to the south of the button. There are only eight possible ways to position the levers. Most of these settings won't do anything useful, but when you try (from left to right) down, down, up, you'll create a path to the treasure at the end (#11a): an Amulet of Life, which will allow you to resurrect a character.
But note: each time you try a different setting for the levers and then press the button, you'll release a basilisk to the east (#11b). If basilisks are easy for you, then you can use this mechanic to grind some xp.
12 - Door
This door will start out closed, and the button on the western side will only close it. To open the door, you'll have to summon a basilisk during the Lever Puzzle (#11). When the basilisk steps onto the pressure plate to the east of the door, the door will open.
13 - Row of Pits Puzzle
When you enter this room, you'll discover that there is a row of pits blocking you from reaching the western side. The easiest way to cross the pits is to press the button here (#13). This will cause (after a delay) the southernmost pit to close for a brief amount of time, which will give you a temporary path across. But note: pressing the button will also cause a basilisk to appear in the western side of the room. To cross back to the eastern side, you'll just need to drop an object onto a nearby pressure plate (#13a). This will close the southernmost pit as long as the object stays there.
Alternatively, you can press the button (#13) to summon the basilisk and then head to the northern side of the room. The basilisk will try to get as close to you as possible, which means it will (briefly) step onto the pressure plate (#13a). When that happens, if you throw something at it or shoot it with something, and if you connect, then the object will fall onto the pressure plate, keeping the southernmost pit closed.
Note: If you fall into a pit, then you'll land in an isolated part of
Level 1 with nothing interesting in it. So there isn't any reason to jump down unless you just really want to explore everywhere.
14 - Illusionary Wall
You'll only be allowed to pass through this wall after you've completed the magic mouth challenge (#26).
15 - Medusa Shield
You'll find a Medusa Shield on the ground here. If you dropped your spell books and holy symbols into the alcove (#26a) before starting the magic mouth's challenge (#26), then you'll find them on the ground nearby. You'll need Medusa Shields on
Level 4.
16 - Western Fireball Traps
In this part of the level, you'll encounter several fireball traps linked to pressure plates (#16). Each time you step onto one of the pressure plates, a single fireball will shoot at your location. These fireballs can be dodged, and a safe path through the traps is shown on the map above. You'll need to make your way through these traps to reach a pair of keys (#20, #21).
Note: One of the pressure plates (#16a) will also cause the pit to the southwest to open while it's weighted down (which will only make a difference after you've closed the pit at #18). Another pressure plate (#16b) appears to be broken.
17 - Levers
You'll find three levers on the wall here (#17). If you pull down the two northernmost levers and leave the southernmost lever up, then you'll open the door to the south (#17a).
18 - Pressure Plate
This pressure plate isn't linked to a fireball trap. Instead, it'll close the pit to the southwest. If you manage to fall into the pit anyway, then you'll land in an isolated part of
Level 1 without anything interesting in it.
19 - Bulettes
You'll encounter a bulette at each of these two locations. They're guarding keys (#20, #21), and they've been positioned so that they'll probably trigger a fireball trap (#16) when they spot you -- where the fireball will hit you rather than them. If you're quick, you might be able to trigger the trap yourself (so the linked fireball doesn't hit anybody), but otherwise you'll have to deal with a fireball and a bulette at the same time, which can cause a lot of damage quickly. So rest up and buff up (and save) before dealing with the bulettes.
20 - Mage Scroll / Shell Key
On the ground here, you'll find a Mage Scroll of Improved Invisibility and a Shell Key.
21 - Crimson Key
You'll find a Crimson Key on the ground here. You'll need it in
Darkmoon Temple (Level 2).
22 - Eastern Fireball Traps
These fireball traps (#22) are different than the ones to the west (#16). They're still linked to pressure plates, but each time you step onto one of them, up to three fireballs will fire, and most of them won't target your location, making them "collateral damage" traps. This is dangerous because a few bulettes will be wandering around the traps, and they'll randomly cause fireballs to hit you. So try to kill the bulettes before doing anything else. With them out of the way, you're the only one who will trigger the traps, and even if you get hit by one, you'll be able to rest safely without fear of getting attacked by a bulette or hit by a fireball.
Note: Only one square (#23) amongst the fireball traps is actually safe, so head there if you get into trouble.
23 - Safe Spot
This spot isn't targeted by any of the eastern fireball traps (#22).
24 - Medusa Shield
You'll find a Medusa Shield on the ground here. You'll need it on
Level 4.
25 - Locked Door
You'll need a Shell Key (#20) to open this door.
26 - Magic Mouth Challenge / Eye of Talon / Medusa Shield
The magic mouth on the wall here (#26) will propose a challenge for you. If you leave all of your holy symbols and spell books in the alcove to the south (#26a), and survive going through the teleporter next to it (Exit G), then it will give you its "greatest item."
Before trying the challenge, be sure to rest and buff up as much as possible. Then drop off your spellcasting items and head through the teleporter. If you go through while carrying a holy symbol or a spell book, then you'll get sent to a bulette ambush (Exit G2). Your best bet for this is to move north right away so you'll only have to fight the bulettes one at a time. You won't be allowed to leave the ambush until you've killed the bulettes. You can repeat this ambush as many times as you'd like, if you feel so inclined.
Inside the challenge area, you'll have to do three things:
- Fight four bulettes at once (#27). This is the most difficult part of the challenge. You won't be able to maneuver much, and the bulettes will be able to attack you from at least two sides. Fighting the battle as intended is extremely difficult -- especially if you created your party for the game. But there's a trick. If you open a mage's spell book before dropping the book, then the mage will still have access to all of their spells. So you can have a mage cast spells in the battle even if you leave their spell book behind. You can also use wands in the battle.
Note: After the battle, you can rest to regain your health. Without spells, it might take you a long, long time to heal, but it'll happen eventually. As a bonus, the only downside to starving is for spellcasters, which isn't an issue here.
- Break through the wall of souls (#28). To break the wall, you'll have to attack it six times. The problem is, each time you damage the wall your entire party will take 8 points of damage, for 48 points total. So hit the wall and rest as necessary until you're through.
- Kill a greater guardian demon (#29). The demon isn't very powerful, so if you face it at full health then it shouldn't pose much of a challenge. You'll find an Eye of Talon on the ground where it started. You'll need the Eye to open a door on this level (#8) and also to open a door in
Darkmoon Temple (Level 2).
After defeating the demon, you'll end up in a treasure room (#15) where you'll find a Medusa Shield plus your spell books and holy symbols (assuming you dropped them into the alcove, #26a, as directed).
27 - Bulette Battle
This is a part of the magic mouth challenge (#26).
28 - Wall of Souls
This is a part of the magic mouth challenge (#26).
29 - Greater Guardian Demon / Eye of Talon
This is a part of the magic mouth challenge (#26).
Exits
- Stairs down to the
Azure Tower (Level 1).
- One-way teleporter to B1.
- One-way teleporter to C1.
- One-wat teleporter to D1.
- One-way teleporter to E1.
- Stairs up to the
Azure Tower (Level 3).
- One-way teleporter to G1 (if you don't have any holy symbols or spell books) or G2 (otherwise).
- One-way teleporter to H1.
- One-wat teleporter to I1.
- One-way teleporter to J1.
- One-way teleporter to K1.