Did we miss anything in this location? Is there something we didn't discover?
Let us know!
Enemies
Notable Loot
Did we miss anything in this location? Is there something we didn't discover?
Let us know!
Enemies
Notable Loot
- Jhonas' Cloak +2 (#17)
- Medusa Shields (#6, #17)
- Ring of Feather Fall (#24)
- Starfire (#15)
Annotations
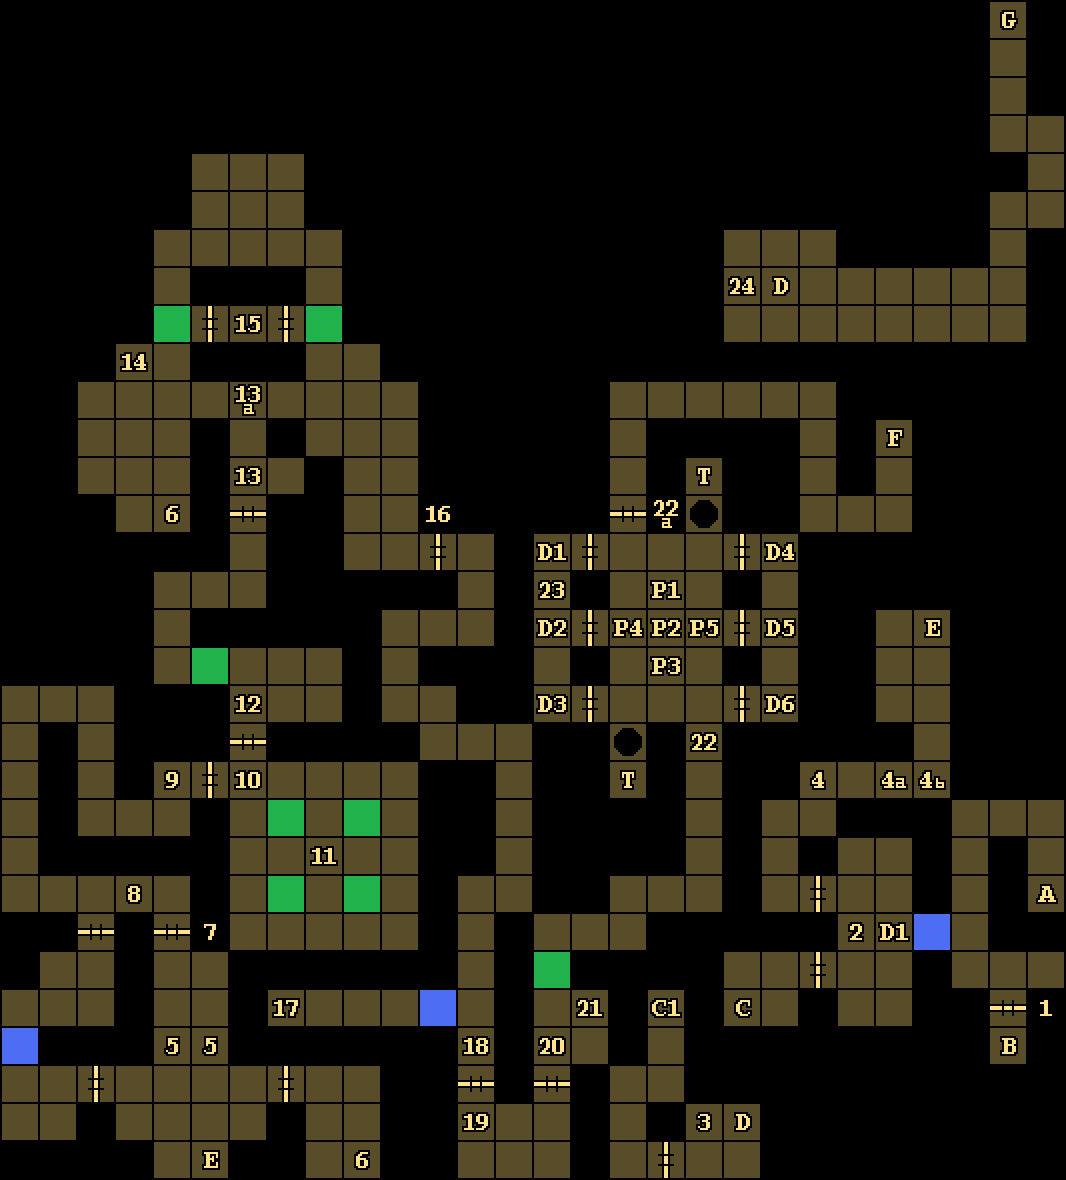
1 - Force Field
You'll need a Crystal Key (#24) and a Shell Key (#3) to remove this force field.
2 - Button / Pressure Plates
When you first enter this room, pressing the button here will open the door to the south. But after going through the southern room (and Exits C and D), pressing the button will open the door to the north. The three pressure plates in the room don't do anything.
3 - Shell Key
You'll find a Shell Key on the ground here.
4 - Hallway Pits
The three pits here (#4, #4a, #4b) will open and close over time, making it tricky to move through this hallway. Luckily, the pits repeat the following pattern:
- #4 and #4a are open, #4b is closed.
- #4a and #4b are open, #4 is closed.
- All three pits are closed.
If you're quick, then you can run through the hallway when all of the pits are closed. Otherwise, to cross the hallway from west to east, wait for #4 to close, then cross over it to the safe spot in between the pits, and then exit the hallway to the east when #4a and #4b are closed. And to cross from east to west, just do the opposite. If you fall into a pit, then you'll end up in
Level 2, near the stairs leading back to this level.
5 - Guardian Demons / Crystal Key
You'll encounter two guardian demons here. They'll be blocking the way north, and they'll tell you to leave. This will give you the choice of attacking them or not... but eventually you'll have to attack them. When you do, the doors to the east and west will open, and two more demons will join in the fray. For best results, you should retreat to the square just to the west of the teleporter (Exit E) so the demons can only attack you from the north. If the battle goes poorly, you can also use the teleporter to flee and then return later. One of the demons will drop a Crystal Key when it dies.
6 - Medusa Shields
You'll find a Medusa Shield at these two spots. You'll need six Medusa Shields on
Level 4.
7 - Locked Door
You'll need a Crystal Key (#5, #24) to open this door -- or you can use the illusionary wall to the west to go around it.
8 - Magic Mouth
When the magic mouth here spots you, it will call for the guards, and the three greater guardian demons in the room to the southwest will attack you -- unless you've already killed them.
9 - Sigil
Each time you step onto the sigil here, you'll get hit with 5d6 lightning damage. Stepping onto the sigil will also cause the door to the east to open (which will allow two greater guardian demons to attack you).
10 - Pressure Plate
Stepping onto this pressure plate will close the door to the west. Stepping off the pressure plate will open the door to the north (which will allow three greater guardian demons to attack you).
11 - Fireball Trap
To reach the pressure plate here, you'll need to dodge a pair of circling fireballs. Then on the pressure plate, you'll find (worthless) Brahma's Boots +1 and a Mage Scroll of Ice Storm. But be careful. If you take the two items and move away from the pressure plate -- that is, if you leave the pressure plate so it's not weighted down -- then four moveable walls will spring up around it, and four fireballs will shoot at you. To minimize this damage, you should charge forward twice and then strafe right or left. You'll get hit by one of the fireballs, but you'll avoid the other three.
You can also avoid the trap entirely since the boots don't do anything. If you just leave them on the pressure plate, then the trap will never spring. Or you can take the items but leave a Rock (or some other item) in their place, and that will keep you safe as well.
12 - Hidden Button
Pressing the hidden button on the western wall here will cause the moveable wall to the north to disappear.
13 - Pressure Plate
Stepping onto the pressure plate here (#13) will cause a fireball to shoot at you from the south. You'll encounter over a dozen greater guardian demons north of the pressure plate, so try to use the pressure plate to your advantage. For example, you can wait in the alcove to the east of the pressure plate, and then each time a demon attacks you, it'll step onto the pressure plate and get hit by a fireball. For that case, don't use ranged weapons against the demons. If an item lands on the pressure plate, then it'll stay weighted down and the trap won't trigger.
Note: It looks like the pressure plate to the north (#13a) was originally intended to trigger a fireball as well, but it doesn't actually do anything.
14 - Lever
When you pull this lever, you'll remove two nearby moveable walls (which will allow nine more guardian demons to attack you).
15 - Mage Scroll / Starfire
To reach this location, you'll need to attack the force fields on either side. Then on the ground here, you'll find a Mage Scroll of Stone to Flesh and a scepter called Starfire. Starfire gives protection against fire, which you might find useful at the end of the game.
16 - Locked Door
To open this door, you'll need to place Starfire (#15) into the socket next to it, and then take Starfire back out.
17 - Loot / Medusa Shield
On the ground here, you'll find a Jhonas' Cloak +2, a Medusa Shield, and a Parchment. The parchment shows a bit of
Level 4, just rotated 90 degrees so the right side of the map is actually north. You'll need Medusa Shields on
Level 4.
18 - Message
At this spot, you'll receive a message from Khelben. He'll tell you that Dran is preparing a spell to destroy you -- and that there's only on way to foil it. You'll have to wear a "magical artifact" and allow yourselves to be killed by the guardian demons in the next room. The artifact will then resurrect you, and by dying and coming back to life, you'll break your link to the spell.
You might find this encounter to be a little bit fishy, especially since the artifact is nothing more than a cursed Bauble. But if you go along with the plan, and if you let the demons kill you, then you'll learn that it was all just a trick from Dran. He'll then laugh at you for your stupidity, and you'll have to load your game. So don't follow the plan. Just leave the Bauble on the ground and kill the demons in the next room.
19 - Pressure Plate / Button
When you step onto the pressure plate here, the door to the north will close, and you won't have any way to open it again from this side. When you press the button here, the door to the east will open (which will allow three guardian demons to attack you).
20 - Guardian Demons / Tooth
You'll encounter three greater guardian demons in this room. One of them will drop a Tooth when it dies. You'll also find a Sling +1 on the floor to the east.
21 - Skull
If you use the Tooth (#20) on the skull hanging on the wall here, then the nearby moveable wall will disappear, and Dran will rail at you for seeing through his deception (#18).
22 - Pressure Plate Puzzle
Your goal in this puzzle is to open the door to the north (#22a). To do this, you'll need to throw items into the two teleporters (T) so that they land on the six destination pressure plates (D1-D6). The trick is that the pressure plates in the middle of the room (P1-P5) control where the items will land. The middle three pressure plates (P1-P3) decide the north-south part of the destination, while the outer pressure plates (P4, P5) decide the east-west part. So to hit a destination pressure plate, you'll have to step onto a middle pressure plate, then step onto an outer pressure plate, and then throw an item into a teleporter.
For example, to hit D1, you have to step onto P1 and then P4, and then throw an item into the teleporter to the south. To hit D2, you have to step onto P2 and then P4, and then throw another item into the teleporter to the south. And so on. When you land an item on all six destination pressure plates, the exit door (#22a) will open, and two of the force fields along the sides will also open, allowing you to take back the items that you threw.
23 - Mage Scroll
You'll find a Mage Scroll of Wall of Force on the ground here. You'll have to complete the Pressure Plate Puzzle (#22) to reach this location.
24 - Shelf / Crystal Key
Inside the shelf here, you'll find a Crystal Key and a Ring of Feather Fall.
Exits
- Stairs down to the
Azure Tower (Level 2).
- Stairs up to the
Azure Tower (Level 4).
- One-way teleporter to C1.
- One-way teleporters to D1.
- Teleporter.
- Stairs to the
Azure Tower (Level 3B).
- Stairs to the
Azure Tower (Level 3B).