Did we miss anything in this location? Is there something we didn't discover?
Let us know!
Enemies
Notable Loot
Annotations
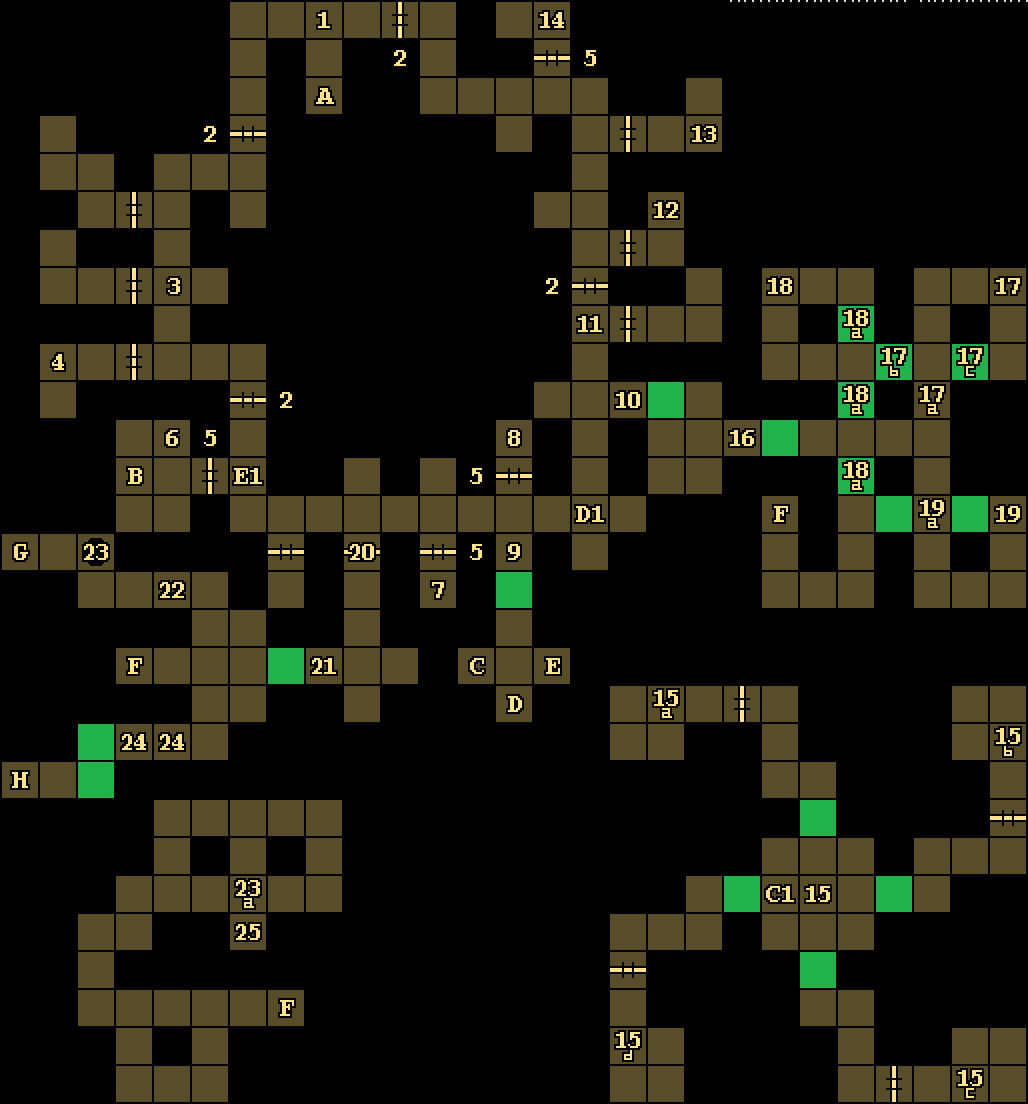
1 - Cleric Guard
Did we miss anything in this location? Is there something we didn't discover?
Let us know!
Enemies
Notable Loot
Annotations
1 - Cleric Guard
The first time you step here, a cleric will stop you. If you talk to him, then he'll tell you that this level of the temple is off limits, and he'll send you back downstairs (via Exit A). If you attack the cleric, or if you return to this spot later after talking to him, then you'll have to fight him. That is, you'll have to fight the cleric eventually.
2 - Locked Doors
You'll need Copper Keys (#6, #11, #12, #15) to open these four doors.
3 - Conversation
When you arrive here, you'll overhear two clerics talking in the room to the west. If you eavesdrop on them, then you'll learn a few things about the old woman from the
Forest, and about somebody named Dran. You'll meet Dran later. Regardless of what you choose to do, the two clerics will detect your presence, and they'll open the door and attack you.
4 - Cleric Scrolls
On the shelf here, you'll find two Cleric Scrolls of Create Food.
5 - Locked Doors
These three doors have copper keyholes, but Copper Keys won't work with them. Instead, you'll have to pick the locks to open them. For the westernmost of the three doors, if you enter the room behind it via the stone door (Exit B), then you'll be able to open the door by pressing a button.
6 - Shelf / Copper Key
On the shelf here, you'll find a Copper Key and a Mage Scroll of Improved Identify.
7 - Cell
On the ground here, you'll find a Complete Set of Elf Bones -- the remains of the thief/mage
Amber (Khelben's scout, whom he sent in before you) -- plus Magic Dust and a Parchment. Magic Dust can cure paralysis. The Parchment is a report from
Amber to Khelben, letting him know that the clerics in the temple are creating "an army of undead warriors."
8 - Statue / Hidden Button
If you destroy the statue here (by attacking it), then you'll discover a hidden button behind it. Pressing the button will remove the moveable wall to the south.
9 - Shelf
On the shelf here, you'll find two pouches of Magic Dust, which can be used to remove paralysis.
10 - Magic Mouth
When you step here, a magic mouth will appear. If you have the Mark of Darkmoon (gained at the end of the
Silver Tower) then it'll remove the wall to the east and allow you to pass. Otherwise, it won’t.
11 - Ambush / Copper Key
When you step here, the two clerics in the room to the east will exit the room and attack you. One of the clerics will drop a Copper Key when he dies.
12 - Bed / Copper Key
If you click on the bed here, then you'll find a Copper Key.
13 - Shelf
On the shelf here, you'll find Lock Picks and a Spellbook.
14 - Shelf
On the shelf here, you'll find a Mage Scroll of Invisibility.
15 - Tropelet Puzzle / Copper Key
In this chamber, you'll find four shelves along the walls. If you loot them all, then you'll find a Red Gem, a Green Gem, a Blue Gem, and a Copper Key. The gems are necessary for the puzzle. If you place all three of them into one of the shelves, then the wall with the shelf -- and the gems -- will disappear, and you'll gain access to a room beyond. You'll only be able to visit one of the rooms, so choose wisely. The rooms are listed below:
- Northern room (#15a). Inside this room, you'll get hit by a Dart trap, and you'll get ambushed by three clerics, but you'll find a Tropelet Seed on the ground.
- Eastern room (#15b). Inside this room, you'll find a Cleric Scroll of Raise Dead, a Parchment, Plate Mail +3, a (worthless) Ring of Adornment, a Tropelet Seed, and a Two-Handed Sword +2. But when you enter the room, the moveable wall behind you will re-appear, locking you inside forever (or until you load your game, whichever comes first). So don't choose this room. On the Parchment you'll discover the last words of Lord James of Natingdale, who also got locked in the room.
- Southern room (#15c). Inside this room, you'll find a Mage Scroll of Lightning Bolt, two Potions of Extra Healing, a Potion of Healing, a Potion of Vitality, a Tropelet Seed, and a Wand of Magic Missile.
- Western room (#15d). Inside this room, you'll find eight Iron Rations, a Tropelet Seed, and a Two-Handed Sword.
Regardless of which room you choose, you'll end up with a Tropelet Seed. If you drop this seed into the soft patch of dirt in the center of the starting chamber (#15), and if you're not standing in that square at the same time, then a teleporter will pop up, and walking into it will take you back to where you were in the main part of the level (Exit C).
16 - Crystal Shield
You'll find a crystal shield hanging on the eastern wall here. If you attack it with the Crystal Hammer +2 (from the
Silver Tower, Level 3), then you'll destroy it and the wall behind it.
17 - Pressure Plate
When you step here (#17), you'll cause one wall to appear (#17a) and two walls to disappear (#17b, #17c). This will allow you to reach the next pressure plate (#18). For clarity, the walls are shown in their initial state in the map above.
18 - Pressure Plate
When you step here (#18), you'll cause one wall to appear (#17b) and three walls to disappear (#18a). This will allow you to reach the exit (Exit F). For clarity, the walls are shown in their initial state in the map above.
19 - Shelf
If you place any object into the shelf here (#19), then the moveable wall to the west will disappear, and a hidden button will appear on the western wall of the square beyond it (#19a). If you press this button, then the moveable wall behind it will disappear as well, creating an easy path to the exit staircase (Exit F).
20 - Locked Door
You'll need a Crimson Key (from the
Azure Tower, Level 2) to open this door.
21 - Wall Carving
You'll see a carving in the shape of a sword on the wall here. If you place the Eye of Talon (from the
Azure Tower, Level 2), the Hilt of Talon (from the
Azure Tower, Level 4), and Talon's Tongue (from the
Frost Giant Prison) into the carving, then you'll create the long sword Talon +4, and the wall behind the carving will disappear.
22 - Pressure Plate
Every other time you step onto the pressure plate here (starting with the first time), a fireball will shoot at you from the west. So if you step onto the pressure plate and dodge the fireball, then the next time you'll be able to cross over it without any worries.
23 - Pit
Every couple of seconds, this pit (#23) will toggle between being open or closed. So wait for it to close, and then cross over it. If you fall into the pit, then you'll land in a sublevel (#23a) and get ambushed by some clerics.
24 - Pressure Plates
These two pressure plates will remove the moveable walls to the west, but you'll have to keep them weighted down to keep the walls away. So drop a pair of unwanted items onto them, and then head west, where you'll encounter four clerics guarding the exit staircase (Exit H).
25 - Mage Scroll
You'll find a Mage Scroll of True Seeing on the ground here.
Exits
- Stairs down to
Darkmoon Temple (Level 1).
- Stone door. If you use the Stone Gem (from the
Catacombs, Level 3) with this door, then it will take you to the
Catacombs (Level 3). If you use the Stone Dagger (from the
Azure Tower, Level 4) with the door, then it will take you to the
Frost Giant Prison.
- One-time, one-way teleporter to C1.
- One-way teleporter to D1.
- One-way teleporter to E1.
- Stairs.
- Stairs up to the
Crimson Tower (Level 1).
- Stairs up to the
Crimson Tower (Level 1).