 Did we miss anything in this location? Is there something we didn't discover?
Let us know!
Note
Did we miss anything in this location? Is there something we didn't discover?
Let us know!
Note
- Once you get far enough into this level (past the door at #2a), you'll start encountering medusae. Medusae can petrify you with their gaze and poison you with their bite, so have remedy spells memorized. Wearing a Medusa Shield will give you some protection against petrification, but it won't give you immunity. So don't force a character to wear a shield if it gimps what they can do.
Enemies
Notable Loot
- Hilt of Talon (#21)
- Stone Dagger (#17)
Annotations
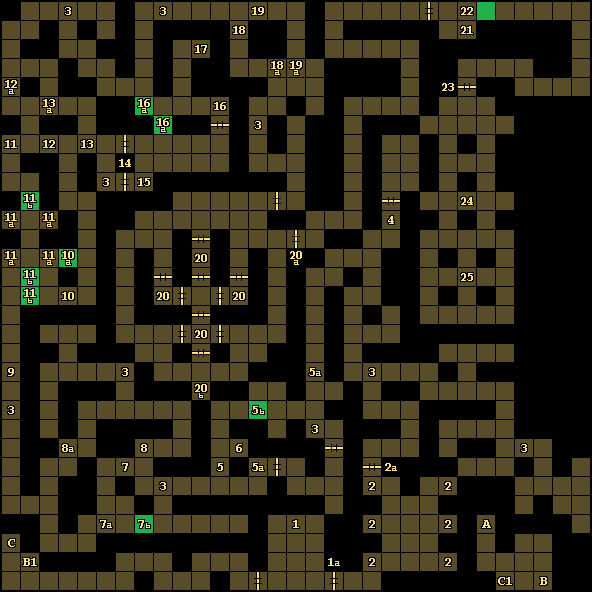
1 - Guardian Statue
When you walk up to the statue here (#1), it will announce that it's the guardian of the Medusae's Labyrinth, and it will encourage you to find and equip the six Medusa Shields from the lower levels of the tower. But regardless of whether you have the shields or not, it'll open the door to the east (#1a).
2 - Shield Mounts
At each of these six locations (#2), you'll find a mount on the wall for hanging a Medusa Shield. When you hang a shield on all six mounts, the door on the northern side of the room (#2a) will open. You'll find one shield on
Level 1, two shields on
Level 2, and three shields on
Level 3. After opening the door, you can take the shields back and equip them as protection against the medusae in the rest of the level.
3 - Medusa Ambushes
The first time you visit these locations, two or more medusae will spawn nearby and attack you. In general, the deeper you get into the labyrinth, the more medusae will spawn. Luckily, medusae don't have a lot of hit points, so you should be able to kill them quickly.
4 - Medusa Door Ambush
When you step here, the door to the north will open, and three medusae will attack you.
5 - Pressure Plate
Each time you step onto the pressure plate here (#5), you'll toggle three moveable walls, creating two (#5a) and removing one (#5b), or vice versa. So just step onto the pressure plate twice to keep the walls in their initial position, which is what is shown on the map above.
6 - Tooth
You'll find a Tooth on the ground here.
7 - Pressure Plate
Stepping onto this pressure plate (#7) will create one wall (#7a) and remove another (#7b). For clarity, only the initial state of the walls is shown on the map above. The pressure plate won't function if you've already stepped onto its partner pressure plate (#8).
8 - Pressure Plate
Stepping onto this pressure plate (#8) will create a wall to the west (#8a). For clarity, the map above is shown without the wall in place. The pressure plate won't function if you've already stepped onto its partner pressure plate (#7).
9 - Spinner
When you step here, you'll be rotated by 180 degrees.
10 - Pressure Plate
Stepping onto the pressure plate here (#10) will toggle the moveable wall to the north (#10a).
11 - Pressure Plate
Stepping onto the pressure plate here (#11) will add four walls (#11a) and remove three others (#11b). For clarity, only the initial state of the walls is shown on the map above.
12 - Pressure Plate
Stepping onto the pressure plate here (#12) will create a wall to the north (#12a). For clarity, the map above is shown without the wall in place. The pressure plate won't function if you've already stepped onto its partner pressure plate (#13).
13 - Pressure Plate
Stepping onto the pressure plate here (#13) will create a wall to the north (#13a). For clarity, the map above is shown without the wall in place. The pressure plate won't function if you've already stepped onto its partner pressure plate (#12).
14 - Major Medusa Ambush
Stepping through the southern door here will cause two things to happen: the northern door will open up, and no less than ten medusae will spawn nearby and attack you.
15 - Pressure Plate
Stepping onto the pressure plate here will create a wall to the northwest (#13). For clarity, the map above is shown without the wall in place.
16 - Pressure Plate
Stepping onto the pressure plate here (#16) will remove the two moveable walls to the west (#16a).
17 - Loot / Stone Dagger
On the ground here, you'll find a Mage Scroll of Invisibility 10' Radius and a Stone Dagger. The Stone Dagger will allow you to use the stone doors in the
Catacombs (Level 3),
Darkmoon Temple (Level 2), and the
Frost Giant Prison.
18 - Pressure Plate
Stepping onto the pressure plate here (#18) will create a wall to the south (#18a). For clarity, the map above is shown without the wall in place. The pressure plate won't function if you've already stepped onto its partner pressure plate (#19).
19 - Pressure Plate
Stepping onto the pressure plate here (#19) will create a wall to the south (#19a). For clarity, the map above is shown without the wall in place. The pressure plate won't function if you've already stepped onto its partner pressure plate (#18).
20 - Pressure Plate Puzzle
What you'll need to do for this puzzle is lure medusae onto the four pressure plates in the middle of the room (#20), and then close the doors around them to lock them in place. When all four pressure plates are weighted down, the exit door to the east (#20a) will open up. Medusae move too quickly for you to just run around and close the doors on them. Instead, you'll have to draw them to a pressure plate and cast Hold Person or Hold Monster on them. Then while they're held, you'll need to close the doors around them. You should save the southernmost pressure plate for last since you'll need to cross it when dealing with the three northern pressure plates.
Note: Medusae will keep spawning in the puzzle room, so don't worry if you kill some. In fact, you can just hang out in the puzzle room and kill them for extra xp if you want.
Another Note: You'll see a clue for the puzzle on the plaque at the southern end of the puzzle room (#20b).
21 - Loot / Hilt of Talon
Scattered around this room, you'll find several Femurs and Skulls, plus the Hilt of Talon and a Mage Scroll of Flesh to Stone. You'll need the Hilt of Talon in
Darkmoon Temple (Level 2).
22 - Hidden Button
Pressing the hidden button on the northern wall here will remove the moveable wall to the east.
23 - Locked Door
You'll need a Tooth (#6) to open this door.
24 - Mage Scroll
If you click on the banner on the northern wall here, then a Mage Scroll of Cone of Cold will fall to the floor.
25 - Pressure Plate
When you step here, four force fields will spring up around you, and Dran will chastise you for being "barbaric." Then he'll open up a trap door beneath your feet, and you'll fall down into the
Frost Giant Prison. If at some point later you return to this spot -- perhaps because you need to return to the prison -- you can destroy the force fields by attacking them.
Exits
- Stairs down to the
Azure Tower (Level 3).
- One-way teleporter to B1.
- One-way teleporter to C1.


