 Did we miss anything in this location? Is there something we didn't discover?
Let us know!
Notes
Did we miss anything in this location? Is there something we didn't discover?
Let us know!
Notes
- You won't be able to rest in this level of the catacombs, or in the
next level. That means you'll need to be careful until you pick up the Stone Gem (#15), which will allow you to activate a stone door (Exit C) and teleport to
Darkmoon Temple (Level 2), where there won't be any restrictions. For the most part, this just means you should avoid margoyle battles (such as the margoyle trap at #5) until then.
- Be careful with gelatinous cubes. They can paralyze you and eat your equipment. Luckily, they don't have many hit points, so you should be able to kill them quickly.
Enemies
- Gelatinous Cubes
- Margoyles
Notable Loot
- Arrows +2 (#15)
- Bracers of Protection +5 (#5)
- Cloak of Protection +3 "Moonshade" (#15)
- South Wind (#18)
- Stone Gem (#15)
Annotations
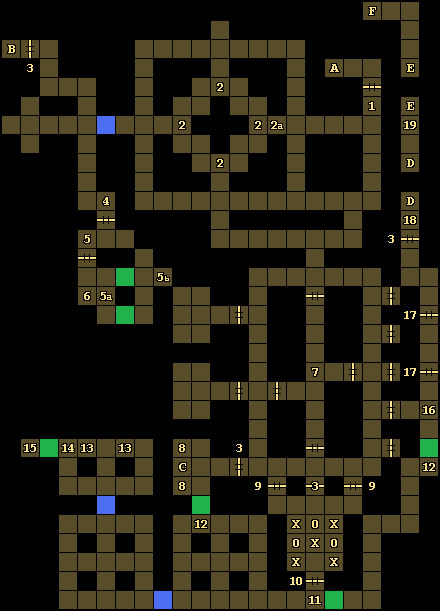
1 - Pressure Plate
When you step onto the pressure plate here, the door to the north will close, and you won't be able to open it from this side. This will lock you into the lower levels of the catacombs for a while, where you won't be able to rest. So be sure to rest before hitting the pressure plate.
2 - Spinners
Each time you visit one of these four locations (#2), you'll get rotated 90 degrees to the right (clockwise). You can turn off these spinners by pressing a nearby button (#2a).
3 - Locked Door
You'll need Spider Keys (#4, #8, #13) to open these doors.
4 - Gelatinous Cube / Spider Key
You'll encounter a gelatinous cube here. It'll drop a Spider Key when it dies. You'll also find a Potion of Healing on the ground here.
5 - Margoyle Trap
When you step onto the pressure plate here (#5), the door to the south will open, inviting you into the trap. Then inside the trap room, you'll find lots of loot, including Bracers of Protection +5, a Cursed Long Sword -2 "Hath Kull," and a Shield +1 (#5a). But when you pick up any of these items, the entrance door will close and two moveable walls will disappear -- and five margoyles will attack you.
Margoyles are fairly nasty -- especially in a level where you can't rest -- and they can't be damaged by normal weapons. So only attack them using magical weapons +1 or better, or with spells. Also try to position your party so you can only be attacked on two sides, and where your mage is safe (or else your mage will probably get killed in two hits). This battle will likely be tough enough that you should avoid it until after you've cleared a way to a place where you can rest.
After defeating the margoyles, you can re-open the entrance door by pressing a button on the eastern side of the trap room (#5b).
6 - Staff +1
At this spot, you'll find a Staff +1. It's not a part of the margoyle trap (#5).
7 - Mage Scroll
You'll find a Mage Scroll of Remove Curse on the ground here.
8 - Loot / Spider Key
At these two spots, you'll find a (worthless) Amulet, three Iron Rations, a Mage Scroll of Haste, a Robe +1, and a Spider Key.
9 - Doors
These doors can only be opened from the southern side (by pressing a button there).
10 - Door Puzzle
If you read the runes next to this door (#10), then you'll see a clue for opening it: "You must leave many things behind." It turns out that "many" equals five. If you place items onto five of the nearby pressure plates (X) and leave three of the other pressure plates (O) clear, then the door will open. When this happens, you'll release several margoyles, so it's a good idea to save the pressure plates next to the door for last, so you can immediately move to the doorway and block the margoyles from surrounding you. You can also try opening and closing the door so you only face one margoyle at a time.
11 - Hidden Button
Pressing the hidden button in the eastern wall here will remove the moveable wall behind it.
12 - Hidden Buttons
If you press the hidden button in the northern wall at these two places, then you'll remove the moveable walls behind them.
13 - Loot / Dark Moon Key / Spider Key / Stone Gem
Inside these two shelves (and on the floor next to them), you'll find two Arrows +1, an Axe, a Dark Moon Key, two Fire Spheres, a Potion of Extra Healing, a Potion of Healing, a Spider Key, and a Stone Gem. Fire Spheres can be used once each to cast the Fireball spell. The Stone Gem can be used to activate the stone door in this level (Ext C).
14 - Hidden Button
Pressing the hidden button in the western wall here will remove the moveable wall behind it.
15 - Loot
You'll find a pile of loot on the ground here: eight Arrows +2, a Cloak of Protection +3 "Moonshade" (which is worn as body armor), and a regular Long Bow.
16 - Margoyles / Grey Key
You'll get attacked by three margoyles around here. One of them will drop a Grey Key.
17 - Locked Doors
You'll need Dark Moon Keys (#13, #18) to open these doors.
18 - Dark Moon Key / South Wind
You'll find a Dark Moon Key and the South Wind in the shelf here.
19 - Locked Shelf
If you use a Grey Key (#16) in the keyhole here, then you'll unlock a shelf containing a Cleric Scroll of Raise Dead, a Mage Scroll of Detect Magic, a Mage Scroll of Fireball, and a Mage Scroll of Shocking Grasp.
Exits
- Stairs up to the
Catacombs (Level 2).
- Stairs down to the
Catacombs (Level 4).
- Stone door. If you use the Stone Gem (#13) with this door, then it will take you to
Darkmoon Temple (Level 2). If you use the Stone Dagger (found in the
Azure Tower, Level 4) with the door, then it will take you to the
Frost Giant Prison.
- Stairs.
- Stairs.
- Stairs up to the
Catacombs (Level 1).


