 Did we miss anything in this location? Is there something we didn't discover?
Let us know!
Enemies
- Darkmoon Clerics
- Skeletal Warriors
Notable Loot
- Axe +2 "The Bait" (#8)
- Dagger +2 (#6)
- East Wind (#21)
- Plate Mail +2 (#15)
- Short Sword +2 "Sting" (#8)
Annotations
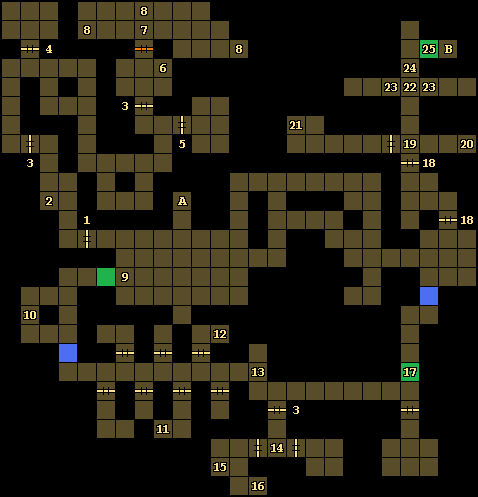
1 - Locked Door
You'll need a Grey Key to open this door.
2 - Lever / Shelf / Skull Key
Every time you pull the lever here, a fireball will shoot at you from the northern end of the hallway. The first time you pull the lever, a Skull Key will also appear in the shelf just to the north. If you have trouble with some of the upcoming battles (like at #7), then you can lure enemies to this spot and let the fireballs help you out.
3 - Locked Doors
You'll need Skull Keys (#2, #5, #6, #15) to open these doors.
4 - Door
When you approach this door, it'll open up automatically, and you'll get ambushed by four skeletal warriors.
5 - Door / Skull Key
When you approach this door, it'll open up automatically, and you'll get ambushed by three skeletal warriors and a cleric. The cleric will drop a Skull Key when he dies.
6 - Loot / Skull Key
When you enter this chamber, you'll get attacked by three skeletal warriors and a cleric. But after defeating them, when you check the ground here, you'll find a Dagger +2, a Robe +1, and a Skull Key.
7 - Major Battle
When you enter this room, you'll unleash a horde of clerics and skeletal warriors. If you imported your party from EOB1, then this battle might not be too bad. Otherwise, you'll need to do a lot of retreating and resting (and saving) before you kill everything.
8 - Loot / Dark Moon Key
In these three spots, you'll find your reward for defeating the undead horde (#7): an Axe +2 "The Bait," two Cleric Scrolls of Cure Serious Wounds, two Cleric Scrolls of Neutralize Poison, a Dark Moon Key, a (worthless) Helmet, two Iron Rations, (worthless) Leather Boots, and a Short Sword +2 "Sting."
9 - Hidden Button
If you press the hidden button here, then you'll remove the moveable wall behind it.
10 - Potions
On the ground here, you'll find a Potion of Cure Poison and a Potion of Vitality.
11 - Shorn Diergar
Inside this cell, you'll meet the dwarven cleric
Shorn Diergar. There's about a 50-50 chance that he'll offer to join your party. You'll find a Cleric Holy Symbol for him nearby (#14).
12 - San-Raal
On the ground here, you'll find a complete set of bones -- otherwise known as the remains of the elf mage
San-Raal. To resurrect
San-Raal, you'll need to take his bones to the holy symbol in
Darkmoon Temple (Level 1). You'll find a Spellbook for him nearby (#15).
13 - Ambush
When you step here, you'll get ambushed by a pair of clerics.
14 - Ambush / Dark Moon Key
When you step here, the cell door to the west will open, and two clerics will attack you. The clerics will drop a Cleric Holy Symbol and a Dark Moon Key when they die.
15 - Loot / Skull Key
You'll find a pile of loot on the ground here: a (worthless) Helmet +1, Iron Rations, a Long Sword +1, Plate Mail +2, a Shield +1, a Skull Key, and a Spellbook. These are all useful items if you add Calandra (#16) or San-Raal (#12) to your party.
16 - Calandra
In this part of the cell, you'll meet a human fighter named
Calandra. If you talk to her, then she'll offer to join your party. You'll find equipment for her nearby (#15).
17 - Moveable Wall
To remove this wall, you'll need to press the hidden button on either side of it.
18 - Locked Doors
You'll need Dark Moon Keys (#8, #14) to open these doors.
19 - Message
When you reach this spot, you'll be contacted by Khelben, and you'll update him about the temple.
20 - Parchment
On the ground here, you'll find a Parchment from Wently Kelso's journal mentioning a hidden level. You'll find the secret entrance to this level to the north (Exit B).
21 - Shelves / East Wind
Inside the two shelves here, you'll find the East Wind, two Potions of Healing, a Potion of Speed, and a Parchment. You'll need the East Wind in Darkmoon Temple (Level 1). The Parchment is another page from Wently Kelso's journal, this time linking the temple to the drow.
22 - Parchment
On the ground here, you'll find a Parchment from Wently Kelso to Dran. You'll meet Dran later.
23 - Pressure Plates
Every other time you step onto one of these two pressure plates, a fireball will shoot at you.
24 - Pressure Plate
The first time you step onto this pressure plate, a fireball will shoot at you from the north.
25 - Fragile Wall
If you attack this wall a few times, then you'll destroy it.
Exits
- Stairs up to the
Catacombs (Level 1).
- Stairs down to the
Catacombs (Level 3).