Did we miss anything in this location? Is there something we didn't discover?
Let us know!
Notes
Did we miss anything in this location? Is there something we didn't discover?
Let us know!
Notes
- Flying snakes won't hit you often, but they can poison you when they do.
- Gas spores will explode when they die, so try to kill them with ranged attacks before they can get close to you.
Enemies
Notable Loot
- Banded Armor +2 (#9)
- Short Sword +3 (#9)
- Two-Handed Sword +3 (#28)
Annotations
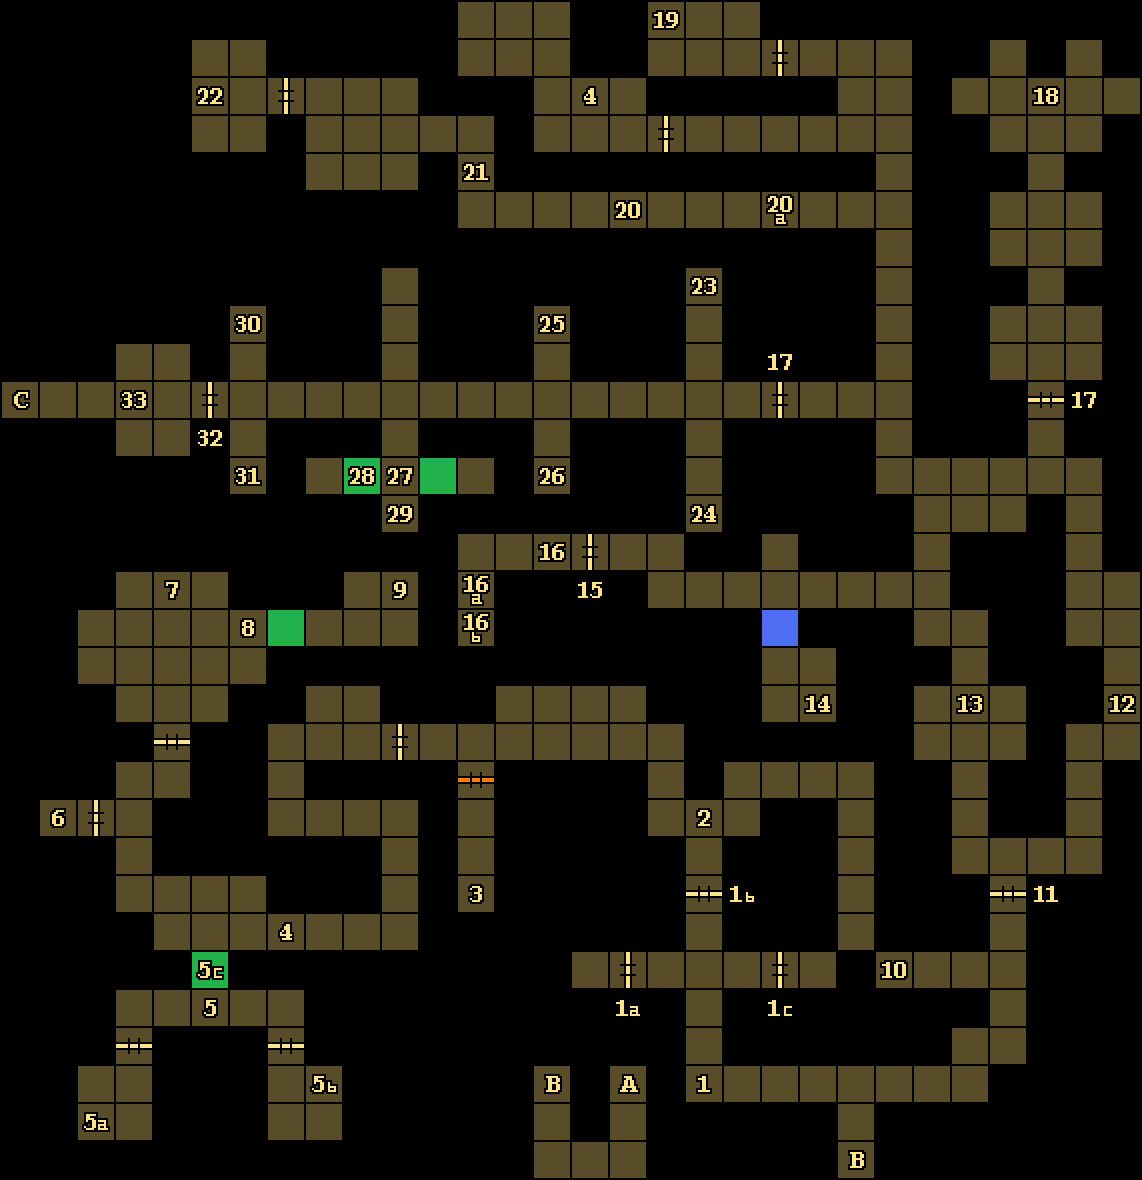
1 - Door Puzzle
If you read the plaque here, then you'll see a clue for the puzzle: "The way through three is two, not four." You'll then come to three doors to the north. The correct door to go through is "II" (#1b). If you go through "I" (#1a), then you'll get hit by a fireball trap. If you go through "III" (#1c), then you'll have to fight a gas spore.
2 - Magic Mouth
This magic mouth will give you a hint about escaping the level: "When all my brothers sing their song, the way will open and you'll carry on!" You'll find the magic mouth's brothers in the middle of the level (#23-26, #29-31). After the mouth has spoken to you, it'll start shooting out fireballs when you stand next to it, so move away quickly.
3 - Rotten Food
You'll find two packs of Rotten Food here. You'll need one of them for a magic mouth (#23).
4 - Flying Snakes / Dark Moon Keys
Somewhere around these two places, you'll encounter a flying snake that will drop a Dark Moon Key when it dies.
5 - Spirit Test
When you arrive here (#5), a female spirit will urge you to go through "the right door" or else "feel my master's wrath." If you take the spirit's advice literally and head through the right (western) door, then you'll find a Bone Key on the ground (#5a), and the spirit will congratulate you. If you go through the left (eastern) door, then you'll get hit with 3d6 damage (#5b), and you'll get teleported to a bone door (#11), where you'll find a Bone Key on the ground. Either way, after leaving the test area, a wall will appear (#5c), blocking you from returning to the area.
6 - Cell
This cell can only be opened by a magic mouth (#25). You'll find a Red Gem inside.
7 - Shelf
Inside the shelf here, you'll find a Cleric Scroll of Raise Dead and five Potions of Cure Poison.
8 - Hidden Button
If you press the hidden button in the eastern wall here, then the moveable wall behind it will disappear.
9 - Loot
On the ground here, you'll find Banded Armor +2, a Cursed Polearm -2 "Leech," (worthless) Leather Boots, and a Short Sword +3. You might need the polearm for one of the magic mouths (#9).
10 - Magic Mouth
The magic mouth here will talk about the Children of Darkmoon, and how they've become "the dust which we blow down these corridors."
11 - Locked Door
You'll need a Bone Key (#5) to open this door.
12 - Flying Snake
Around here you'll encounter a flying snake. It'll drop a (worthless) Ring of Adornment when it dies.
13 - Gas Spores
You'll encounter four gas spores in this room. Be sure to have your ranged weapons ready!
14 - Greed Shelf
Any item you place into the shelf here will get transformed into a Rock. You can do this as many times as you'd like. You'll need five Rocks for one of the magic mouths (#24).
15 - Door
This door can only be opened from the eastern side.
16 - Abandoned Cleric
When you reach this spot (#16), you'll hear a voice from the west warning you to turn back. If you head west anyway, then you'll run into a cleric lying on a pressure plate (#16a). He'll tell you that he failed his test and is now waiting to die, and he'll once again implore you to leave. If you comply, then you'll automatically retreat back down the hallway. If instead you attack the cleric, then he'll get up from the pressure plate, closing the door to the east (#15), and he'll attack you -- and probably die quickly. However, when you step onto the pressure plate yourself, it'll break and the door will remain closed, so even though you can find some nice loot -- including three Fire Spheres and Plate Mail +2 -- to the south (#16b), there isn't any way to loot it and escape. The only thing you can do is heed the cleric's warning and leave him be.
17 - Locked Doors
You'll need Dark Moon Keys (#4) to open these doors.
18 - Loot
On the ground here, you'll find five Arrows +1, a Composite Bow, a Parchment, and a Potion of Extra Healing. The Parchment is a partial map of the Silver Tower (Level 3).
19 - Mage Scroll
You'll find a Mage Scroll of Disintegrate on the ground here.
20 - Teleporter / Hidden Button
This teleporter (#20) will send you back four squares to the east (#21a). To turn it off, you'll need to press the hidden button at the destination point.
21 - Spinner
When you enter this square, you'll get rotated by 180 degrees.
22 - Shelf
Inside the shelf here, you'll find a Potion of Vitality (which will reduce the hunger of the character who drinks it).
23 - Magic Mouth
The magic mouth here will tell you, "One man's refuse is another's gold. Your famine is my feast." To satisfy it, you'll need to give it Rotten Food (#3).
24 - Magic Mouth
The magic mouth here will tell you, "Items born from greed are what I need. One for each year, and one less to fear." To satisfy it, you'll need to give it five Rocks. If necessary, you can get Rocks from the greed shelf (#14).
25 - Magic Mouth
The magic mouth here will tell you, "From the fiends. From below. Find the item with the hidden glow!" To satisfy it, you'll need to give it the Mantis Idol from
Level 1. When this happens, the mouth will open a door to the southwest (#6).
26 - Magic Mouth
The magic mouth here will tell you, "Nature's beauty is my meat. Tiny and red, 'tis such a treat!" To satisfy it, you'll need to give it a Red Gem (#6).
27 - Weak Wall
If you attack the western wall here, then you'll knock it down. At the same time, the eastern wall will disappear, and you'll get attacked by flying snakes from both sides. So immediately strafe to one side or the other so you can keep your back row characters safe and fight the snakes one at a time.
28 - Random Loot
On the ground here, you'll find either a Mage Scroll of Disintegrate or a Two-Handed Sword +3. The decision for the item isn't made until you knock down the nearby wall (#27), so if you don't like the item that appears for you, load your game and try again.
29 - Magic Mouth
The magic mouth here will tell you, "I must have the blade which has eaten so much! I must have the one which I fear not to touch!" To satisfy it, you'll need to give it the Cursed Long Sword -2 "Hunger" (from
Level 1) or the Cursed Polearm -2 "Leech" (#9).
30 - Magic Mouth
The magic mouth here will tell you, "I am parched. I am dry! Give me liquid so I can cry!" To satisfy it, you'll need to give it a potion. Any potion will work. A good choice is the Potion of Vitality to the north (#22).
31 - Magic Mouth
The magic mouth here will tell you, "No matter how parched, no matter how rolled, no matter if magic, no matter how old." To satisfy it, you'll need to give it some paper, like a spell scroll or a Parchment.
32 - Closed Door
This door will open when you satisfy all of the magic mouths to the east (#23-26, #29-31).
33 - Dran Draggore
When you arrive here, you'll meet Dran Draggore, the "high priest and overlord" of the temple. He won't be happy to see you, so he'll shut the door behind you (#32), blocking your escape, and then he'll disappear. But don't worry; you'll see him again later.
Exits
- Stairs down to the
Silver Tower (Level 1).
- Stairs.
- Stairs up to the
Silver Tower (Level 3).