 Did we miss anything in this location? Is there something we didn't discover?
Let us know!
Note
Did we miss anything in this location? Is there something we didn't discover?
Let us know!
Note
- After attacking Nadia and Joril (#1), groups of clerics will regularly spawn in the temple foyer. So always be ready for a fight.
Enemies
Notable Loot
Annotations
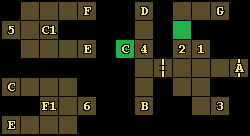
1 - Nadia and Joril
The clerics Nadia and Joril will greet you when you approach them. If you talk to them, then they'll welcome you to stay and rest in the temple. But if you attack them, or break the temple's windows, or go through the doorway to the west -- that is, if you want to progress into the game -- then you'll have to fight them. The duo will cast spells quickly against you, so it's best to buff up before facing them. If you have trouble with the fight, then don't initiate it during dialogue. Instead, ambush the clerics afterwards using an area-effect spell like a Fireball.
Note: When talking to the clerics, you'll automatically ask them about Amber. Amber is the name of the scout Khelben sent in before you (and who hasn't been seen since). You'll find Amber's remains on
Level 2 of the temple.
2 - Carving
You'll see a carving of the Four Winds on the northern wall here. As you explore the catacombs beneath the temple, you'll find four horns named after the Four Winds:
If you play all four horns while standing next to the carving, then the wall behind it will disappear. To play a horn, just have one of your characters hold it and then right-click on it from the main screen. You can play the horns in any order using any characters.
3 - Ira
If Nadia and Joril (#1) are still alive, then you'll meet a woman named Ira here. She'll tell you that her sister Calandra was kidnapped from the Forest last night, and she'll ask you to keep an eye out for her. Then she'll leave the temple. You'll meet Calandra in the
Catacombs (Level 3).
4 - Hidden Button
If you press the hidden button on the western wall here, then the moveable wall behind it will disappear, revealing a teleporter (Exit C).
5 - Holy Symbol
This holy symbol will resurrect dead characters, including any sets of bones that you might have in your possession. You'll only be able to use the symbol three times.
6 - Holy Symbol
This holy symbol is just like the other one (#5), except it's out of charges, and so you won't be able to use it for anything.
Exits
- Exit back to the
Forest. This exit will close and lock after attacking Nadia and Joril (#1) or talking to Ira (#3). It'll remain closed for the rest of the game.
- Stairs down to the
Catacombs (Level 1).
- One-way teleporter to C1.
- Stairs up to
Darkmoon Temple (Level 2).
- One-way teleporter back to #4.
- One-way teleporter to F1.
- Stairs up to the
Silver Tower (Level 1).


