 Did we miss anything in this location? Is there something we didn't discover?
Let us know!
Notes
Did we miss anything in this location? Is there something we didn't discover?
Let us know!
Notes
- Salamanders and mind flayers will regularly spawn on this level -- especially when you rest -- and you won't find any loot, so unless you really want to grind some extra xp, you should head straight for Dran (#9).
- Mind flayers can paralyze you with their attacks, so be sure to have Remove Paralysis spells available.
- Salamanders are immune to fire-based spells.
Enemies
- Dran
- Mind Flayers
- Salamanders
Notable Loot
Annotations
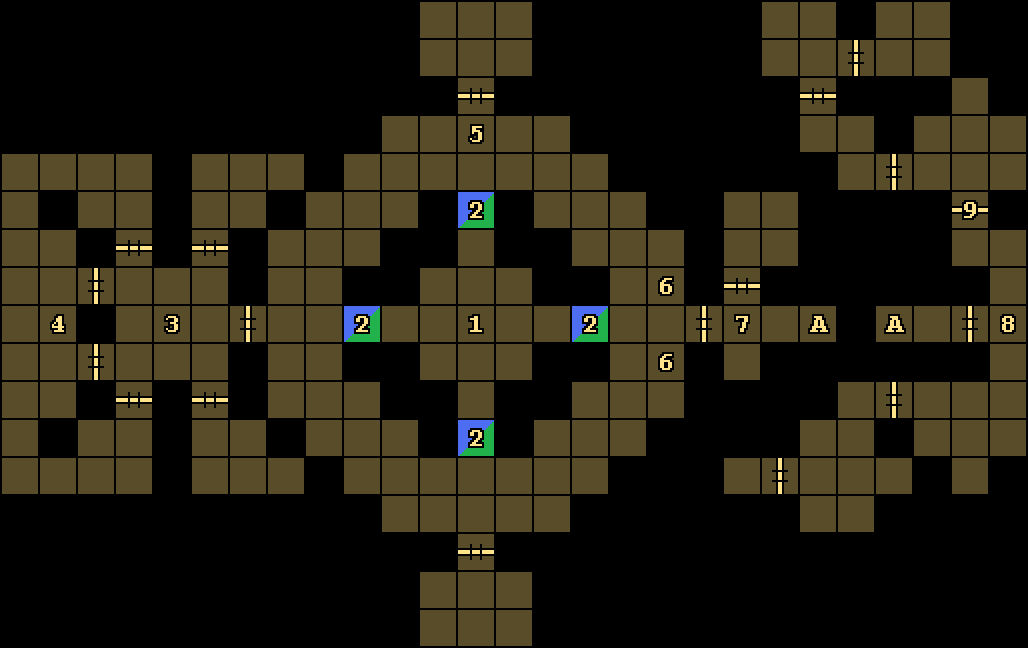
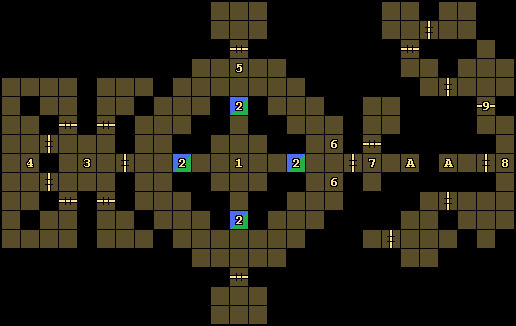
1 - Starting Point
2 - Illusionary Walls / Salamanders
When you step into any of these illusionary walls, all four walls will disappear, and salamanders will spawn behind them. The salamanders will then start hunting you, so be ready for them to show up behind you.
3 - Pressure Plate / Mind Flayers
If you step onto the pressure plate here, then seven mind flayers spawn in the rooms around you, and the entrance door to the chamber will close. You'll still be able to open the door, but by the time you turn around and press the button, you might already be paralyzed. In other words, unless you're a glutton for punishment, don't step here.
4 - Crystal Ball
When you look into the crystal ball here, you'll see visions -- but you won't know if they're from the past or the future, or if they're just Dran's wildest dreams.
5 - Door / Salamanders
When you step here, the door to the north will open, and the three salamanders in the room beyond it will attack you.
6 - Shelves / Door
You'll discover magical force fields blocking these two shelves. If you cast Dispel Magic on them, then you'll be able to loot them for an Amulet of Death (which can kill a character) and an Amulet of Life (which can resurrect a character). Dispelling the shelves will also open the door in between them.
7 - Dying Mage / Stone Cross
When you step here, you'll spot a dying mage to the south. He'll inform you that Dran is in a "foul mood," and then he'll disappear. The mage will leave behind a Stone Cross, but it doesn't serve any purpose (and there isn't any way to reach a stone door from here, anyway).
8 - Pressure Plate
When you step here, the door behind you will close, and you won't have any way to open it again.
9 - Dran Draggore
Before heading here, be sure to rest and buff up as much as possible. Cast spells like Bless, Prayer, and Haste, and have characters memorize Remove Paralysis and Raise Dead. You can also have characters equip Magic Pouches, Amulets of Life, and the Starfire scepter (depending on what you have available). It's likely that only your two tanks will attack Dran, so everybody else can equip useful non-weapons.
When you step through the doorway here, you'll finally encounter Dran. He'll talk to you for a bit, including bragging about how he used Xanathar (the end boss from EOB1), and then the fight will be on. At first, you'll battle Dran in his human form. He'll be a mage and he'll cast a variety of spells at you (including Fireball and Hold Person), but if you advance into the room with him, then you should be able to attack and strafe around him quickly enough that he never has a chance to hit you.
Note: If you're too slow at the start of the fight and can't advance into the room with Dran, then you should retreat to a room to the south. Fighting Dran in a hallway is a good way to die quickly.
When you "kill" Dran, he'll transform into a red dragon. At this point, you should start activating the Starfire scepter, since it's supposed to protect you against fire breath attacks -- not that we could discern any difference ourselves (which means it probably just improves your saves rather than reducing damage). Still, your mileage may vary, and every little but of protection helps. Otherwise, fighting Dran in his dragon form should be about the same as fighting him in his human form. Strafe around him to avoid taking damage, and hit him when he moves to intercept you. If you're patient and lucky, then eventually you'll wear him down.
When Dran dies the second time, Khelben will show up and escort you out of the tower, and then his mage friends will destroy the temple in its entirety. For your brave actions, you'll be named Heroes of the Realm! Congratulations for completing Eye of the Beholder II!
Exits
- Stairs.