 Did we miss anything in this location? Is there something we didn't discover?
Let us know!
Notes
Did we miss anything in this location? Is there something we didn't discover?
Let us know!
Notes
- You won't be allowed to rest in some parts of this level, but if necessary you can always retreat back to Darkmoon Temple (via Exit A) and rest there.
- Giant wasps can poison and paralyze you, and mantis warriors can paralyze you. So make sure you have plenty of remedy spells memorized.
Enemies
- Giant Wasps
- Mantis Warriors
Notable Loot
Annotations
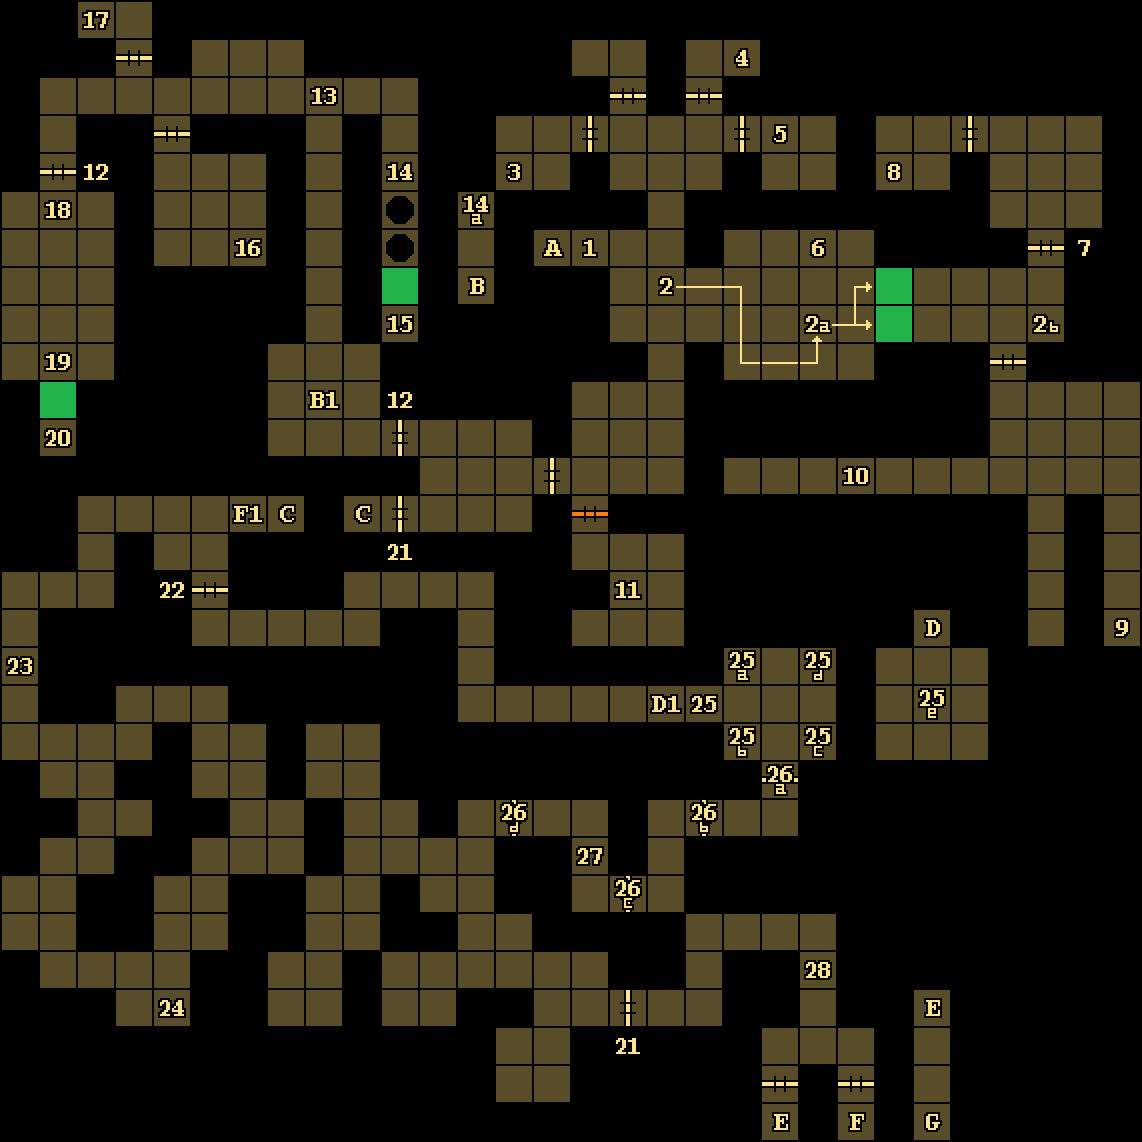
1 - Spirit
The first time you arrive here, you'll be greeted by a spirit. He'll welcome you to the Test of Faith, and he'll warn you to only trust yourself.
2 - Lightning Pad Puzzle / Bone Key
In this part of the tower (starting around #2), you'll encounter an array of pressure pads on the floor, some "on" and some "off." If you step onto a lighted pad -- that is, one that is "on" -- then your entire party will take significant lightning damage. So what you'll need to do is watch the pads as they turn on and off, and follow a safe path through the array (shown on the map above). You'll get hit once when following this path; there isn't any way to avoid it.
When you get close to the eastern edge of the array (#2a), the two moveable walls blocking the exit will disappear, allowing you to escape. But four mantis warriors will converge on you at that point, and they'll try to block you from exiting the array. So you'll either need to kill them quickly so you can press forward (Lightning Bolts are best for this), or you'll need to strafe left (and get hit by a lighted pad), and then move forward to a free spot and fight from there. The mantis warriors will paralyze you with their attacks, so have some Remove Paralysis spells (or Magic Dust pouches) ready. One of the mantis warriors will drop a Bone Key when it dies.
To the east of the puzzle, you'll find a lever (#2b). Pulling it will turn off several of the pressure pads, creating a safe east-west passage through the puzzle array, and also creating a path so you can exit the array to the north. To exit the array to the south, you'll have to go through a lighted pressure pad and take damage.
3 - Polearm +1
You'll find a Polearm +1 on the ground here.
4 - Wounded Mantis Warrior / Mantis Key
You'll discover a wounded mantis warrior here. If you heal it, then it will attack you. If you kill it, then it will die instantly. Either way, the creature will drop a Mantis Key when it dies.
5 - Tanglor
In this cell, you'll meet the "half-elf" fighter/cleric
Tanglor. He'll offer to join your party. If you accept him, then you'll find a Shield +1 and a Short Sword +1 on the ground next to him. If you refuse him, then he'll take those items with him when he leaves.
6 - Cursed Axe
You'll find a Cursed Axe -2 on the ground here.
7 - Locked Door
You can open this door using a Bone Key (#2, #11) or by picking the lock.
8 - Mantis Egg
If you break open this egg (by attacking it), then a mantis warrior will jump out and attack you.
9 - Cursed Sword
You'll find the Cursed Long Sword -2 "Hunger" on the ground here. You might need this sword on
Level 3 of the tower.
10 - Shelf
If you put a small item (like a Skull or a Rock) into the triangular shelf here, then it'll transform into a Wand of Lightning. You can only make this transaction once.
11 - Magic Mouth / Bone Key
When you step here, a magic mouth will tell you, "Of the bones you need three; together they are the key!" If you feed three bones -- Skulls or Femurs (which you can find all over the place in the Catacombs) to the mouth, then it will reward you with a Bone Key.
12 - Locked Doors
You'll need Mantis Keys (#4, #15) to open these doors.
13 - Ambush
When you arrive here, two mantis warriors to the west will spot you, and one of them will throw a Fire Sphere at you. You'll automatically turn to face the warriors, so if you immediately strafe left, then you'll avoid the damage.
14 - Pit Puzzle
To get past the two pits to the south (the closest of which will start out closed), you'll need to throw an item to the south. It'll hit a button just to the south of the second pit, which will toggle both pits (closing the farthest one and opening the closest one) and remove the moveable wall to the south. Then you'll need to press the button at this spot (#14) to toggle the pit just to the south (closing it). This should leave both pits closed and allow you to claim the Mantis Key at the southern end of the hallway (#15). If you fall down into one of the pits, then you'll land in a sublevel (#14a) and have to use the teleporter there (Exit B) to return to the puzzle.
15 - Mantis Key
You'll find a Mantis Key on the ground here.
16 - Mage Scrolls
At this spot, you'll find a Mage Scroll of Blur and a Mage Scroll of Dispel Magic.
17 - Iron Rations
You'll find Iron Rations on the ground here.
18 - Mantis Nest
Inside this chamber, you'll discover no less than eight mantis eggs. If you walk to the southern edge of the chamber (#19), then all of the eggs will burst open, and you'll have to fight eight mantis warriors at once. So don't do that. Instead, attack the eggs as you come to them, which will allow you to fight the mantis warriors one at a time.
19 - Green Gems
You'll find two Green Gems in the wall here. If you take one of them out and then put it back in, then the moveable wall behind it will disappear.
20 - Loot / Copper Key
On the ground here, you'll find a Copper Key, a Fire Sphere, and a Mantis Idol. You'll need the Mantis Idol on
Level 3 of the tower.
21 - Locked Doors
You'll need Copper Keys (#20, #24) to open these doors.
22 - Locked Door
You'll need a Bone Key (#2, #11) to open this door.
23 - Wasp Nests
South of here, you'll run into lots of wasps and wasp nests. The wasps will respawn regularly, so try to get into and out of their part of the level as quickly as possible. There isn't any way to destroy the nests.
24 - Loot / Copper Key
On the ground here, you'll find a Copper Key, a Femur, and a Potion of Cure Poison.
25 - Lever Puzzle
Inside the room to the east, you'll find four levers. Each lever will open a door to the south, but also open a pit in the puzzle room. The mapping is detailed below:
- Lever #25a will open a pit at #25d plus open the door at #26c.
- Lever #25b will open a pit at #25a plus open the door at #26b.
- Lever #25c will open a pit at #25b plus open the door at #26a.
- Lever #25d will open a pit at #25c plus open the door at #26d.
The key to the puzzle is the hidden button past three of the doors (#27). Pressing it will (invisibly) cover the pit at #25d, which will allow you to pull all of the levers, provided you save the lever at #25d for last.
So here's the solution:
- In order, pull the levers at #25a, #25b, and then #25c. This will open the first three doors to the south so you can reach the hidden button.
- Press the hidden button (#27).
- Return to the puzzle room and pull the lever at #25d. This will open the final door so you can continue on.
If you mess up the puzzle and fall into a pit, then you'll end up in a sublevel (#25e), and you'll have to use a teleporter (Exit D) to escape. Stepping onto the pressure plate at the start of the puzzle (#25) will reset all of the levers, doors, and pits -- unless you've already completed the puzzle, and then the pressure plate won't do anything.
26 - Lever Puzzle Doors
These four doors are a part of the lever puzzle (#25).
27 - Hidden Button
Pressing the hidden button on the western wall here will cover up the pit at #25d.
28 - Spirit
At this spot, you'll once again meet the spirit who greeted you at the entrance to the level (#1). This time he'll tell you that the left door leads to your next trial, and the right door leads to "almost certain death." But be aware -- the spirit is lying (remember that he told you not to trust anyone but yourself). The left (eastern) door will actually cause you to take damage (and get teleported back to F1), while the right (western) door will take you to the Silver Tower (Level 2).
Exits
- Stairs down to
Darkmoon Temple (Level 1).
- One-way teleporter to B1.
- Stairs.
- One-way teleporter to D1.
- Teleporter.
- One-way teleporter to F1. Some members of your party will take 3d6+24 damage when you go through this teleporter.
- Stairs up to the
Silver Tower (Level 2).