 Did we miss anything in this location? Is there something we didn't discover?
Let us know!
Notes
Did we miss anything in this location? Is there something we didn't discover?
Let us know!
Notes
- You'll find lots of Rocks in this level. Even if you don't plan to use a Sling, you should pick up a few Rocks because you never know when you're going to need to throw something or weigh down a pressure plate.
- You'll run into a few spider webs in the eastern part of the level. Just attack them to remove them.
Enemies
Notable Loot
Annotations
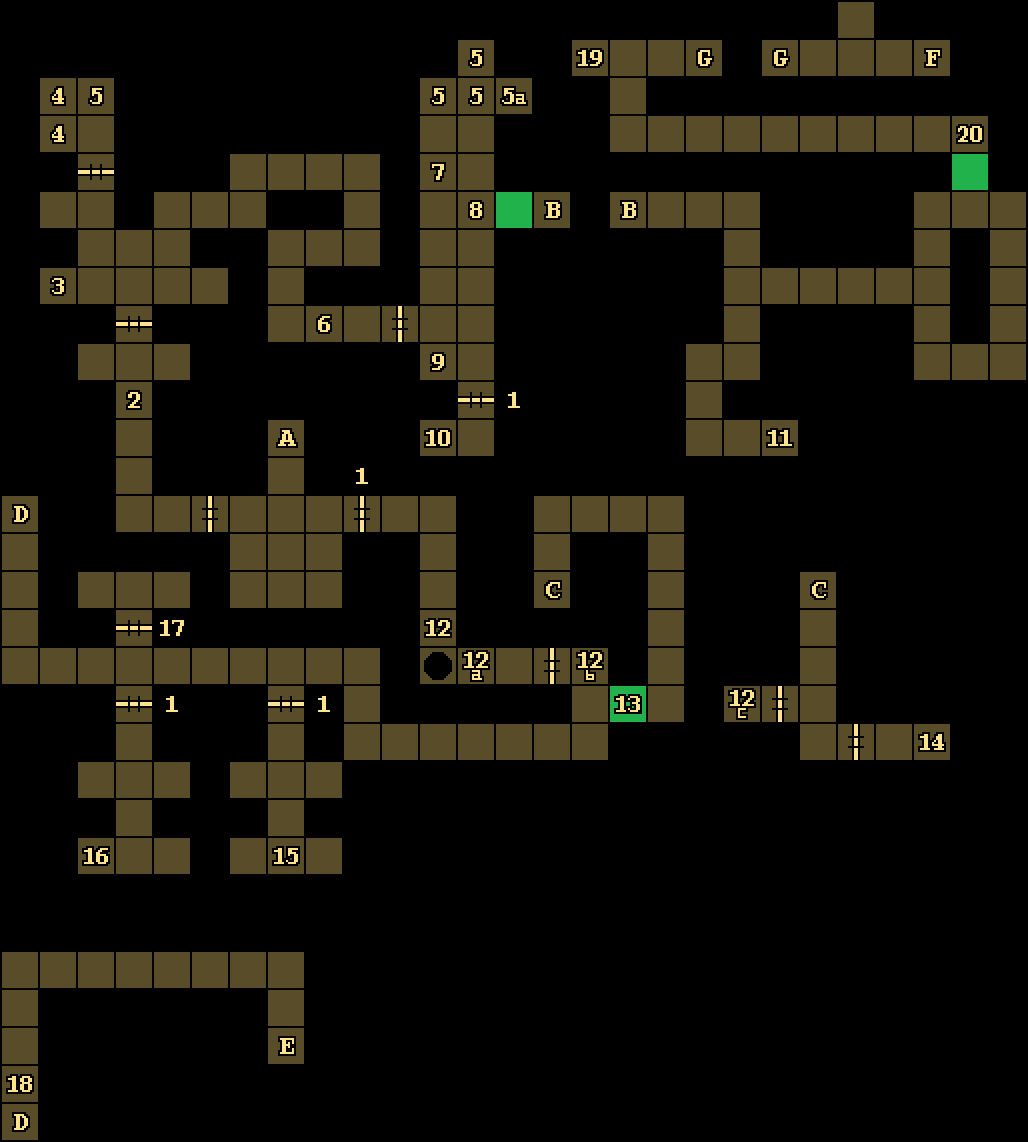
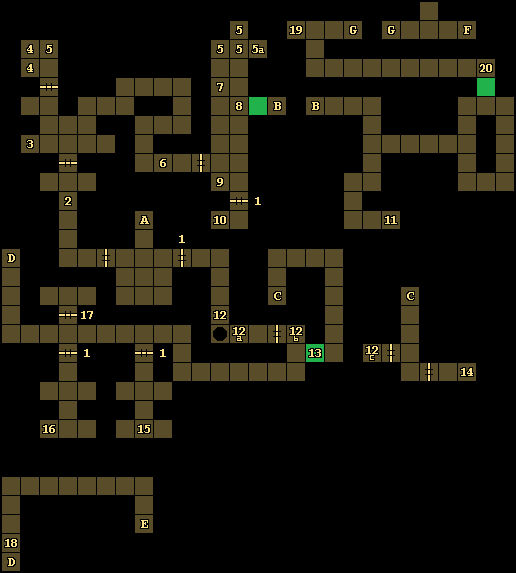
1 - Locked Doors
You'll need Grey Keys (#3, #9, #12, #17) to unlock these doors.
2 - Pressure Plate
Stepping onto the pressure plate here will open the door to the north. Once opened, the door will stay open.
3 - Guards / Grey Key
The two guards here will call you thieves and attack you when you get too close to them. One of the guards will drop a Grey Key when he dies.
4 - Shelves
You'll find Iron Rations inside each of these shelves.
5 - Barrels
These barrels can be opened by attacking them. Most of them (#5) will be empty or only contain rations, but one (#5a) will drop three pouches of Magic Dust, which can be used to remove paralysis.
6 - Pressure Plate
Stepping onto the pressure plate here will open the door to the east. But when you step off the pressure plate, the door will close. So you'll need to drop something onto the pressure plate -- like one of the Rocks littering the level -- to keep the door open.
7 - Guard
Around here, you'll encounter an angry guard. He'll drop Lock Picks when he dies.
8 - Hidden Button
If you press the hidden button here, then the moveable wall behind it will disappear.
9 - Shelf / Grey Key
You'll find a Grey Key inside the shelf here.
10 - Insal the Quick
When you step here, you'll discover a halfling thief named Insal the Quick in the back of the cell. You'll automatically free him, and he'll offer to join your party. However, if you add him, then the first time you rest with him in your party, he'll rob you and flee, so he's not a recommended addition. But regardless, as long as Insal survives, you'll see him again later (in the
Crimson Tower, Level 1).
11 - Loot / Copper Key
On the ground here, you'll find Ancient Bones (that will crumble when you touch them), a Cleric Scroll of Neutralize Poison, a Copper Key, a Mage Scroll of Magic Missile, and a Parchment. If you interact with the Parchment (by placing it into the weapon- or off-hand of a character and right-clicking it there), then it will show you a partial map of the level.
12 - Pit Ambush / Grey Keys
When you pull the lever here (#12), you'll close the pit to the south. But when you step onto the pressure plate just past the pit (#12a), you'll open the pit back up, plus open the door to the east, which will allow four guards to attack you. Two of the guards will drop Grey Keys when they die. To close the pit again, you'll need to pull the lever to the east (#12b).
If you fall into the pit, then you'll drop down into a small cell (#12c). To open up the cell's door, you'll need to throw a Rock (or something else) through the door's grating so it hits the button on the other side. If you don't fall into the pit, then you can just press the button manually to open the cell's door.
13 - Moveable Wall
To remove this wall, you'll need to press the hidden button on either side of it.
14 - Cell
This cell will start out locked. There isn't any key for the lock, so the only way to open it is to pick the lock. Inside the cell, you'll find a Mage Scroll of Lightning Bolt.
15 - Dagger +1
You'll find a Dagger +1 in the basin here.
16 - North Wind
On the ground here, you'll find a Parchment and a horn called the North Wind. The Parchment will give you a clue about the horn, which you'll need in
Darkmoon Temple (Level 1).
17 - Locked Door / Grey Key
This door has a keyhole, but there aren't any keys that work with it. So to open the door, you'll have two choices: you can pick the lock, or you can walk down the hallway to the west, which will cause the door to open automatically. Inside the room past the door, you'll encounter two guards. One of them will drop a Grey Key when he dies.
18 - Hidden Button
If you press the button hidden in the eastern wall here, then a shelf containing a Sling and a Cleric Scroll of Raise Dead will appear.
19 - Cursed Loot
On the ground here, you'll find a Cursed Dagger -2 "Yargon," a Cursed Long Sword -3, and a Cursed Mace -2 "Thumper."
20 - Keyhole
If you use a Dark Moon Key in the keyhole here, then you'll remove the moveable wall to the south.
Exits
- Stairs up to
Darkmoon Temple (Level 1).
- Staircase.
- Staircase.
- Staircase.
- Stairs down to the
Catacombs (Level 2).
- Stairs down to the
Catacombs (Level 3).