 Did we miss anything in this location? Is there something we didn't discover?
Let us know!
Objectives
Did we miss anything in this location? Is there something we didn't discover?
Let us know!
Objectives
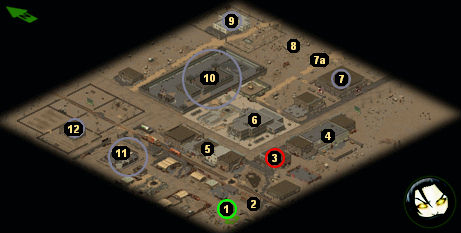
- Rescue the mayor (#3).
- Rescue the mayor's daughter (#6).
- (Optional) Turn off the main alarm (#3).
- (Optional) Save the power plant (#4).
- (Optional) Rescue the prostitutes (#8).
- (Optional) Rescue Warden Felix (#10).
- (Optional) Help the ghouls (#11).
Walkthrough
Note: You'll have to face some adult deathclaws in this mission. If you're still using
hunting rifles and
pump-action shotguns, then you might want to wander around in the wastelands for a while and search for regular encounters involving civilians (if the civilians are fighting something in the encounter, then they might drop
neostead combat shotguns when they die) or special encounters involving merchants. Since the enemies in the mission won't be wearing armor, flechette ammunition is also useful.
You'll start out in the southwestern corner of the map (#1). Just to the east, you'll find Arlene Turling, the mayor's assistant (#2). When you talk to her, she'll tell you how the mayor has been captured, and that the beastlords are holding her in a nearby house (#3). Further, she'll tell you that the house with the mayor contains a big siren, and if that siren goes off then the beastlords will kill all of their hostages.
Rescuing the mayor isn't all that difficult. If you sneak your party to her house, you'll see that there are ladders on the southern side leading up to the roof, and then another ladder leading down the western side onto a balcony. If you sneak a couple of squad members onto the balcony, then when they enter the house, they'll come in behind the beastlord commander, and it shouldn't be much of a challenge to kill him using a couple of blasts from your favorite shotgun.
When the commander dies, you'll automatically complete the objective to free the mayor, which is worth 1000 experience points. The commander will drop a
house key, and you can use that key to enter the mayor's room right next door. The mayor will ask you to further help the town by rescuing other hostages, but only rescuing her daughter (#6) is required. The mayor will then give you another
house key to access the siren on the roof, and you'll also find a third
house key on the floor in her room. If the third
house key is actually needed for anything, we don't know what it is.
After talking to the mayor, head up to the roof of her building and flip the switch next to the big siren. Nothing will obviously happen, but flipping the switch will turn off the siren, and it will net you 800 experience points.
From here, you'll just need to make your way through the town, rescuing other hostages. With the big
siren out of the way, you'll only have to worry about little sirens at each of the other hostage
locations. The little sirens will cause nearby beastlords and deathclaws to wake up, and maybe start
attacking hostages, but as long as you can kill the enemies quickly, or get between them and the hostages, it doesn't really matter if the little sirens go off or not. To be extra safe, you can click on the little sirens to break them.
The only hostage that is required is the mayor's daughter (#6), but rescuing other hostages will net you good equipment -- such as
metal armour mark II at the church (#9) and the
neostead combat shotgun at the prison (#10) -- plus good experience. And if you help the ghouls (#11), then you'll also gain the ability to recruit ghouls when you visit a bunker next.
Once you've completed all of the objectives that you want to deal with, simply walk to the edge of the map to leave the area.
1 - Starting Point
2 - Arlene Turling
Arlene will introduce you to the mission.
3 - Mayor's House
You'll encounter two beastlords on the porch, three baby deathclaws and one beastlord sleeping inside,
and a commander on the second floor. If you sneak up the ladders to arrive behind the commander and
then kill him quickly, it won't matter what you do with the enemies down below, although you'll
probably want to kill them just to be thorough.
You'll also find the mayor on the second floor. Freeing her and talking to her are required for the mission.
4 - Power Plant
On the upper floor you'll find a locker and a civilian corpse to loot, and between the two you'll be able to pick up a
first aid kit, a
lockpicks, a
tool kit, and some
micro fusion cells.
The bottom floor is where you'll need to do your work. You'll find five beastlords down there, including one commander beastlord, along with six hostages and two generators. The generators will be wired to explode using
plastique and
remote detonation traps. Your goal is to sweep through the room, killing the beastlords before they can kill the hostages and blow up the generators. If you're playing in turn-based mode, then this is reasonably easy because then the commander will never (as far as we can tell) try to blow up the generators. That will only happen in continuous turn-based mode. If the commander signals the charges, then you'll see a 60-second timer appear at the top of the screen, and you'll need to disarm the explosives before that timer winds down. If you save the generators, then you'll earn 400 experience points. If you disarm the explosives, then you'll earn 100 extra experience points. The hostages don't seem to affect how much experience you receive.
Note: There's also a switch you can use to turn off the lights in the room. You can use the switch to make it easier to sneak some squad members into the room.
5 - Buildings
You'll find three beastlords and one adult deathclaw patrolling along the train tracks next to the buildings. You won't find anything of use inside the buildings.
6 - City Hall
City Hall is where you'll find Evita, the mayor's daughter. You'll also find a bunch of beastlords
and a deathclaw here, not to mention several alarms. Fortunately, it doesn't seem to make any
difference if the bad guys set off the alarms. From our experience, they won't rush into the room
where Evita is and try to kill her. At worst, the alarms just mean that all of the enemies will be awake when you enter the building.
So take out the beastlords any way you'd like. Most will have weapons that you've seen numerous times before, but one of the guards outside will be carrying the
M1 Garand, a rifle better than the
hunting rifle. Really, the only thing you have to be careful about is entering the main room
on the ground floor, because you'll encounter an adult deathclaw there, and adult deathclaws can be nasty. So be sure you have your shotguns primed and ready before you go inside.
Killing the beastlords and deathclaw will automatically complete the objective to rescue the mayor's
daughter, and you'll receive 1500 experience points. Talking to Evita afterwards won't accomplish
anything more, although she'll ask you to look out for the ghouls in town (#11).
A couple notes: You'll find yet another
house key in the cabinet in Evita's room. You can use
the key to lock (or unlock) the western door to her room. Presumably, this is how you could prevent
the deathclaw in the main room from attacking her, but we've never seen the deathclaw try it. You can
also find a tunnel entrance in the back (eastern) room of the building. You'll encounter a couple of
beastlords in the tunnel hiding behind the doorway where the civilian corpse is (just throw grenades
to kill them), plus a crate with a
first aid kit and some ammunition. The tunnel will lead you to the prison (#10), giving you an alternative way to get inside there.
7 - Brothel

|
| A close-up view of the tunnel entrance at #7a.
|
The brothel (#7) won't have any alarms in it, but at the first sign of trouble the beastlords inside
will start shooting at the prostitutes, and the prostitutes will die quickly. Your best bet for the
area is to attack the beastlords from a couple different directions. The beastlords outside won't
notice if you approach the brothel from the north, and there is also a secret underground tunnel
that you can access at #7a (see insert to the right) that you can use to sneak inside. If you can
quickly swarm the beastlords and block them from attacking the prostitutes, then you'll receive
100-250 experience for the encounter.
8 - Downed Helicopter
You'll encounter a beastlord and two sneaking deathclaws here.
9 - Church
You'll find two adult deathclaws inside the church. The best way to deal with them is to approach
the church from the south and then shoot the deathclaws through the windows. The deathclaws won't
respond very well. Most likely they'll just charge at the windows and then act confused when they
can't get to you. But even if the deathclaws act smarter in your game, it's a long trek for them
to run all the way around to get to you, and so you should be able to shotgun them to death before
they reach you regardless.
Also in the church you should notice a chest against the back wall. Inside you can pilfer a
field medic F/A kit and
metal armour mark II.
10 - Prison
There are two ways to get into the prison: through the doors on the western side, or through the
tunnel leading from City Hall (#6). There are locked gates leading into the prison from the gallows,
but these can't be picked, and we've never found a key for them. Since your goal in the prison is to protect Warden Felix, and since Felix can be found near where the tunnel enters the prison, the tunnel is the best way to get inside.
If you enter the prison through the tunnel, then you'll find yourself on the ground floor of the main building. Only one guard will be patrolling inside, and you should be able to sense him when he approaches the tunnel exit. So wait for him to turn around, and then blast him before he can do anything.
If you make noise while killing the guard, then a couple of beastlords and a couple of baby deathclaws will probably rush into the building to investigate. But you should be able to shoot them through the windows, and then blast them when they're bunched up in the doorway, and so they shouldn't present much of a problem.
Before heading up to the roof of the building, flip the switch near the doorway. That will open the three cell doors. Inside one of the cells, you'll find a chest containing a
neostead combat shotgun and some
12 gauge ammunition.
On the roof, you'll encounter five beastlords, Duff the Beast Master, and Warden Felix. Ideally, what you should do is sneak your squad members around, so that when combat starts you'll be able to knock out the beastlords quickly. Since they'll all be looking outward, this should be straightforward, provided that your squad can sneak reasonably. If Felix survives the fight, then you'll earn 400 experience points when it's over.
11 - Ghoul Headquarters
You'll find a ghoul named Elliot in the headquarters. He'll ask you to help the ghouls against the
deathclaws. A few seconds after you finish your conversation with him, a battle will begin. Three
wolves, three beastlords, four baby deathclaws, and an adult deathclaw will all charge at the
headquarters from the nearby farm (#12). The ghouls will attempt to defend themselves, but they're
hopelessly bad shots, and so you'll have to do all of the work yourself.
The enemies won't coordinate their attack very well, and so you'll probably see them in waves: first the wolves, then the beastlords, and then the deathclaws. With their forces divided, you should have a pretty easy time with the enemies, especially if you've already acquired the
neostead combat shotgun from the prison (#10). Defeating the charge will net you 500 experience points.
After the battle, Elliot will ask for a bit more help. He'll tell you that his brother Gorgi was
captured by the beastlords, and that he's being held in the farm (#12). You'll find Gorgi being
guarded by a pair of beastlords. If you can kill the beastlords before they kill Gorgi, then when
you talk to Elliot next, he'll be thankful. He'll let you know that ghouls are now willing to join
the Brotherhood, and then when you return to a bunker, you'll find ghouls waiting to be recruited.
Saving Gorgi will also earn you 250 experience points.
12 - Farm
You'll find a bunch of enemies here. It's easiest to wait for them to attack the ghoul
headquarters (#11) and kill them in the open.


