 Did we miss anything in this location? Is there something we didn't discover?
Let us know!
Objectives
Did we miss anything in this location? Is there something we didn't discover?
Let us know!
Objectives
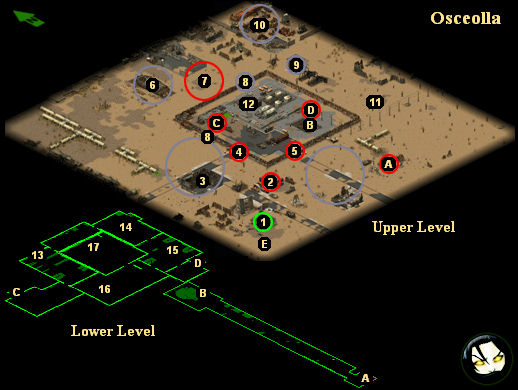
- Kill Gammorin (#17).
- (Optional) Discover what happened to General Barnaky (#15).
Walkthrough
You'll start out in the southwestern corner of the map (#1). You'll find some medical supplies in the Brotherhood crates nearby. You should pick them up because you'll probably need them.
The surface part of the map is dominated by a large mutant military base. That means, without surprise, that you'll encounter a lot of heavily armed mutants in the area, and that you'll have to do a lot of fighting to get inside.
There are five ways to get into the military base: two front gates (#4 and #5), two breaks in the fence (#8), and an underground tunnel (between Exits A and B). It doesn't really matter which route you take, except that we'd discourage you from using the tunnel. You'd have to med up to pass through the radioactive goo in the tunnel, and then when you entered the facility, you'd be right next to the mutants, which is always a bad idea. So we'd recommend that you first circle around the base, killing all of the mutants on the outside, and then pick one of the surface entrances to go through, and kill all of the mutants on the inside. If you've concentrated on creating snipers up to this point, then squad members with
sniper rifles should fare pretty well against super mutants with
Browning M2s (not to mention
M249 SAWs), and so defeating the mutants in the base shouldn't be too complicated, as long as you start your attacks from far away.
Both objectives (#15, #17) can be found in the lower level of the military base. You can enter this level of the base through the staircases in the surface part of the base (Exits C and D). Fighting mutants from room to room can be tricky, since you won't usually have range on your side, but you won't actually find many mutants underground, and those that you will find will usually die pretty easily, such as the mutants in the gas tank room (#14).
Gammorin himself (#17) will be in a room with two other mutants. You can fire through vents in the
wall to lure out the mutants, and then since Gammorin will only have a
tommy gun, you should safely be able to snipe at him from a distance. When Gammorin dies, you'll
earn 12,000 experience points, and the mission will be considered complete.
1 - Starting Point
You'll find a pair of Brotherhood crates here. From them you can grab some medical supplies and explosives.
2 - Guard Shack
Guards will patrol near this shack, so if you position your squad around it, you should be able to pick off the guards at range as they arrive. Inside the shack, you'll find a shelf containing some ammunition.
3 - Ruined Building
You'll encounter three super mutants inside the building -- two wielding
iron pipes, and one with an
M249 SAW. You should be able to snipe at them through the windows of the building. Unfortunately, there doesn't seem to be any way to get to the second floor (the staircase wouldn't work for us), and so you can't really use the building as a sniper post to take out the gate guards to the east (#4).
Inside the building you can rummage through a crate and pick up some ammunition and medical supplies.
4 - Western Gate
The gate guards will carry
Browning M2s.
5 - Southern Gate
The gate guards will carry
Browning M2s.
6 - Airship / Roshambo
You'll meet a crazy old man named Roshambo next to the downed airship. He'll warn you about the minefield to the east (#7). You can also loot a trio of crates next to the airship. Inside each one you'll find four
stimpaks.
7 - Minefield
The minefield will extend from the splattered super mutant on the western side to the splattered Brahmin on the eastern side, and will consist of about 20
T45LE mines.
8 - Break in Fence
9 - Sniper Tower
You'll find two super mutants on the tower, and they'll both be using
M249 SAWs. Unfortunately, they'll also both be looking at the ladder leading up to the tower, and so there doesn't appear to be any way to sneak up on them. So if you want to kill them, the best strategy seems to be to kill them
quickly. If you have two characters with
Browning M2s, then send them up and have them target different mutants. One burst from close range with a
Browning M2 will usually kill a mutant (and most everything else). If you only have lesser guns,
then use the same strategy but also cross your fingers and your toes. You won't find anything
interesting on the tower, but getting rid of the mutants up there will make it easier to move around the map.
10 - Junk Yard
You'll find a couple of super mutants guarding the junkyard. In the back, you can loot a crate for some medical supplies and ammunition.
11 - Minefield
You'll find another 20 land mines here, bounded on the north by a dead civilian and on the south by a dead dog.
12 - Office
You'll find two super mutants with
M249 SAWs in the office. If you put some squad members on the platform to the west, then they should be able to shoot through the doorway and kill at least one of the mutants from range. Also in the office you'll find a bookshelf containing two
field medic F/A kits and 150 rounds of
.50 cal ammunition.
13 - Bookshelf
In this bookshelf you'll find a
field medic F/A kit, three
super stimpaks, and 120 rounds of
.50 cal ammunition.
14 - Gas Tank Room
This room is the mutant equivalent of a crematorium. You'll find nine gas tanks in the room.
Destroying one will cause all nine to blow up, mortally roasting everything in the room (even people
in the doorway will die). You'll also find a couple of super mutants in the room. If you approach
them and try to kill them without setting off the gas tanks, then you'll just get your squad killed
along with the mutants. So just have one character hit a gas tank from outside the room, and that
should take care of the mutants.
15 - Toccomatta
Toccomatta is a super mutant, but he won't attack you when you enter the room. He'll mistake you for Gammorin, and he'll tell you that his prisoner Barnaky was captured by a "monster" that "breathes fire and death." Then he'll fall over dead, and you'll find
impact gloves and
Barnaky's letter on his corpse. You'll also receive 4000 experience points.
In the shelves behind Toccomatta, you can pick up some medical supplies.
16 - Mutants
You'll find four mutants in this room -- three near the bar and one in the little alcove next to the door. We lured a couple of them out by firing at them from outside the room, and then we used our heavy guns expert to sneak in and take out the other two.
17 - Gammorin

|
| How to position your squad to kill the mutants next to Gammorin.
|
You'll find Gammorin and two super mutants in this room. There seems to be a hole in the wall near the
door, perhaps where the vent is, and if you position a squad member there, he or she should be able to
hit the super mutant in the back of the room. When that happens, the second mutant will come charging
through the door and attempt to kill you with a
crowbar. So if you put a sniper in line with the hole, and a heavy weapons squad member next to
the door, you should be able to kill the two mutants without waking up Gammorin yet (see the insert
for how we set up our squad.
If you enter the room, Gammorin will talk to you about the "menace in the west," and then he'll attack. However, you don't have to enter the room. Since Gammorin has a
tommy gun, and since he's a pretty good shot, he might slaughter whoever you send through the doorway.
What we did was creep one character near the door to get it to open, and then have our
sniper shoot at Gammorin from as far away as possible. Gammorin will drop down behind
some crates and then pop up to shoot every few seconds, and our sniper was able to kill
him without taking any damage in return. When Gammorin dies, you'll earn 12,000
experience points.
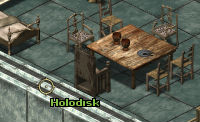
|
| A holodisk can be found next to the table.
|
In a chest in the room you can loot a
briefcase and three
super stimpaks. Along the western wall, near the table, you can also pick up a
holodisk (see insert). You won't be able to do anything with the
briefcase
or the
holodisk or
Barnaky's letter (from #15), but General Dekker will mention all three in his debriefing, and you'll receive 1300 experience points for each.
Exits:
- Stairs. You'll find three super mutants next to the stairs on the surface. Two will have
M249 SAWs, and the other will have a
Browning M2.
- Ladder.
- Stairs.
- Stairs.
- Extraction Point.


