 Did we miss anything on this map? Is there something we didn't discover? Let us know!
1 - Arrival
Did we miss anything on this map? Is there something we didn't discover? Let us know!
1 - Arrival
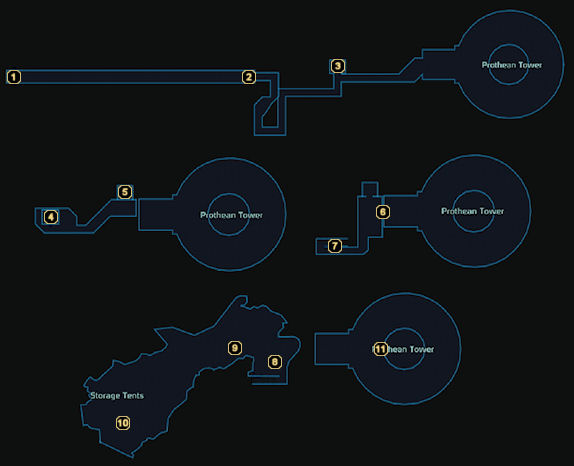
Entering through the reinforced door back in the mining camp on the
Therum: Ruins map, you'll find yourself at the starting end of a long well-lit tunnel descending underground.
2 - Geth Attack
When you reach the end of the tunnel, two Geth Shock Troopers and a Geth Sniper will attack your squad. Prepare accordingly.
3 - Elevator #1, First Floor
Don't worry about the blue energy field blocking the tunnel to the east. Just jump on board the elevator and take it down to area #4.
4 - Elevator #1, Second Floor
Step off the elevator and loot the medical kit to your right before engaging the three Geth Assault Drones to the east.
5 - Elevator #2
Once all three Geth Assault Drones have been dispatched, take this second elevator further down into the mining facility. It will short circuit when you reach the third floor, so there's no turning back.
6 - Dr. Liara T'Soni
Now that you're on the third floor, you'll discover that Dr. Liara T'Soni is actually being held inside the blue energy field. When she realizes that you're here, she tells you that it's some kind of Prothean security device and that she needs your help to get free of its entrapment. Use the Investigate dialogue option to make sure she's not working with her mother, Benezia, then offer to help her out. She'll explain that you must find a way past the barrier curtain as the control to deactivate it is on the other side. Perhaps the key lies on the floor below you?
Once you've activated the mining laser and have taken the elevator back up to the third floor, you can speak to Liara again to learn that the button to her left will deactivate the containment field. Once she's free, the four of you will walk back to the elevator before realizing that the ruins are starting to cave in as a result of the mining laser you used earlier. You'll radio Joker to meet you outside just as the elevator begins climbing to the surface.
You're not safe yet, though. When you reach the top floor, a Krogan Battlemaster, two Geth Shock Troopers, a Geth Rocket Trooper, and a Geth Sniper will enter the Prothean Tower and demand that you hand over Liara. Obviously, that's not an option, so a battle ensues. The only real difficult opponent is the Krogan, so try to focus most of your firepower on him. When all five opponents lie dead, you'll be shown a cutscene of your party escaping the mining facility just as it collapses. Luckily, Joker is waiting to pick you up for
another visit to the Normandy.
7 - Sloping Platform
This sloping metal platform is your only means to reach the mining facility's floor.
8 - Geth Attack
The floor of the mining facility is inhabited by two Geth Shock Troopers and a Geth Sniper positioned back by the tents, so be careful.
9 - Mining Laser Controls
Entering a code of A-X-B-Y into these controls will cause the mining laser to burn a hole through the rock to the east. You can use this new passageway to get past the barrier curtain.
10 - Loot
Ransack the locked storage locker and locked weapon locker in these two tents before moving into the Prothean Tower.
11 - Tower Elevator
Now that the mining laser has etched a passageway beneath the energy field, you can activate the switch here and ride the tower's elevator up to the third floor to free Liara from her imprisonment.


