 Did we miss anything on this map? Is there something we didn't discover? Let us know!
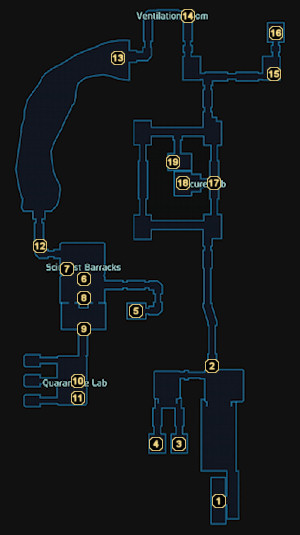
1 - Arrival
Did we miss anything on this map? Is there something we didn't discover? Let us know!
1 - Arrival
The tram from the
Noveria: Peak 15 Mira Core map brings you to the lower level of the Rift Station. You're finally closing in on Matriarch Benezia.
2 - Emergency Exit
You won't be able to pass through this door until you've dealt with Matriarch Benezia at area #17.
3 - To Hot Labs
This elevator leads to the
Noveria: Rift Station Hot Labs map, but it's been locked down by someone named Captain J. Ventralis. You're going to need his pass from the station's main level to use it.
4 - To Main Level
This elevator will take you up to the
Noveria: Rift Station Main Level map.
5 - To Main Level
This elevator leads up to the
Noveria: Rift Station Main Level, though you'll be using it to access the scientist barracks and quarantine labs area on this level for the "Noveria: Quarantine" mission.
6 - Han Olar
Han is a Volus scientist that just happens to be the sole survivor from the hot labs following the Rachni attack. He'll tell you that an egg from the extinct race of aliens was found on a derelict ship and brought here... and now things have gotten out of hand. The two nearby scientists will silence him at this point, though, so you won't be able to learn much else.
When you emerge from the quarantine labs having successfully mixed the cure, Han will also mention that the Geth came from the maintenance area to the northwest.
7 - Storage Locker
Some extra weapons for the battles ahead.
8 - Aid Station
Might as well replenish your stock of Medi-gel while you're here.
9 - Quarantine Labs Entrance
You won't be able to get past this ERCS guard until you've received clearance from Captain Ventralis to look for a toxin cure as part of the "Noveria: Quarantine" mission. Once that's out of the way, you're free to enter the labs - though you'll be locked in until you can prove that you're infection-free.
10 - Xenobiology Database
Sift through this database to unlock the
Thresher Maws codex entry.
11 - Cure Station
Access this computer to begin mixing a cure for the Thorus-B toxin. The mixing process plays out as a short mini-game where you must press X-Y-X-A when each of the four progress bars reaches a point that is in between the two arrows.
When you've successfully mixed the cure, Alestia Iallis (the Asari from the main level) will enter the room with an Asari Commando and two Geth Troopers at her side. She's been secretly working for Matriarch Benezia and has strict orders to take you out, so combat is inevitable. Use what little cover is available to take them down one at a time and you should walk away without taking too much damage.
Before heading back to Dr. Zev Cohen, make sure you search the locked crate in this room and the secure storage locker and medical kit in the rooms to the west.
12 - Maintenance Area Entrance
The door leading into the maintenance area is locked. You'll need a pass from Dr. Zev Cohen on the station's main level to reach the area beyond it.
13 - Rachni Soldier
This cavernous area is home to a single Rachni Soldier.
14 - Secure Storage Locker
Yet another locker awaiting your plundering.
15 - Kits
A technician kit and upgrade kit lie on the floor here. Loot away.
16 - To Main Level
This elevator will bring you up to the "restricted" area of the
Noveria: Rift Station Main Level map. If this is the first time you've entered the "restricted" area, then all ERCS guards (including Captain Ventralis!) will become hostile.
17 - Matriarch Benezia
Benezia stands atop the platform here staring at an encased Rachni "mother" to the west when you arrive. She tells you that they intended to raise a legion of Rachni and force them to hunt and slay Saren's enemies before turning her complete attention to you. Even if Liara is in your squad, Benezia casts aside any chance of surrender and sends a small group of Asari Commandos at you from the south and west. She then retreats to the platform directly to her west where she will launch biotic talents at your squad.
Benezia is totally invincible until you've slain three waves of her forces. The first wave is composed of the Asari Commandos I just mentioned, the second wave hosts more Asari Commandos and a couple of Geth Snipers, and the third and final wave hosts eight Geth Snipers. Survive all three waves and you'll automatically be brought to Benezia's platform for a conversation in her now weakened state.
The Asari Matriarch starts off the conversation by claiming that her "mind is filled with Saren's light." She's long since succumbed to the indoctrination of Saren's flagship, Sovereign, and even now she fights it just to speak with you. In the short time that she has, she tells you that she came here to find the location of the Mu Relay. According to Benezia, the relay leads to the Conduit (though she doesn't know what it is) and the Rachni were the only species in existence that knew of its location. Benezia extracted the location from the Rachni Queen's mind and gave the coordinates to Saren, but is able to resist the indoctrination just long enough to give you an OSD containing them as well.
As soon as you have the coordinates, Benezia's mind falls back under the control of Sovereign and she attacks with the help of three more Asari Commandos. When this final battle concludes, Matriarch Benezia dies and you receive a massive amount of experience, credits, Omni-gel, and Paragon or Renegade points (depending on your dialogue choices).
18 - Rachni Queen
When Matriarch Benezia lies dead, you're free to approach the Rachni Queen inside the holding tank. As you peer inside, one of the Asari Commandos lifts from the floor and shambles up behind you. You'll soon discover that the Rachni Queen has taken control of the lifeless corpse and is now "singing" through it so that the two of you can have a conversation.
The Queen tells you that the Rachni children were stolen from her and driven to madness, which is why they attacked the facility without provocation. There is no salvation for them, so the Queen accepts the fact that you must kill all that remain. However, she has one request - spare her so that the Rachni race does not fall back into extinction.
This is a major decision that falls on your shoulders alone. The Rachni Queen promises to teach her children harmony and to live peacefully in the galaxy, but can you really trust her? The container she's in is rigged to a bed of acid tanks, so restoring or destroying the entire race comes down to this one pivotal decision. If you choose to let her live, you'll receive experience, credits, and twenty-four Paragon points. If you choose to kill her, you'll receive the same reward but twenty-four Renegade points instead. The choice is yours.
Whatever you decide, make sure you loot the secure crate along the south railing before moving on.
19 - Secure Crates
Two more secure crates can be searched on this platform.


