 Did we miss anything on this map? Is there something we didn't discover? Let us know!
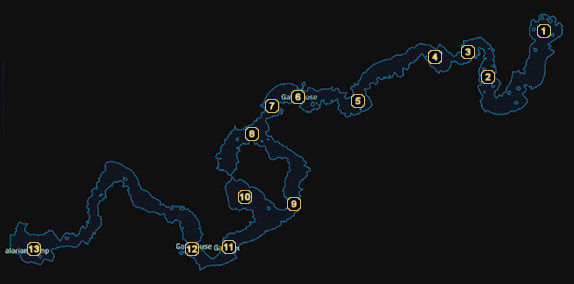
1 - Arrival
Did we miss anything on this map? Is there something we didn't discover? Let us know!
1 - Arrival
You'll pick up a signal from the Salarian infiltration team here during your approach, but you don't get a chance to track them down just yet. As it turns out, there are AA defense towers set up, so Joker has to fly in low and drop you off under their radar. Your first order of business is to take out the guns at the AA tower so that the Normandy can rendezvous with you at the Salarian camp. Hop in the Mako and get moving.
2 - Geth Resistance
A Geth Rocket Drone and two Geth Assault Drones give you a warm welcome to planet Virmire.
3 - Geth Resistance
Rounding this corner, you'll encounter two more Geth Rocket Drones and two Geth Rocket Troopers.
4 - Geth Resistance
You'll have to deal with a Geth Juggernaut flanked by a couple of Geth Rocket Drones in this vicinity.
5 - Geth Resistance
A Geth Rocket Drone, two Geth Assault Drones, and four Geth Rocket Troopers will attempt to slow your progress.
6 - Gatehouse #1
This first gatehouse is heavily defended by Geth Troopers, Geth Rocket Drones, and Geth Rocket Troopers. When the main ground forces have been taken out, jump out of the Mako and use the stairs on your left to reach the gatehouse's main level. You'll be facing more opposition here, including a Geth Troopers, a Geth Sniper, two Geth Stalkers, and a Geth Ghost. Once they're all dead, search the weapon locker and hardened weapon locker then return to the Mako.
7 - Geth Colossus
Just beyond the gatehouse, you'll have to face off against a Geth Colossus. Might want to save your game first.
8 - Geth Resistance
Five Geth Armatures are spread across both the left and right paths here. If you don't want to deal with all of them, choose a route and stick to it.
9 - Geth Colossus
Another Geth Colossus for you to deal with. You don't technically have to deal with this one unless you took the right path.
10 - Geth Colossus
Yet another Geth Colossus for you to deal with. You don't technically have to deal with this one unless you took the left path.
11 - Gatehouse #2
See the AA gun on top of this gatehouse? That's your target. Blast the Geth Sniper, Geth Rocket Trooper, and Geth Shock Trooper near the water with the Mako, then head up to the gatehouse's main floor on foot. Here, you'll be facing two Geth Destroyers, a Geth Sniper, a Geth Shock Trooper, and a Geth Rocket Trooper.
When all the opposition has been eliminated, there's a crate and a secure weapon locker to plunder before turning your attention to the gate controls and AA gun power controls. You must shut down the AA gun before you can override the gate, as the generator cannot be active. When the AA gun is offline, Joker comes over your comm to let you know that he's landing the Normandy in the Salarian base. Open the gate and hop back into the Mako.
12 - Gatehouse #3
One last gatehouse to deal with. Use the Mako's cannon on the Geth Rocket Troopers and Geth Trooper standing in the basin, then head upstairs to deal with the two Geth Shock Troopers and two Geth Destroyers awaiting you there. Once the battle is over, ransack the crate and hardened weapon locker, then use the gate controls to open the way for the Mako.
13 - Salarian Camp
Just before you reach the camp, Joker will notify you that the Normandy has been grounded by the Salarian captain. When you arrive, you'll join Ashley and Kaidan in a conversation with Captain Kirrahe (after receiving some experience and credits for getting here, of course). Apparently every AA gun in a ten-mile radius has been alerted to your presence, so getting off of Virmire isn't going to be easy.
Kirrahe isn't too excited to hear that you're the reinforcements he requested from the Council, but he begins briefing you on the situation anyway. Saren has set up a research facility here on Virmire to breed Krogan - which means that he's discovered a cure for the genophage. Because he'd be virtually unstoppable with an army of Krogan at his disposal, it's determined that the facility and its secrets must be destroyed. Wrex obviously isn't very happy to hear this, so you'll have to do your best to convince him this is the right choice. This new dilemma becomes the "Virmire: Wrex and the Genophage" assignment.
When Captain Kirrahe leaves to consider the Salarians' plan of attack, you're free to explore the camp. Your first priority should be to deal with Wrex, so head along the beach and strike up a conversation with him. He's mad as hell that you're even considering the possibility of destroying the only known cure for the genophage, even going so far as to unholster his weapon to demonstrate that he's willing to kill if you're determined to pursue this course of action.
You have a few choices here. The obvious choice is to make a successful Charm ("These aren't your people!") or Intimidate ("Don't be so naive.") check to get through to Wrex (though this isn't required if you previously completed the "Wrex: Family Armor" assignment). If, instead, you think that Wrex is more trouble than he's worth, then you can signal Ashley to kill him from behind (with a firm "hmph") or you can slay your previously loyal follower yourself. Whichever route you take, you'll earn a massive number of Paragon or Renegade points. You'll also pick up the Charismatic achievement if Wrex lives to see another mission.
Following your conversation with Wrex, head into the nearby building and decrypt the communications relay to unlock the
Salarians: Culture codex entry. Next, move to the building on the south side of the beach to decrypt a medical station and to chat with Commander Rentola. Rentola carries a few supplies you may be interested in, including the
Armali Council License, the
Elanus Risk Control License, and a couple of grenade/medigel upgrades.
When you've done everything you need to here in the camp, chat with Captain Kirrahe again to go over his assault plans. Basically, your "shadow" team (squad) must bring a nuclear bomb into the facility and place it in a particular location to ensure that the whole thing gets wiped off the map. Kirrahe will be leading three teams to the front of the facility to make sure you're able to sneak in and get the job done. As it turns out, he wants one of your squadmates to accompany him and help coordinate the teams. Pick either Kaidan or Ashley, it really doesn't matter. You should then proceed to investigate all four topics (Salarian exit plan, other teams, recap the mission, and the nuke) to make sure you understand the mission and to unlock the
Salarians: Government and
Salarians: Military Doctrine codex entries.
That about wraps it up. When Kirrahe finishes giving his inspiring speech to the other teams, you're ready to move on to the
Virmire: Base Approach map.


