 Did we miss anything on this map? Is there something we didn't discover? Let us know!
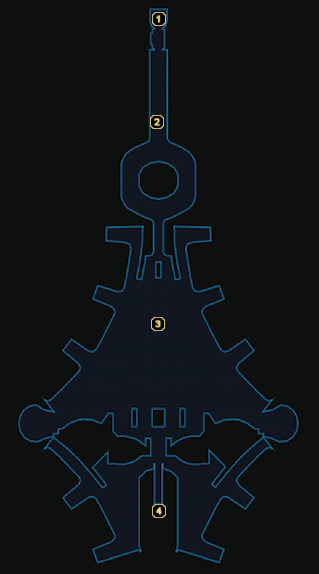
1 - Arrival
Did we miss anything on this map? Is there something we didn't discover? Let us know!
1 - Arrival
You've scaled the side of Citadel Tower, braving the elements to reach the Council chambers. Continue moving south for the final confrontation with Saren!
2 - Medical Kit
Grab the contents of this medical kit, as you'll want to be well-stocked with Medi-gel for the battle ahead.
3 - Geth Resistance
Two Geth Shock Troopers and six Geth Troopers are all that stand between you and Saren.
4 - Saren Arterius
Charging up to the Council chambers, you'll find that Saren is still busy transferring control of the Citadel to Sovereign. He'll leap off the edge when he sees you coming and then rise up on his personal hover vehicle, tossing a grenade at your squad to get things started.
As you dive behind cover, you'll enter a conversation with Saren. The former Spectre is only a few minutes away from giving Sovereign full control of the Citadel, which will lead to the extinction of every organic in known space. Saren claims that Sovereign has "upgraded" him, enhancing his combat abilities and casting away all doubt you might have instilled him after your encounter on Virmire. Or so he thinks.
At this point, you'll have the option to start issuing Charm or Intimidate responses to Saren. You must choose three such options to break his resolve, the difficulty of which depends on whether or not you successfully persuaded him back on Virmire. If you're able to make him see the error of his ways, Saren will actually turn his pistol on himself and take his own life. Should you be unable to persuade him, then you'll have to battle Saren the old fashioned way.
In either case, Saren's lifeless body crashes through the glass to the level below. Approach the control panel and upload the data Vigil gave you to take control of the Citadel for yourself. You'll begin receiving a distress message from the Destiny Ascension, the ship currently housing the three Council members. Joker will also reach out to let you know that the Arcturus fleet is ready to move in after Sovereign or they can make a rescue attempt on the Destiny Ascension. You alone control the Citadel's arms, so the fate of the Council is in your hands. Saving them is worth a large amount of Paragon points while leaving them to perish is worth a large amount Renegade points. Each decision is followed by a slightly different cutscene. With the Destiny Ascension saved or destroyed, the armada moves in after Sovereign under Admiral Hackett's orders.
Meanwhile, you'll send your two other squad members down to make sure Saren is dead. Even with another pistol shot to the head, the synthetic implants installed by Sovereign come to life and Saren's body transforms into a cybernetic creature with devastating firepower and evasion traits similar to a Geth Hopper. This new version of Saren is much more powerful - just getting in enough decent shots to get past its shields is difficult. When you bring its health down to about 60%, the game will break away to another cutscene showing the ongoing battle between the Alliance fleet and Sovereign. At the conclusion of the cutscene, Saren's shields will be completely replenished. Just keep hammering the creature while sidestepping its nasty energy attacks and it will eventually fall.
Following Saren's second death, the battle between the Alliance fleet and Sovereign will continue. Thanks to a well-placed shot by Joker, Sovereign is torn apart and one of its claws comes crashing through the Citadel Tower and into the Council chambers. When Captain Anderson and his men come in to help your squad, it appears that Shepard may have been killed by the flying debris. As they turn to leave, though, the Commander rushes out smiling - the Reaper invasion has been stopped.
There are two possible outcomes for the game's conclusion - the Council has perished or they are alive and grateful to those men and women who died to save them. Either way, humanity is granted a seat on the Council and Shepard's recommendation for who fills that seat will obviously carry a lot of weight. Should it be Ambassador Udina or Captain Anderson? Personally, I think the choice is clear (a backstabbing politician or the man who risked his life to get you to Ilos?). If you're undecided, you can always leave the choice up to "the politicians".
And so the galaxy is spared... for now. Sovereign has been destroyed, but hundreds if not thousands of Reapers still exist. Sooner or later, they will find a way to emerge from dark space and continue their cycle of devastation. But that, my friends, is a fight to be waged at another time. See you in Mass Effect 2!


