 Did we miss anything on this map? Is there something we didn't discover? Let us know!
1 - Arrival
Did we miss anything on this map? Is there something we didn't discover? Let us know!
1 - Arrival
After passing through the door at the west end of the
Citadel: Upper Wards alleyway, you'll emerge in the Lower Wards at this location.
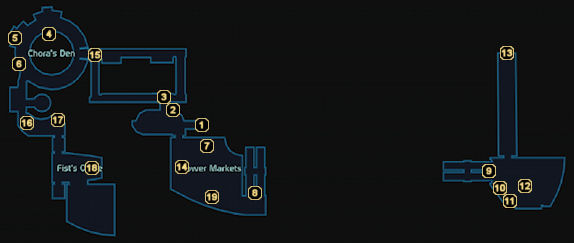
2 - Citadel Rapid Transit (Chora's Den)
Public transportation is important to the galactic community, so the fine people of Citadel Station have installed these nifty vehicles to quickly transport you to any of the station's major locations. You'll have to discover each one on foot first (or obtain a quest directly related to the location), though, otherwise the transit vehicle won't allow you to choose it as a destination.
This particular destination will be labeled as "Wards Locations - Chora's Den" if you need to travel here from one of the other transit vehicles.
3 - Ambush
As soon as you step foot in the hallway leading up to Chora's Den, two of Saren's assassins will begin firing on your squad. They shouldn't be too difficult for you, but at the very least it demonstrates that you're in a seedier area of the Citadel.
4 - Jenna
Jenna is actually a C-Sec informant, though you won't know that until you've acquired the "Citadel: Rita's Sister" assignment from Rita in the Citadel's Flux nightclub. Once you have that information, you can warn her about how dangerous her job is and she'll get pretty defensive about it. You won't be able to make any real progress, but when you turn to leave the club, a visibly drunk Turian named Chellick will bump into you and whisper "If you got questions about Jenna, meet me at C-Sec Academy." Hmm. Maybe you should do as he says and head over to the
Citadel: Security map.
5 - General Septimus
If you have the "Citadel: Asari Consort" assignment, then Septimus is the one you'll want to speak to on Sha'ira's behalf. He'll admit that he's been spreading lies about the Consort, but that he's only doing it because she rejected him. With a sufficient amount of Charm or Intimidate, you can either tell him to "straighten up" or "get a grip" and he'll begin to realize the error of his ways.
Once he realizes how stupid he's been acting, he'll ask you to speak to Xeltan the elcor diplomat in the embassies section of the
Citadel: Presidium map. Apparently the diplomat thinks that Sha'ira gave up his secrets (because the General told him so...), but Septimus gives you a datapad that will exonerate her. This triggers the "Citadel: Xeltan's Complaint" assignment.
6 - Harkin
Speak with Harkin about Garrus (after being subjected to a little sexual harassment if you're a woman) and he'll immediately recognize that you're working with Captain Anderson. Before revealing Garrus' whereabouts, he tells you that the captain used to be a Spectre. The induction was really "hush-hush" and, according to Harkin, it didn't last long. Anderson was kicked out for "screwing up a mission", a blemish he now blames on Saren.
Once you've heard enough, inquire about Garrus again to learn that he was headed up to Dr. Michel's medical office on the
Citadel: Upper Wards map. Utilize the investigation dialogue to learn more about Captain Anderson, Citadel Security, and Garrus if you'd like, then continue on.
7 - Morlan
This salarian merchant sounds mysteriously like Steve Buscemi, though he's not listed in the game's credits so apparently I'm mistaken. In any event, Morlan carries a selection of standard items and non-human armors that you'll want to browse through from time to time. Even if you don't wany anything else, I'd highly recommend picking up any Medigel/Grenade Upgrades, as well as the
Elanus Risk Control License and the
Geth Armory License as soon as they become available.
If you received the "Citadel: Doctor Michel" assignment from Chloe, then you'll also want to ask Morlan about his role in the blackmailing scheme. When you do, the Krogan "Blackmailer" shows up and mentions someone named Banes before demanding the doctor's supplies from you. If you have a sufficient amount of Charm, you can offer him the "You should reconsider" line. Enough Intimidate and you can feed him the "Talk and you're dead!" line. Either of these convinces the Krogan to leave Dr. Michel alone and gains you some Paragon or Renegade points. If you don't have enough Charm or Intimidate, then you'll wind up having to fight the Krogan. This is an acceptable result as well, though you won't gain any Paragon or Renegade points using this method.
Regardless of how you handled the situation, head back up to the clinic to report your success to Chloe and to inquire about this Banes character.
8 - Exit to Upper Wards
These stairs lead back up to the
Citadel: Upper Wards map.
9 - Exit to Upper Wards
These stairs also lead back up to the
Citadel: Upper Wards map.
10 - Public Extranet Terminal
Pay a visit to this terminal to unlock the
Starships: Dreadnought and
Communications: Administration codex entries.
11 - Keeper #17
This is yet another of the 21 different Keepers that are part of Chorban or Jahleed's "Citadel: Scan the Keepers" assignment. Scan it to earn some extra experience points and credits.
12 - Officer Eddie Lang
Lang seems to be a nice enough guy and will answer questions pertaining to C-Sec, the Citadel, Spectres, and Harkin. There's nothing groundbreaking to learn here, but might be worth a stop nonetheless.
13 - Exit to C-Sec Academy
Hop on board this elevator to ascend up to the
Citadel: Security map.
14 - Chorban
If you're investigating the "Citadel: Jahleed's Fears" assignment, then you'll run into Chorban and some other armed Salarians here in the lower markets area. Demand the truth out of the scientist and he'll admit that he and Jahleed "got a little over their heads." He continues to tell you that the two of them stole some experimental plans to develop a tool capable of scanning the Keepers. Nobody has ever been able to get any readings on them for centuries, so the data they're capturing is the first of its kind. Apparently Jahleed has been keeping the data for himself, which is why Chorban has been following him. It's time to make a return visit to the Volus.
I should also point out that if you did not get the "Citadel: Scan the Keepers" assignment prior to helping Jahleed, then Chorban's men attack you instead. When they've been cleaned up, you can listen to what Chorban has to sa and accept the assignment via this alternate route. From there on, it plays out the same.
15 - Battle Preparations
Following the addition of Garrus or Wrex to your squad, you'll wind up paying a visit to Chora's Den to confront Fist about his alliance with Saren and the Quarian that he's been trying to silence. You'll discover that the thug leader was expecting you, though, as the entire bar will light up with enemy markers on your radar. There are several standard thugs for you to deal with, along with a Krogan Bouncer that will definitely be the bar's most difficult adversary. Just keep moving toward Fist's office while taking down each opponent one at a time.
16 - Warehouse Workers
After clearing out the bar of all opposition, you'll run into two warehouse workers in this last stretch of hallway before confronting Fist. If you have a sufficient amount of Charm or Intimidate, you can choose the appropriate dialogue choice and avoid a fight. This will earn you a couple of Paragon or Renegade points.
17 - Weapon Locker
Override the encryption on this locker to loot yourself a couple of random weapons and a grenade.
18 - Fist
You finally have the thug leader cornered. He'll immediately open fire on your squad while two defensive turrets pop up on either side of him. Take cover to avoid getting ventilated immediately and then slowly work Fist's health down as he sprints around the office.
After dealing enough damage to the thug leader or destroying his turrets, Fist surrenders and starts talking. He explains that he told the Quarian that he'd set up a meeting with the Shadow Broker himself, but instead arranged for Saren's men to meet her in the back alley of the upper wards. If you hurry, you can save her from an untimely demise.
At this point, Wrex will end Fist's life if you currently have him in your squad. If you follow up the execution with the "he deserved it" line, you'll earn Renegade points. If Wrex isn't in your squad, you can choose to let Fist go or take his life yourself. The latter approach will earn you a similar amount of Renegade points. Unfortunately, no Paragon points can be gained regardless of what choices you make.
When the dialogue session concludes, you'll have four minutes to make it to the alleyway on the
Citadel: Upper Wards map (area #17). Snatch the Optical Storage Disc lying at your feet for Emily Wong's "Citadel: Reporter's Request" assignment and decrypt the nearby wall safe for a couple of upgrades and some credits, then prepare to deal with even more thuggish resistance as you move back through Chora's Den.
19 - Jax
If you're participating in the "Citadel: Rita's Sister and Chellick" assignment, then you will have been sent down to the lower markets area to meet with an illegal arms seller named Jax. The Krogan and his lackeys will show you the goods, then demand payment. If you choose any other options other than "Sure", you'll be forced to kill them all and Chellick will be very angry when you return. This will net you Renegade points, though.
To complete the assignment for Paragon points, you just need to pay the Krogan, get the mods, and return to Chellick's office on the
Citadel: Security map.


