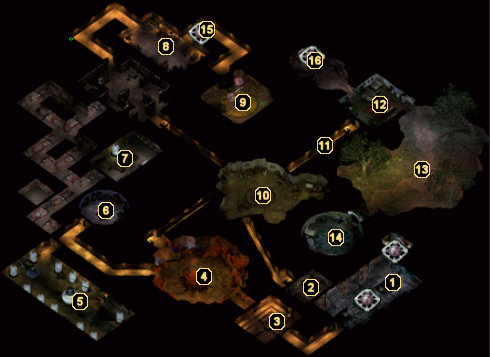
 Did we miss anything on this map? Is there something we didn't discover? Let us know!
1 - The Beginning
This room holds your cell, where you begin the game. Located in two nearby cells are your old friends Jaheira and Minsc. You will need a key from area #2 to free Jaheira.
2 - Jaheira's Cell Key
A table of mundane weapons and armor can be found in this room, along with the key to Jaheira's cell in area #1. A
Dagger +1 and three
Potions of Healing can be found in a locked (and trapped) compartment behind one of the pictures on the wall.
3 - Lightning Switch
The large contraption in the center of this room will continually fire bolts of lightning around the room, which in turn spawn Lightning Mephits when they strike the wall. To shut down the contraption, activate the switch along the eastern wall. This will allow you to navigate through the room without having to battle Mephits and will also earn you 2000 experience points.
4 - Aataqah
A djinn named Aataqah will confront the protagonist in this crystallized room. He will pose a hypothetical question to you that goes something like this, "You and a sibling are locked in separate cells, each of which contains the button. Push your button and you die, but your sibling goes free. If your sibling pushes their button, they die but you go free. If neither or both of you push the buttons, you both die."
If you choose to push the button, Aataqah will summon an Ogre Mage to attack your party. Destroy the Ogre Mage to earn 650 experience points, as well as 3500 bonus experience for choosing the noble path. If you choose not to push the button, Aataqah will summon a handful of Gibberlings to attack your party. You'll gain some experience from these creatures, but you won't get the 3500 experience bonus mentioned above. You can also choose to ignore Aataqah altogether, if you'd like to avoid combat.
Regardless of how you answered the question, Aataqah will recommend that you seek out Rielev elsewhere in the prison.
5 - Creatures
You will need the energy cells from Rielev in area #5 to talk to some of the creatures in this room. Scour the room to find a
Quarterstaff +1 lying within a crate.
6 - Sewage Golem
The Sewage Golem is here, but he is inactive. You need the activation stone from area #4 in order to activate the golem and get him to open the doors to area #8. If you're stealthy, you can also pickpocket the golem for the "Sewage Golem Key" and unlock the doors yourself. Before heading out, though, ransack the room to find a
Long Sword +1.
7 - Rielev
This room has another experiment tube for a creature named Rielev. When you speak to the creature, it will tell you that it no longer wishes to have its life "suspended" by the tube. He'll then ask you to relieve him of his non-death by removing the crystals that power the chamber.
After you've given Rielev what we wants, take the crystals to the imprisoned creatures at area #3 to learn more about escaping Irenicus' depths. You'll also want to search the barrel and table to find the activation stone (which is needed to activate the golem in area #4) and a couple of
Potions of Extra Healing.
8 - Ilyich the Duergar
A Duergar named Ilyich and a few of his thugs await your party in this area. After dispatching the lot of them, you'll find Ilyich's
Mail of the Dead +2 and some acorns, which are needed for the dryads in area #11.
Before leaving the room, search the tables and nearby containers to find a whole slew of nonmagical weapons, armor, and ammunition. You'll also find several
Potions of Extra Healing among the loot.
9 - Cambion
If you click on the device in the middle of this room a couple of times, it releases a Cambion in the east corner of the room. Once killed, the Cambion can be looted for a
Bastard Sword +1.
10 - Otyugh
This sewage room is hom to an Otyugh, which attacks on sight. Once it's dead, grab the Wand of Frost Key off its corpse, then search the room to uncover a
Helm of Infravision, an
Oil of Speed, a few
Potions of Healing, some Splint Mail, and a couple of minor scrolls.
11 - Goblin Battle
One of the goblins in this hallway drops
Arrows of Biting.
12 - Bedroom
This bedroom houses a couple of scrolls, a
Helmet of Balduran, a
Metaspell Influence Amulet, the Wand of Lightning Key, and an Air Elemental statue. The statue is used at area #15.
13 - Dryads
There are some Dryads here that request that you kill Ilyich (in area #6) and take some acorns from him. These acorns are to be brought to the Fairy Queen to free the Dryads. If you choose to help the Dryads and obtain the acorns, you'll be granted 9500 experience points.
14 - Mistress' Bedroom
Upon entering the mistress' bedroom, an alarm will sound that gets you attacked by a golem. You can find a
Potion of Master Thievery in one of the containers here, along with some
Bracers of Defense AC 8, the Portal Key, and a pommel jewel used for constructing
The Equalizer long sword at
Cromwell's Forge.
When you leave the bedroom, your party will be attacked by a Lesser Clay Golem for "violating the sanctity" of the bedroom. Destroy the Golem to earn 2000 experience points.
15 - Air Plane Portal
Using the Air Elemental statue from area #12, you can open a door to
Irenicus Prison 3.
16 - Exit
This portal leads to
Irenicus Prison 2.