 Did we miss anything in this location? Is there something we didn't discover?
Let us know!
Enemies
Notable Loot
Special Quest
Annotations
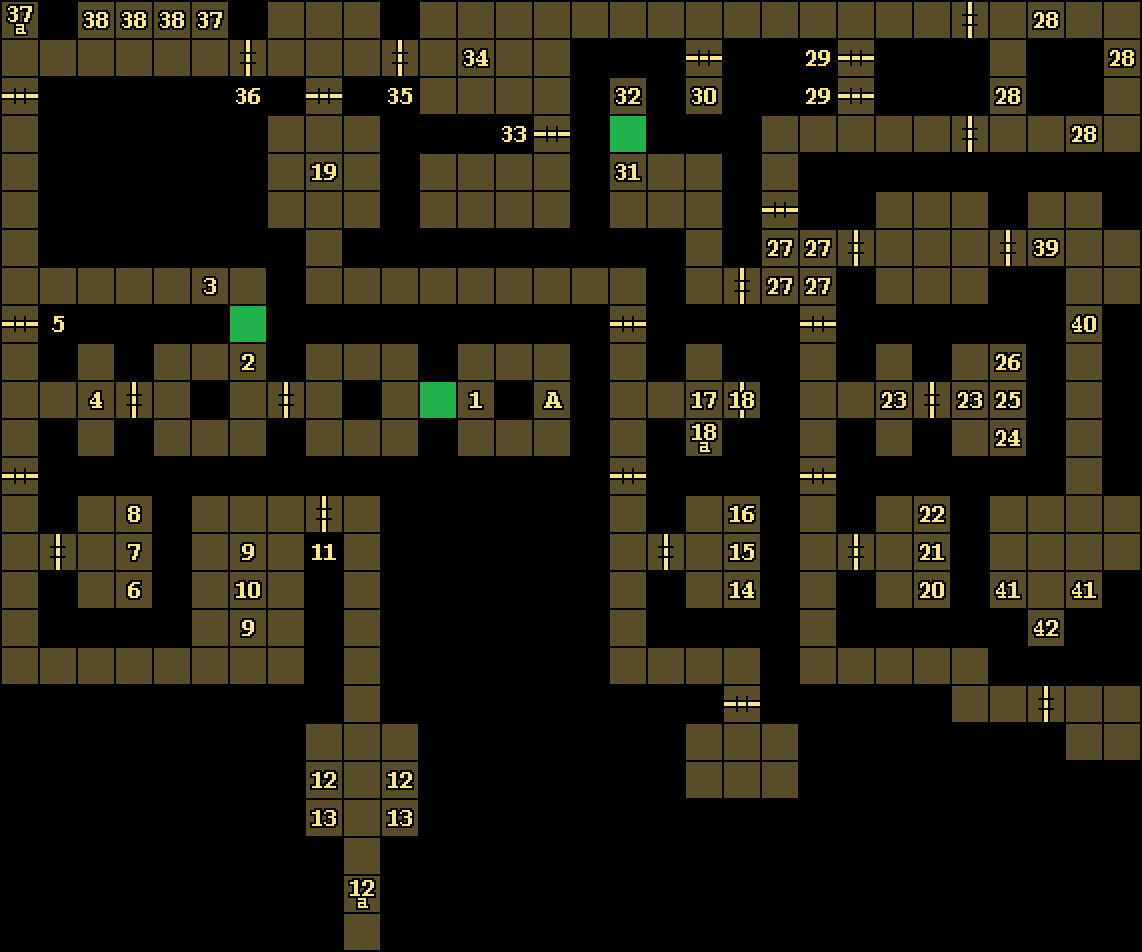
1 - Lamp
Did we miss anything in this location? Is there something we didn't discover?
Let us know!
Enemies
Notable Loot
Special Quest
Annotations
1 - Lamp
If you click on the lamp on the western wall here, then the moveable wall behind it will disappear.
2 - Hidden Button
If you press the hidden button on the eastern wall here, then the moveable wall to the north will disappear.
3 - Pressure Plate
When you step onto the pressure plate here, if the nearby moveable wall is still in place, then a fireball will shoot at you from the east.
4 - Pressure Plate / Skull Key
Stepping onto the pressure plate here will close the door to the east. You'll also get attacked by four golems around here. One of them will drop a Skull Key when it dies.
5 - Door
This door can only be opened from the northern side.
6 - Button
If you press the button here, then you'll get teleported far to the east (#20).
7 - Button
If you press the button here, then you'll get teleported to the east (#15).
8 - Button
If you press the button here, then you'll get teleported into the wall to the east, where you'll only be allowed to go forwards into the next room or backwards into the square where you started.
9 - Cursed Pedestals
These two pedestals are cursed. You'll find a Potion of Extra Healing and a Ring of Adornment on the northern one, and a (worthless) Necklace and a second Potion of Extra Healing on the southern one. But if you try to take any of these items, then a small item will be stolen from one of your characters -- or from a spot on the ground nearby -- and placed on the pedestal in its stead, which means you'll probably lose more than you gain. The only way to loot the items without losing anything is to drop all of your small items (pretty much everything except for weapons, shields and body armor) onto the ground before approaching the pedestals. So unless you really need the Potions of Extra Healing, we'd recommend skipping the pedestals altogether.
10 - Pedestal / Skull Key
This pedestal isn't cursed. On it, you'll find a Skull Key.
11 - Locked Door
You'll need a Skull Key (#4, #10) to open this door. If you move away from the door on its western side, then it will close and lock again.
12 - Eye Pedestals
If the eyes hovering over the two pedestals here (#12) spot you when you step between them, then they'll release the three golems in the hallway to the south (#12a). Otherwise, the golems will remain locked in the hallway (where they'll still be able to hit you if you move adjacent to them). So if you want to avoid fighting the golems, then you should have a mage cast Invisibility 10' when you enter the room. Or you can just fight the golems for some extra xp.
13 - Shelves
Inside these two shelves, you'll find two Potions of Invisibility and two Potions of Vitality.
14 - Button
If you press the button here, then you'll get teleported to the east (#20).
15 - Button
If you press the button here, then you'll get teleported into the wall to the east, where you'll only be able to move forwards into a hallway or backwards into the square where you started.
16 - Button
If you press the button here, then you'll get teleported to the west (#8).
17 - Pressure Plate
Stepping onto the pressure plate here will close the door to the east (#18).
18 - Door / Button / Shelf
Pressing the button here (#18) will create a shelf to the southwest (#18a), where you'll find a Wand of Fireballs.
19 - Room of the Spheres
Inside this room, you'll find three pedestals. Two of them will be empty, and the middle one will have an eye hovering over it. If you place an Orb of Power (#24, #34) onto the two empty pedestals, then the eye will disappear. If you then place an Orb of Power onto the eye's pedestal, then all three pedestals (and the Orbs of Power) will disappear, granting you access to the room to the north.
20 - Button
If you press the button here, then you'll get teleported into the wall to the east, where you'll only be able to move backwards into the square where you started (if you try to move forwards, then you'll be blocked by an eye pedestal, #41).
21 - Button
If you press the button here, then you'll get teleported to the west (#15).
22 - Button
If you press the button here, then you'll get teleported far to the west (#8).
23 - Pressure Plates
These two pressure plates will close the door between them.
24 - Button / Orb of Power
If you press the button in the eastern wall here, then a shelf will appear in the southern wall. You'll find an Orb of Power inside the shelf.
25 - Button
If you press the button here, then two fireballs will shoot out of the walls on the western side of the room -- and then turn to hit this spot. So don't press the button.
26 - Button
If you press the button in the eastern wall here, then a shelf will appear in the northern wall. You'll find a Potion of Speed inside the shelf.
27 - Pressure Plates
The four pressure plates in this room will close the four doors to the room.
28 - Rotating Shelves
These shelves will rotate each time you loot them. If you loot them all, then you'll find four Iron Rations.
29 - Locked Doors
You'll need Skull Keys (#4, #10) to unlock these doors. In between them, you'll find a Wand of Magic Missile.
30 - Golem
You'll encounter a golem in this room. To open the door to the room, you'll just need to press the button on the wall next to it.
31 - Hidden Button
Pressing the hidden button on the western wall here will remove the moveable wall to the north.
32 - Potions
You'll find two Potions of Invisibility on the ground here.
33 - Door
This door can only be opened by pressing the hidden button on the wall to the west of it.
34 - Pedestal / Orbs of Power
You'll find three Orbs of Power on top of this pedestal.
35 - Door
This door can only be opened from the western side.
36 - Door
This door can only be opened from the eastern side.
37 - Golem Generator
If you place a Rock (of any kind), a Potion of Giant Strength, and an Orb of Power (#24, #34) onto the three pedestals to the west (#38), and press the button here (#37), then you'll create a hostile golem to the west (#37a). The only reason to do this is to earn some extra xp.
38 - Pedestals
From left to right, these pedestals are labeled "Stone for Substance," "Potion for Strength," and "Sphere for Animation."
39 - Xanathar
Without any sort of fanfare, this is where you'll finally run into Xanathar, the final boss for the game. Xanathar won't think much of you, and he'll give you a chance to surrender. Don't do it. If you surrender, then you'll drop all of your gear, and Xanathar will attack you anyway.
When the fight starts up, don't try to attack Xanathar normally, as this strategy is doomed to failure. Xanathar will spam you with Cause Serious Wounds, Death and Fireball, and it won't take him long to decimate your entire party.
Instead, you'll need to hit Xanathar repeatedly with the Wand of Silvias (which you should have gotten from the dwarves on
Level 5 after handing them the Dwarven Healing Potion from
Level 11). Each time you hit Xanathar with the wand, you'll disrupt him, and he'll back away from you. So you'll have to keep shoving him around until you can force him into the spike trap at the southern end of his chamber (#42). Only mages can wield the Wand of Silvias, so give it to your healthiest candidate (if you have options), just in case the battle goes sideways.
While you're pushing Xanathar around, you can get hit by a fireball trap (#40), which will shoot at you from the north. This trap will only trigger if it can see you, so if you cast Invisibility 10' before the battle starts, then you'll avoid it (since using the Wand of Silvias won't break invisibility). But note: If any characters in your party are dead, then you'll be visible, and you'll get hit by the trap.
Even using the Wand of Silvias as quickly as possible, pushing Xanathar into the spike trap can be difficult, and it might take you a few tries to get it right. But when you're eventually successful, your party will get teleported out of the dungeon, and you'll be named Heroes of Waterdeep. Congratulations for completing Eye of the Beholder!
Note: The game won't autosave when you win, so when importing characters into Eye of the Beholder 2, you'll have to use your final save before facing Xanathar. In other words, it won't really make any difference if some of your characters get killed during the final battle, so long as you succeed in the end.
40 - Fireball Trap
This trap will only trigger if it can see you. The fireball will fly at you from the north.
41- Eye Pedestals
42 - Spike Trap
This trap will only trigger if it can see you. You'll need to guide Xanathar (#39) here to win the game. On the southern wall here, you'll also find a shelf containing all of the items for activating the stone doors. Of course, at this point in the game, there's almost no reason why you'd want to pick them up.
Exits
- Stone door to
Level 11. This door requires the Stone Orb.