 Did we miss anything in this location? Is there something we didn't discover?
Let us know!
Note
Enemies
Notable Loot
Special Quest
Annotations
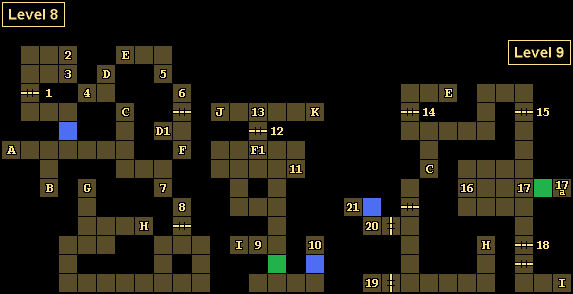
1 - Locked Door
Did we miss anything in this location? Is there something we didn't discover?
Let us know!
Note
Enemies
Notable Loot
Special Quest
Annotations
1 - Locked Door
You'll need a Ruby Key (#13) to open this door.
2 - Ruby Key
You'll find a Ruby Key on the ground here.
3 - Loot
You'll find a Drow Bow and a Mage Scroll of Vampiric Touch on the ground here. The Drow Bow is exactly the same as the regular Bow.
4 - Pit Destination
If you jump into the pit near the Shelf of Sacrifice on
Level 7, then this is where you'll land.
5 - Drow Key
You'll find a Drow Key on the ground here.
6 - Loot
You'll find a Cleric Scroll of Raise Dead and a Potion of Extra Healing on the ground here.
7 - Drow Key / Red Gem
You'll find a Drow Key and a Red Gem on the ground here. You'll need Red Gems on Level 9 (#12, #16).
8 - Jeweled Key / Mage Scroll
You'll find a Jeweled Key and a Mage Scroll of Shield on the ground here.
9 - Secret Button
If you press the secret button on the southern wall here, then you'll delete the nearby moveable wall.
10 - Drow Key
You'll find a Drow Key on the ground here.
11 - Shelf / Key Transformer
If you place any key in the shelf here and press the button on the wall next to the shelf, then you'll receive a Red Gem in return.
12 - Locked Door
You'll need to place a Red Gem (#7, #11) into the compartment next to the door here to open it.
13 - Ruby Key
You'll find a Ruby Key on the ground here. You'll need a Ruby Key to the west (#1).
14 - Locked Door
You'll need a Jeweled Key (#8, #16) to open this door.
15 - Locked Door
You'll need a Drow Key (#5, #7, #10) to open this door.
16 - Shelf / Gem Transformer
If you put a Red Gem or a Blue Gem into the shelf here and press the button on the wall next to the shelf, then you'll receive a Jeweled Key in return. You can do this as many times as you'd like. You should have four Blue Gems left over from the Cat Eyes Special Quest on
Level 3.
17 - Runes / Orbs of Power
When you click on the runes here (#17), you'll see the words: "It is written, the key lies on the other side." To reach the other side, you'll need to throw something at the runes (by aiming over them). The item will fly through the wall and hit a button. This will complete the Special Quest for Level 9 and cause the wall with the runes to disappear. In the room beyond (#17a), you'll find three Orbs of Power. You can use the orbs with the Oracle of Knowledge or
Level 5, or with the Oracle of Devouring on
Level 9 (Main).
18 - Locked Door
You'll need a Jeweled Key (#8, #16) to open the door here.
19 - Spear
You'll find a Spear on the ground here.
20 - Mage Scroll
You'll find a Mage Scroll of Armor on the ground here.
21 - Cleric Scroll
You'll find a Cleric Scroll of Flame Blade on the ground here.
Exits
- Stairs up to
Level 7.
- Stairs up to
Level 7.
- Stairs between Levels 8 and 9.
- One-way teleporter to D1.
- Stairs between Levels 8 and 9.
- One-way teleporter to F1.
- Stairs up to
Level 7.
- Stairs between Levels 8 and 9.
- Stairs between Levels 8 and 9.
- Stairs up to
Level 7.
- Stairs up to
Level 7.


