 Did we miss anything in this location? Is there something we didn't discover?
Let us know!
Enemies
Notable Loot
Did we miss anything in this location? Is there something we didn't discover?
Let us know!
Enemies
Notable Loot
- Bow (#25b)
- Sling (#6)
- Stone Dagger (#23)
Special Quest
Annotations
1 - Silver Key
You'll find a Silver Key on the ground here. It'll unlock a nearby door (#2).
2 - Locked Doors
You'll need a Silver Key to unlock these three doors. Each time you use a key, it will disappear. So you'll need to find three Silver Keys total (#1, #10, #21).
3 - Spinner
When you move here, you'll get rotated to the right by 90 degrees.
4 - Mage Scroll
You'll find a Mage Scroll of Shield on the ground here.
5 - Dagger Carvings
You'll discover a dagger carving at each of these three locations, plus another at a fourth location (#7). If you place a Dagger into each carving, then you'll complete the Special Quest for this level, which will reward you with Rations at each carving. You'll find Daggers on
Level 1.
6 - Sling
You'll find a Sling on the ground here.
7 - Pressure Plate / Dagger Carving
When you step onto the pressure plate here, an illusionary wall will appear behind you, and then you'll get rotated to the right by 90 degrees, which will point you at a dagger carving (see #5). You'll also find a Rock on the ground here.
8 - Teleporter
This teleporter (#8) will move you two spaces to the east and three spaces to the north (#8a), and then it will rotate you by 180 degrees. You can avoid the teleporter by passing through the nearby illusionary walls.
9 - Teleporter
This teleporter (#9) will move you two spaces to the east and three spaces to the south (#9a), and then it will rotate you by 180 degrees. You can avoid the teleporter by passing through the nearby illusionary walls.
10 - Shelves
Inside these two shelves, you'll find Rations and a Silver Key. You'll need the keys to unlock doors (#2, #31) and remove walls (#22).
11 - Arrows
You'll find two Arrows here.
12 - Rations
You'll find Rations on the ground here.
13 - Lever / Pit
Pulling the lever here (#13) will open and close the pit to the northeast (#13a).
14 - Pressure Plate / Pit
Weighting down the pressure plate here (#14) will close the pit to the south (#14a). To do this, you'll need to stand south of the pit and throw an item (like a Rock) to the north. The item will land on the pressure plate.
15 - Button
Pressing the button here (#15) will toggle two nearby pits (#15a), closing one and opening the other.
16 - Pressure Plate
The pressure plate here (#16) will toggle the pit to the south (#16a).
17 - Stuck Door
To open this door, you'll have to press the button next to it to open it slightly, and then you'll need to click on it -- perhaps multiple times -- to pry it open. Three of the doors past this door will also need to be pried open.
18 - Potion of Vitality
You'll find an unidentified Potion of Vitality on the ground here. Drinking it will remove hunger.
19 - Door / Moveable Wall
This part of the level is blocked by a door and a moveable wall. You'll have two ways to clear them out of the way:
- You can throw an item through the grating of the door (by aiming above the door). The item will hit a button on the moveable wall, which will cause the door to open and the wall to disappear.
- You can place a Dagger into the nearby dagger carving (#5). This will open the door, allowing you to press the button on the moveable wall yourself.
20 - Button
Pressing this button will remove the wall to the northeast.
21 - Shelf
Inside the shelf here, you'll find a Potion of Giant Strength, Rations, and a Silver Key. You'll need Silver Keys to unlock doors (#2, #31) and remove walls (#22).
22 - Moveable Walls
One of the three walls here will disappear each time you pick up a Silver Key (#10, #21).
23 - Stone Dagger
You'll find a Stone Dagger on the ground here. You can use it as a weapon, but mostly it's intended as an activator for a portal on Level 7.
24 - Loot Chamber
Inside this chamber, you'll find Rations and a Potion of Healing. There are two ways to open the door to the chamber. You can insert a Dagger into the nearby dagger carving (#5), or you can throw an item through the grating in the door (by aiming over the door) so it lands on the pressure plate in the chamber.
25 - Cells
You'll face one or two Skeletons in each of these cells. Some of the skeletons will drop Helmets, which don't do anything. In one cell (#25a), you'll find a Bow. In another (#25b), you'll find a Mage Scroll of Invisibility. And in the southernmost cell (#25c), you'll find a button that will eliminate the moveable wall to the south.
26 - Potion of Healing
You'll find a Potion of Healing on the ground here.
27 - Gold Key
You'll find a Gold Key on the ground here.
28 - Pressure Plate
Weighting down the pressure plate here will open the door to the northwest.
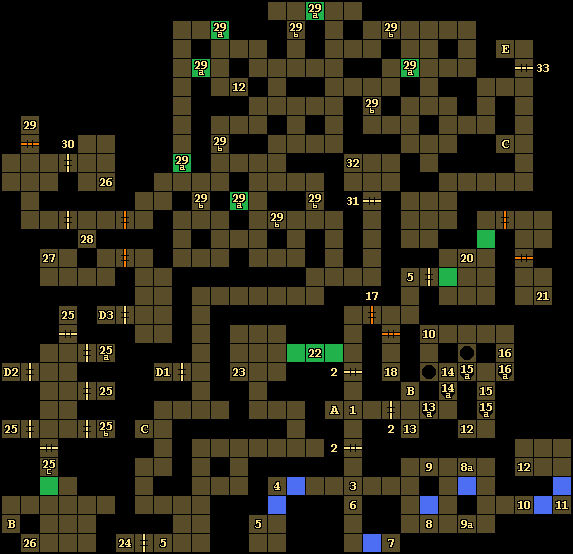
29 - Lever / Button
You'll find a lever and a button at this spot (#29). Pulling the lever will open the door to the southeast (#30). Pressing the button will remove several moveable walls (#29a) but add others (#29b) -- or vice versa depending on how many times you press it. Moving the walls won't really gain you anything (you'll just release a few Skeletons and Zombies), so it's debatable whether you should press the button or not.
Note: For clarity, the map above shows the initial state of the level, with the existing moveable walls (#29a) in green and the others (#29b) in brown.
30 - Door
You'll need to pull a nearby lever (#29) to open this door.
31 - Locked Door
You'll need a Silver Key (#1, #10, #21) to unlock this door.
32 - Leather Boots / Rations
In this corner of the room, you'll find Leather Boots and Rations. Leather Boots don't provide any protection.
33 - Locked Door
You'll need a Gold Key (#27) to open this door.
Exits
- Ladder back up to
Level 1.
- Ladder.
- Rapid Access Teleport System (RATS).
- Shuttle. Pressing the button here will move you between the Entry Level (D1), the Correction Facility (D2), and the Death Section (D3) -- that is, after it's closed the door (if necessary). To see which area you're in, simply turn left from the button and read the runes on the wall.
- Ladder down to
Level 3.


