 Did we miss anything in this location? Is there something we didn't discover?
Let us know!
Enemies
Notable Loot
Did we miss anything in this location? Is there something we didn't discover?
Let us know!
Enemies
Notable Loot
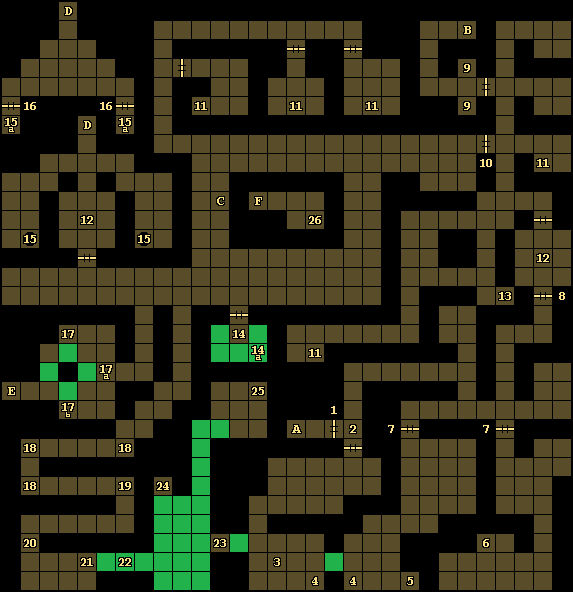
- Adamantite Dart +4 (#20)
- Chieftain Halberd +5 (#14a)
- Dwarven Shield +1 (#24)
- Mace +3 (#23)
- Stone Ring (#26)
Special Quest
Annotations
1 - Door
This door can only be opened from the eastern side. That means you won't be able to use the staircase behind it (Exit A) as your initial entrance into this level. Instead, you'll either have to fall down from the Greed Puzzle on
Level 5 (and land in one of the large chambers in the southeastern part of the level), or you'll have to use the other staircase from
Level 5 (Exit B).
2 - Key
You'll find a Key on the ground here. It'll unlock a door to the north (#10).
3 - Ring of Adornment
You'll find a (red) Ring of Adornment on the ground here.
4 - Secret Buttons
These two secret buttons will toggle the nearby moveable wall.
5 - Cleric Scroll
You'll find a Cleric Scroll of Flame Blade on the ground here.
6 - Bracers
You'll find a (worthless) pair of Bracers on the ground here.
7 - Doors
These two doors can only be opened from the southern side. For the easternmost of the two doors, that means you'll have to drop down from the Greed Puzzle on
Level 5. Of course, you won't find anything particularly useful behind either door.
8 - Door
This door can only be opened from the northern side.
9 - Pressure Plates
Runes just before these pressure plates will advise you to "store weapons before proceeding." You don't need to go that far, but to open the door to the east, you'll have to place weapons on the pressure plates. Once opened, the door will remain that way permanently, so you can quickly retrieve your weapons if you need them.
10 - Locked Door
To unlock this door, you'll need a Key (#2).
11 - Kenku Eggs
In and around these areas, you'll discover one or more Kenku Eggs (ten total). You might also encounter lots of kenku guardians.
12 - Pressure Plates
The first time you step onto either of these pressure plates, four Darts will shoot at you (for eight Darts total). You should be able to avoid the Darts by immediately backing off the plate. You'll need lots of Darts for the silverware rack (#21).
13 - Dark-Robed Figure
When you approach the dark mage here, he'll start doing the bad-guy-talking thing. He'll tell you about Xanathar the beholder's plans to take over Waterdeep, and how Xanathar can only be defeated by the Wand of Silvias, at item currently held by the dwarves on Level 5 (which you can acquire by rescuing their prince for them). Then the mage will attack you.
This battle can be difficult since the mage will utilize area spells that will hit your entire party. So try to lure him the 2x2 area to the north where you can dance around him and hit him without him hitting you back. When the mage dies, he'll drop a Potion of Extra Healing and a Wand of Frost. You'll also find a Potion of Extra Healing and a Mage Scroll of Hold Person at the square where he started.
14 - Nest
If you place ten Kenku Eggs (#11) into this small chamber (#14), then you'll complete the Special Quest for this level. This will cause the moveable walls surrounding the nest to disappear, granting you access to the Chieftain Halberd +5 (#14a).
Note: You might want to carry a single Kenku Egg with you when you first enter
Level 7, as this will allow you to skip a fight. You'll need three Kenku Eggs for the Special Quest on
Level 10.
15 - Pits / Dwarven Keys
You'll need to drop down into these pits (#15) to reach the Dwarven Keys in the sublevel (#15a).
16 - Doors
These two doors can only be opened from the southern side.
17 - Dwarven Lock / Rotating Walls
You'll find a dwarven lock here (#17). It's connected to three moveable walls. Each time you use a Dwarven Key (#15a, #22) on the lock, the walls (including the wall with the lock) will rotate by 90 degrees. If you use three keys on the lock (which means you'll need to move to #17a and #17b to use the second and third keys), then you'll open the way to the exit staircase (Exit E).
18 - Pressure Plates
The first two or three times you step onto these pressure plates, a pair of Darts will shoot at you (for 14 Darts total). You should be able to avoid the Darts by immediately backing off the plate. You'll need a bunch of Darts for the silverware rack (#21).
19 - Pressure Plate
When you step onto this pressure plate, two Darts will shoot at you. You won't be able to avoid these Darts. You'll need Darts for the silverware rack (#21).
20 - Shelf
In the shelf here, you'll find a Dagger and an Adamantite Dart +4.
21 - Silverware Rack
When you first come to the shelf here, you'll find a Wand of Magic Missile in it. If you place a Dagger or a Dart into the shelf, then the wall with the shelf will disappear, and you'll discover another wall with a shelf behind it. If you place a Dagger or a Dart into this new shelf, then it will disappear as well, and you'll find even more walls with shelves behind it. There are 23 walls with shelves in total, but you won't need to remove all of them to visit all of the important locations that they're blocking (#22-25). You'll only need to remove 16 for that, and you'll find more than enough Daggers and Darts scattered throughout the level (at #11, #18, #19, and #20) to create a path to them.
Note: Just be careful. When you place a Dagger or a Dart into a shelf, anything currently in the shelf will disappear along with its wall.
Another Note: You'll also need lots of Darts on
Level 8. So hang onto any that you don't use here.
22 - Dwarven Key
You'll find a Dwarven Key inside the shelf here. Be sure to loot it before placing a Dagger or a Dart into the shelf.
23 - Secret Button / Mace
If you press the secret button on the southern wall here, then you'll eliminate the moveable wall to the east. You'll also find a Mace +3 on the ground here.
24 - Dwarven Shield
You'll find a Dwarven Shield +1 on the ground here.
25 - Scrolls
You'll find a Cleric Scroll of Cure Serious Wounds and a Cleric Scroll of Dispel Magic on the ground here.
26 - Stone Ring
You'll find the Stone Ring on the ground here. It'll activate the stone door to the west (Exit C)
Exits
- Stairs up to
Level 5.
- Stairs up to
Level 5.
- Stone door to
Level 10. You'll need the Stone Ring (#26) to activate the door.
- Staircase between the main part of the level and the sublevel.
- Stairs down to
Level 7.
- Stairs down to
Level 7.


