 Did we miss anything in this location? Is there something we didn't discover?
Let us know!
Notes
Did we miss anything in this location? Is there something we didn't discover?
Let us know!
Notes
- The middle section of this level (which is more of a sublevel to
Level 7) is shown on
its own page.
- You'll encounter rust monsters on this level. When these creatures hit you, they'll destroy metal objects (including weapons, armor, and jewelry), so try to kill them with ranged attacks. Also be sure to save often, just in case.
Enemies
- Displacer Beasts
- Rust Monsters
Notable Loot
- Drow Shield +3 (#10)
- Plate Mail (#23)
- Rock +1 (#6)
- Severious +5 (#23)
Special Quest
Annotations
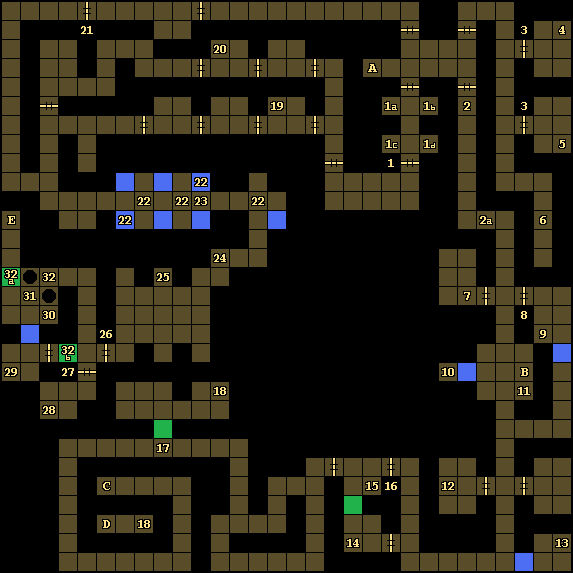
1 - Door / Pressure Plates
To open this door (#1), you'll need to "donate" the correct items onto the pressure plates to the north: a weapon (#1a), a set of armor or a shield (#1b), Iron Rations or regular Rations (#1c), and an Arrow, Dart or Rock (#1d). When all of the items are in place, the door will open, and two displacer beasts will attack you. But be aware: if you remove any of the donations, then the door will close again, so you'll need to find items that you don't care about.
Note: Coming up with most of the donations should be pretty easy. If you're lacking extra armor, you'll find some in the southeastern corner of the level (#13).
2 - Hall of Thieves
As you walk along this hallway (#2), items -- even equipped items -- will be stolen from your characters and placed into the shelves along the western wall. The more you walk in the hallway, the more items you'll lose. So simply head south and then step onto the pressure plate at the end (#2a). When you do this, the "trap" will turn off, and you'll stop losing items. Then just be sure to retrieve any items that you lost.
3 - Locked Doors
To open these two doors, you'll need to place a Rock +1 (#6) into the compartment next to them. But given that the rewards behind the doors aren't great, you might just want to hang onto the rocks.
4 - Drow Key
You'll find a Drow Key on the ground here. You'll need it to unlock an optional door to the west (#21).
5 - Mage Scroll
You'll find a Mage Scroll of Stoneskin on the ground here.
6 - Dead-End Hallway
This is the hallway where you'll end up if you jump into one of the pits in the northeastern part of
Level 8. If you walk down the hallway, then two (red) Rocks +1 should shoot at you and land here. You'll need the rocks to open the doors to the north (#3).
7 - Pressure Plate / Displacer Beasts / Arrows
When you step onto the pressure plate here, the door behind you will close, but you'll still be able to open it back up. Also in the room, you'll encounter two displacer beasts, and you'll find three Arrows.
8 - Door
This door can only be opened from the eastern side.
9 - Mage Scroll
You'll find a Mage Scroll of Invisibility on the ground here.
10 - Drow Shield +3
You'll find a Drow Shield +3 on the ground here.
11 - Drow Boots
You'll find a (worthless) pair of Drow Boots here.
12 - Oracle of Devouring
If you place an Orb of Power into the shelf here, then the Oracle of Devouring will identify all of the magical items carried by your party. You'll find Orbs of Power on
Level 9 (Inner),
Level 11, and
Level 12. Unlike the Oracle of Knowledge (on
Level 4), the Oracle of Devouring will consume the orb placed in the shelf, so only use this oracle if you have lots of orbs to spare.
13 - Chainmail
You'll find Chainmail on the ground here.
14 - Shelf
If you place an item into the shelf here and press the button next to it, then the item will disappear, but you'll remove the moveable wall to the north.
15 - Wand of Fireball
You'll find a Wand of Fireball on the ground here.
16 - Door
This door can only be opened from the western side.
17 - Secret Button
If you press the button on the southern wall here, then you'll eliminate the moveable wall just to the north.
18 - Cleric Scrolls
You'll find a Cleric Scroll of Raise Dead at these two places.
19 - Potion of Poison
You'll find a Potion of Poison on the ground here.
20 - Cleric Scroll
You'll find a Cleric Scroll of Detect Magic on the ground here.
21 - Locked Door
You'll need a Drow Key (#4) to open this door.
22 - Pressure Plates / Darts
The first time you step onto these pressure plates (#22), Darts will shoot at you. Any Dart that misses you is supposed to get teleported to a room to the southwest (#31), but for us the Darts simply disappeared. Since you'll need Darts for the Special Quest on
Level 8, that means you should let the Darts hit you, and then pick them up. One of the pressure plates is broken, but you'll still be able to grab nine Darts here. You'll need 12 Darts for the Special Quest.
23 - Beohram
On the ground here, you'll find the remains of
Beohram: a Helmet, Human Bones, the long sword Severious +5, a Paladin Holy Symbol, Plate Mail, and a Shield. Even if you don't want
Beohram, be sure to loot his armor and sword.
Note: Despite the Paladin Holy Symbol next to his bones,
Beohram is actually a fighter rather than a paladin.
24 - Combination Lock
If you read the runes here, then you'll see: "Combination Lock -- Be Quick!" In the room beyond, you'll find buttons and pressure plates that cause Magic Missiles to shoot out of the walls, and you might think that they form some sort of puzzle. They don't. Either this puzzle was never finished, or it's just there to annoy you.
25 - Drow Key
You'll find a Drow Key on the ground here.
26 - Locked Door
You'll need a Drow Key (#24) to open this door.
27 - Door
This door can only be opened from the southern side.
28 - Potion of Extra Healing
You'll find a Potion of Extra Healing on the ground here. The only way to enter this room and get to the potion is to drop down from the southern pit in the Gauntlet of Fire on
Level 8.
29 - Cleric Scroll
You'll find a Cleric Scroll of Protection from Evil 10' on the ground here.
30 - Pressure Plate
When you step onto the pressure plate here, the nearby pits will disappear.
31 - Cleric Scrolls
At this spot, you'll find a Cleric Scroll of Cure Serious Wounds and a Cleric Scroll of Dispel Magic.
32 - Pits Puzzle
When you arrive here (#32), you'll discover that pits are blocking your way to the south and west. If you try to throw an item onto the pressure plate to the south (#30), then it will bounce back and possibly hit you, so don't do that. Instead, throw an item to the north. It will travel through the wall there and somehow land in the center of the room (#31), and it will cause the moveable wall to the west (#32a) to disappear. You'll next need to throw an item to the west, so that it lands on the pressure plate where the moveable wall was. This will eliminate a moveable wall to the south (#32b) and allow you to circle around the pits, where you'll find a pressure plate (#30) that will make the pits disappear.
Note: If you don't like the above solution, then you can also jump into the northern pit in the Gauntlet of Fire on
Level 8. You'll land in the room past the pits. From there, you can just walk over to the pressure plate (#30) and make the pits disappear.
Exits
- Stairs up to
Level 8.
- Stone door to
Level 7. It requires the Stone Dagger.
- Stairs down to
Level 10.
- Stairs down to
Level 10.
- Stairs down to
Level 10.


