 Did we miss anything in this location? Is there something we didn't discover?
Let us know!
Note
Did we miss anything in this location? Is there something we didn't discover?
Let us know!
Note
- Mind flayers are nasty. They have a ranged paralysis attack that can hit your entire party. Luckily, paralysis doesn't prevent you from running away, so keep that in mind when facing them. Also, enemies can't open doors, so if you flee to a door and close it behind you, then you should be able to rest safely and remove the paralysis effect. Otherwise, you'll have to wait a couple of minutes for the paralysis to wear off on its own, or you'll need to have a cleric cast Remove Paralysis.
Enemies
Notable Loot
- Banded Armor +3 (#15)
- Bracers of Defense +2 (#4)
- Flicka +5 (#4)
- Ring of Protection +2 (#4)
- Robe of Defense +3 (#4)
- Rock +2 (#13)
- Slasher +4 (#15)
- Stone Holy Symbol (#5)
- Stone Orb (#13)
Annotations
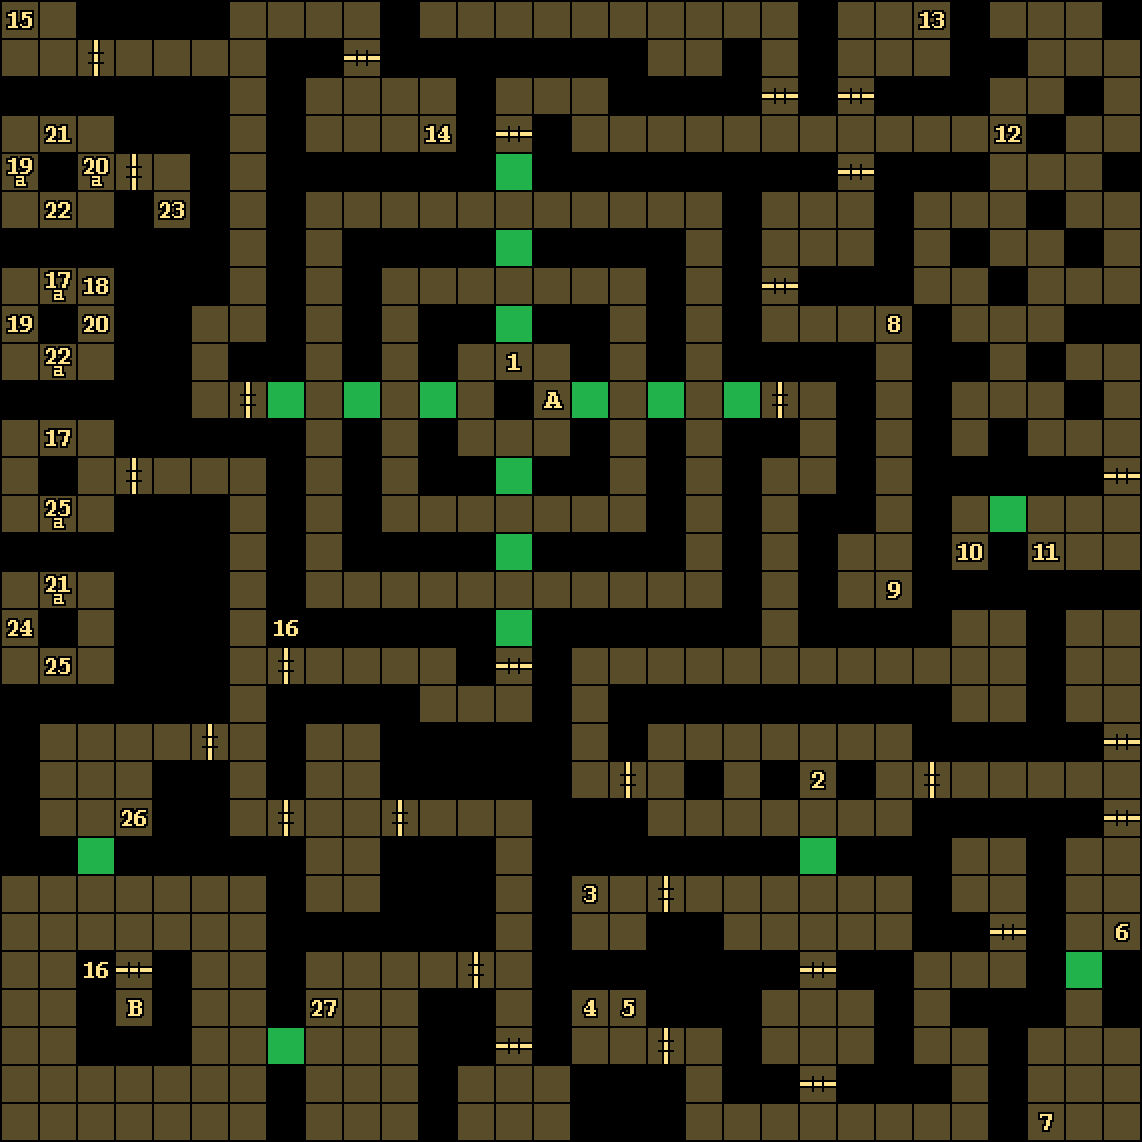
1 - Starting Point / Celestial Stars of Navigation Puzzle
This is where you'll land when you jump into the pit on
Level 10. You'll find yourself in the Celestial Stars of Navigation Puzzle, which consists of three concentric rings of hallways. Each ring has a star symbol on one wall plus a button on the opposite wall. The first two rings also have an opening. Pressing the button will rotate the outer wall of the current ring clockwise, moving the star, the button, and the opening. To create an opening out of the outer ring, you'll need to line up the stars (and buttons and openings) in the three rings. You can do this on all four sides of the outer ring, allowing you to visit the four separate quadrants of the level.
Note: It doesn't really matter in which order you explore the quadrants, but the locked doors and the exit to
Level 12 (Exit B) are in the southern quadrant, so it makes sense to save that one for last.
2 - Hidden Button
You'll find a hidden button on the western wall here. If you press it, then you'll remove the moveable wall to the south.
3 - Drow Key
You'll find a Drow Key on the ground here. You'll need it in the southern quadrant (#16).
4 - Kirath's Remains
At this spot, you'll find the remains of the half-elf mage Kirath: Bracers of Defense +2, the dagger Flicka +5, Human Bones, a Ring of Protection +2, a Robe of Defense +3, and a Spellbook (containing Armor, Burning Hands, Cone of Cold, Fireball, Ice Storm, Invisibility 10', Lightning Bolt, Magic Missile, Melf's Acid Arrow, Shield, Shocking Grasp, and Stoneskin).
5 - Stone Holy Symbol
You'll find the Stone Holy Symbol on the ground here. You'll need it for the stone door by the entrance to the level (Exit A).
6 - Hidden Button
If you press the hidden button on the southern wall here, then you'll eliminate the nearby moveable wall.
7 - Orb of Power
You'll find an Orb of Power on the ground here. You'll need it to reach
Level 12 (Exit B).
8 - Lever Puzzle
You'll find eight levers along the eastern wall here. Pulling some of the levers will affect others. If you label the levers L1 to L8 from north to south, then:
- L1 will toggle itself, L3 and L5.
- L2 will toggle itself, L4, L5 and L6.
- L3 will toggle itself, L2, L6 and L7.
- L4 will toggle itself and L1.
- L5 will toggle iself and L8.
- L6 will toggle itself only.
- L7 will toggle itself only.
- L8 will toggle itself, L1 and L7.
If you can get all of the levers pointing up, then you'll receive a Wand of Frost in the reward shelf (#9). If you put a scroll into the shelf (any scroll will do; you can find one nearby at #8), and if you can get all of the levers pointing down except for L2 and L7, then you'll complete the Special Quest for this level, which will reward you with 10,000 xp and a clue scroll in the reward shelf (but you'll lose the scroll you put there). To read the clue scroll, just equip it in the weapon- or off-hand slot of a character, and right-click on it there. You'll learn "that the greatest weakness of the most feared creature is that, although it lurks in shadows and sees all, it cannot make itself invisible."
Here's the easiest solution for the puzzles. For the first reward, if the levers are in their initial positions, then just click on each one once. For the Special Quest, if the levers are all "up," then only click on L2, L3, L6 and L8.
9 - Reward Shelf
You'll find a Dwarven Healing Potion inside the shelf here. This is the potion that can heal King Teirgoh. If you deliver the potion to the dwarves on
Level 5, then they'll give you -- well, drop at your feet -- the Wand of Silvias, which will help you to defeat Xanathar on Level 12. This shelf is also where you'll receive the rewards from the Lever Puzzle (#8).
10 - Drow Key / Stone Orb
On the ground here, you'll find a Drow Key and a Stone Orb. You'll need both of them in the southern quadrant (at #16 and Exit B).
11 - Hidden Button
If you press the hidden button on the western wall here, then you'll remove the nearby moveable wall.
11 - Safe Spot
You'll encounter lots of xorns in the maze to the east, but apparently they're not allowed to enter this square, so you can run back here if you get into trouble.
13 - Loot
At this spot, you'll find a Cleric Scroll of Raise Dead and a (green) Rock +2.
14 - Ring of Adornment
You'll find a (worthless) Ring of Adornment on the ground here.
15 - Loot
On the ground here, you'll find Banded Armor +3 plus the long sword Slasher +4. Banded Armor +3 is the best armor in the game -- with the caveat that its bonus doesn't stack with any bonus you might have from Rings of Protection. So if your tank has a Ring of Protection +2 or a Ring of Protection +3, then Banded Armor +3 won't actually be better for him (or her) than standard Plate Mail.
16 - Locked Doors
You'll need a Drow Key (#3, #10) to open these two doors.
17 - Teleporter
Stepping here (#17) will teleport you to the north (#17a).
18 - Wand
You'll find a Wand of Lightning on the ground here.
19 - Teleporter
Stepping here (#19) will teleport you to the north (#19a).
20 - Teleporter
Stepping here (#20) will teleport you to the north (#20a).
21 - Teleporter
Stepping here (#21) will teleport you to the south (#21a).
22 - Teleporter
Stepping here (#22) will teleport you to the south (#22a).
23 - Loot
On the ground here, you'll find a Cleric Scroll of Raise Dead and a (worthless) Luck Stone Medallion.
24 - Mage Scroll
You'll find a Mage Scroll of Hold Monster on the ground here.
25 - Teleporter
Stepping here (#25) will teleport you to the north (#25a).
26 - Hidden Button
Pressing the hidden button on the southern wall here will eliminate the nearby moveable wall.
27 - Hidden Button
Pressing the hidden button on the western wall here will eliminate the nearby moveable wall.
Exits
- Stone door to
Level 7. This door requires the Stone Holy Symbol (#5).
- Stone door to
Level 12. This door requires the Stone Orb (#10). This is the only way to reach
Level 12.