Did we miss anything in this location? Is there something we didn't discover?
Let us know!
Note
Did we miss anything in this location? Is there something we didn't discover?
Let us know!
Note
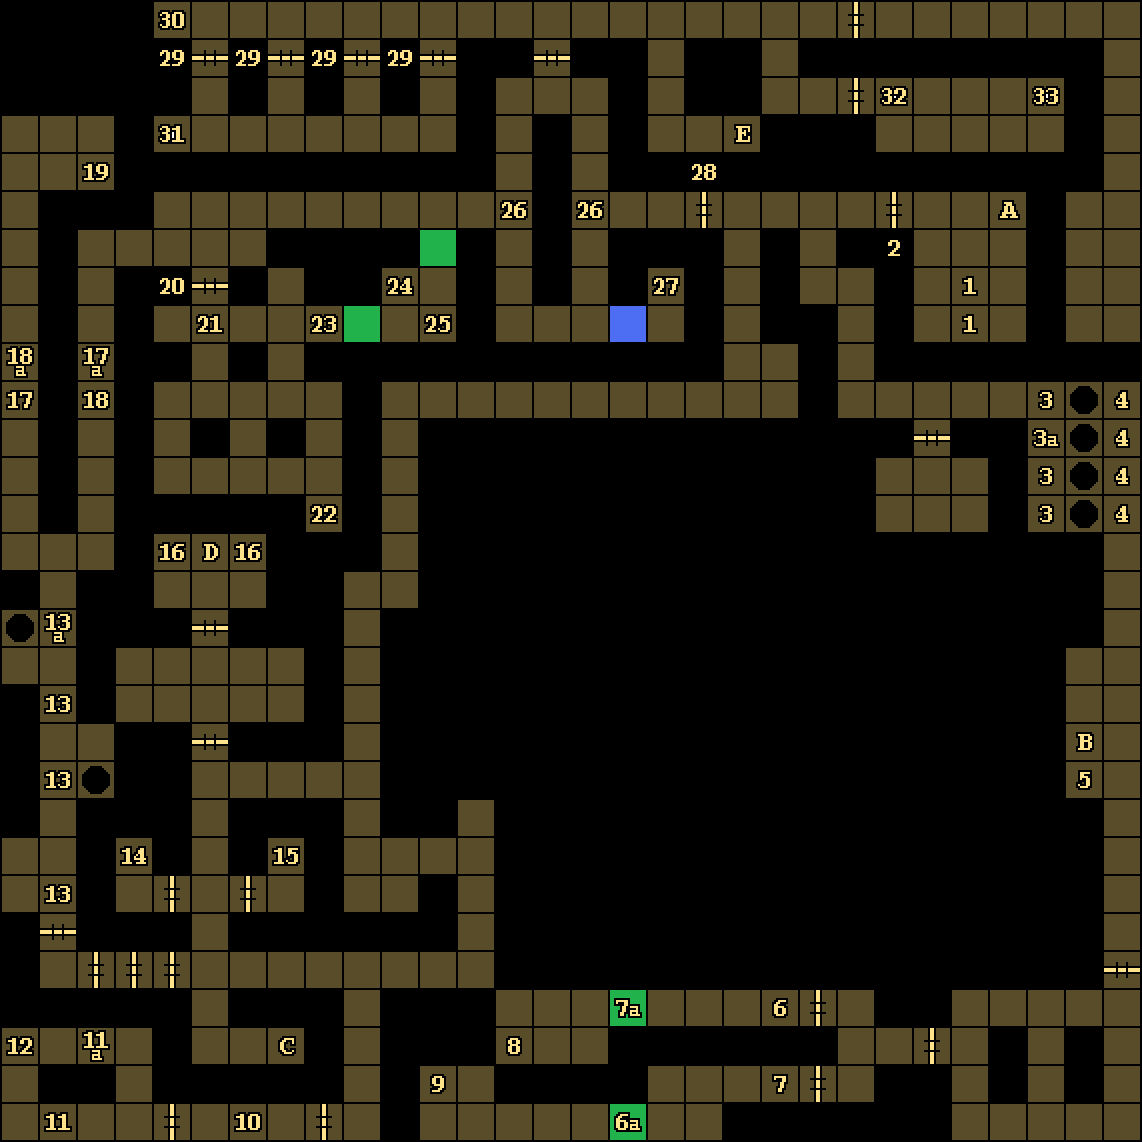
- The middle section of this level (which is more of a sublevel to
Level 7) is shown on its own page.
Enemies
Notable Loot
- Adamantite Darts +5 (#32)
- Night Stalker +3 (#27)
- Ring of Sustenance (#19)
Special Quest
Annotations
1 - Drop Down Points
These are the two places where you can drop down to this level from
Level 7. This is actually the easiest way to reach most of this level.
2 - Door
This door can only be opened from the eastern side.
3 - Pressure Plates
Stepping onto one of these pressure plates will toggle the pit just to the east of it. On one of the pressure plates (#3a), you'll find a Rock +1.
4 - Buttons
These buttons will toggle the adjacent pits just like the pressure plates to the west (#3), but the mapping isn't as straightforward. If you number the buttons and pits from 1 to 4, with 1 being the most northern and 4 being the most southern, then button 1 will toggle pit 3, button 2 will toggle pit 4, button 3 will toggle pit 1, and button 4 will toggle pit 2.
5 - Wand
In the shelf here, you'll find a Wand of Lightning.
6 - Pressure Plate
Stepping onto this pressure plate will permanently add a wall to the west (#6a), which will block you from reaching a set of Lock Picks (#9). But you'll still be able to pick up a Mage Scroll of Ice Storm (#8), which is more useful.
7 - Pressure Plate
Stepping onto this pressure plate will permanently add a wall to the west (#7a), which will block you from reaching a Mage Scroll of Ice Storm (#8).
8 - Mage Scroll
You'll find a Mage Scroll of Ice Storm on the ground here.
9 - Lock Picks
You'll find Lock Picks on the ground here.
10 - Spinner
When you step here, you'll get rotated by 180 degrees.
11 - Teleporter / Spinner
When you step here (#11), you'll get teleported to the north (#11a) and rotated by 180 degrees.
12 - Loot
You'll find a Robe and a Scepter of Kingly Might on the ground here. The scepter is just a basic mace.
13 - Pressure Plates / Gauntlet of Fire
These four pressure plates are a part of the Gauntlet of Fire. Each time you step on one, a fireball will shoot at you. For the first three pressure plates (#13), the fireball will come at you from the northern end of the hallway; for the northernmost pressure plate (#13a), the fireball will come at you from the southern end. That means you should be able to dodge around the fireballs and avoid taking damage from them.
14 - Cursed Plate Mail
You'll find Cursed Plate Mail of Great Beauty -3 on the ground here. You should leave it alone.
15 - Flail
You'll find a Flail here. You might want to keep it around in case you run into any skeletons.
16 - Loot
In the two corners of this room, you'll find a Cleric Scroll of Protection from Evil and a (worthless) set of Drow Boots.
17 - Invisible Teleporter
Stepping into this teleporter will send you to the east (#17a).
18 - Invisible Teleporter
Every other time you step into this teleporter, you'll get sent to the west (#18a).
19 - Ring of Sustenance
In the shelf here, you'll find a Ring of Sustenance. The ring is supposed to prevent the wearer from getting hungry, but it doesn't work. It'll only work if you carry it all the way to Eye of the Beholder 3.
20 - Door
This door can only be opened from the northern side.
21 - Pressure Plate
When you step onto this pressure plate, the door behind you (#20) will close, locking you into a small area with a bunch of hell hounds. So don't step onto the pressure plate right away. Draw the hell hounds to you outside of the room, and flee away from them as necessary until they're all dead. Then enter the room and step onto the pressure plate.
22 - Mage Scroll
You'll find a Mage Scroll of Invisibility 10' on the ground here.
23 - Hidden Button
Pressing the button on the southern wall here will remove the moveable wall just to the east.
24 - Button
Pressing the button here will remove the moveable wall to the northeast.
25 - Cleric Scroll
You'll find a Cleric Scroll of Hold Person on the ground here.
26 - Runes
When you click on one of these sets of runes, you'll get rotated by 180 degrees and teleported to the other set.
27 - Night Stalker +3
You'll find the long sword Night Stalker +3 on the ground here.
28 - Door
This door can only be opened from the western side.
29 - Doors
These doors can only be opened by pressing the button to the west (#30).
30 - Button
Pressing this button will open the four doors to the east (#29) -- and also release four hell hounds.
31 - Loot
On the ground here, you'll find an Amulet of Adornment and a Ring of Adornment.
32 - Pressure Plate / Dart Traps
This pressure plate is connected to the 12 dart traps in the room. Luckily, the dart traps start out empty, so nothing bad will happen when you step onto the pressure plate. If you load the dart traps by placing a Dart into each one, then you'll complete the Special Quest for this level. This won't give you a reward right away, but the next time you step onto the pressure plate, ten of the dart traps will shoot out Adamantite Darts +5, and you'll be able to pick them up.
Note: You'll lose the Darts you load into the traps, but you'll get the Adamantite Darts +5 in return, so it's okay if you have to use your Dart +2 (from
Level 1) or Adamantite Dart +4 (from
Level 6) to complete the quest.
Another Note: You can get lots of Darts from a room on
Level 9, and you might end up with leftover Darts from the silverware rack on
Level 6.
33 - Cleric Scrolls
On the ground here, you'll find a Cleric Scroll of Cure Critical, a Cleric Scroll of Neutralize Poison, and a Cleric Scroll of Prayer.
Exits
- One-way teleporter. This teleporter will take you to
Level 8 (Inner), right next to a staircase leading up to
Level 7.
- Stone door from
Level 10. The Stone Scepter (from
Level 4) should activate this door, but it won't work. To get back to
Level 10, you'll have to use the other stone door on this level (Exit D).
- Stairs up to
Level 7.
- Stone door to
Level 10. You'll need the Stone Scepter (from Level 4) to activate this door.
- Stairs down to
Level 9.