 Did we miss anything in this location? Is there something we didn't discover?
Let us know!
Note
Did we miss anything in this location? Is there something we didn't discover?
Let us know!
Note
- You'll encounter lots of giant spiders on this level. That means you'll have to deal with webs and poison:
- Webs are purely cosmetic. To pass through them, just attack them.
- Giant spiders can poison you when they hit you, and you probably won't have access to the Level 4 Cleric spell Neutralize Poison yet. To avoid getting poisoned, try to kill spiders with spells and ranged attacks before they get to you, or do a little 2x2 dance with them, where you attack and strafe away as soon as they get into melee range. If you do get poisoned, use the Level 2 Cleric spell Slow Poison to keep the affected character alive until you find a Potion of Cure Poison (#12). Or do a lot of saving and loading.
Enemies
Notable Loot
- Drow Cleaver +3 (#23)
- Potion of Cure Poison (#12)
- Ring of Protection +3 (#11)
- Stone Scepter (#10)
Special Quest
Annotations
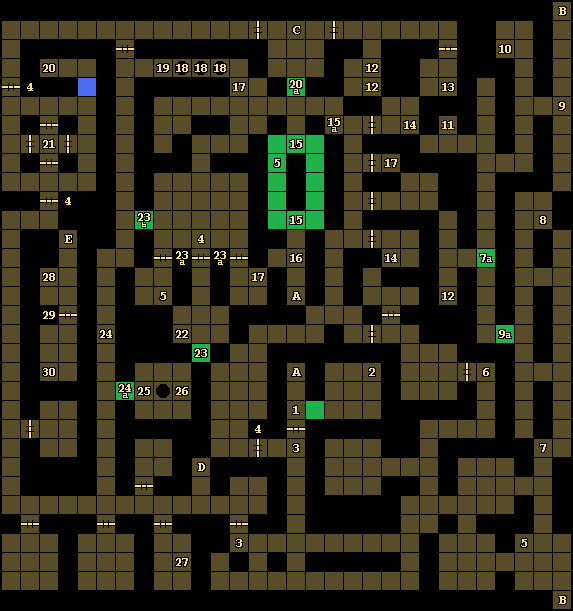
1 - Button
The button here will open the door to the south and the moveable wall to the east.
2 - Iron Rations
You'll find Iron Rations (x3) on the ground here.
3 - Pressure Plates
Stepping onto one of these pressure plates will close the door just to the north of them. To (re)open the doors, you'll have to press the button on their northern side.
4 - Locked Doors
You'll need Dwarven Keys (#5, #21) to open up these doors (one key per door).
5 - Dwarven Keys
You'll find a Dwarven Key at these locations.
6 - Pressure Plate
Stepping onto the pressure plate here will close the door to the west. To (re)open the door, you'll have to press the button on its western side.
7 - Pressure Plate
When you step here, you'll eliminate a moveable wall to the north (#7a).
8 - Ring of Adornment / Arrow
You'll find a (blue) Ring of Adornment on the ground here. It's not beneficial; it just looks pretty. In the square to the north, you'll find an Arrow.
9 - Pressure Plate
When you step here, you'll eliminate a moveable wall to the south (#9a).
10 - Stone Scepter
You'll find a Stone Scepter on the ground here. You'll need the scepter to activate a stone door on
Level 8.
11 - Ring of Protection +3
You'll find a Ring (of Protection) +3 on the ground here.
12 - Potions of Cure Poison
You'll find two Potions of Cure Poison here.
13 - Oracle of Knowledge
If you place an Orb of Power into the shelf here, then the Oracle of Knowledge will identify all of the magical items carried by your party. You'll find Orbs of Power on
Level 9 (Inner),
Level 11, and
Level 12. Unlike the Oracle of Devouring (on
Level 9), the Oracle of Knowledge won't consume your orbs, so this is the best place to identify your items.
14 - Maces
You'll find a Mace on the ground in these two places.
15 - Moveable Walls / Chain
In this rectangular part of the level, you'll have to deal with two moveable walls. If you walk counterclockwise, then the walls won't budge, and you'll get blocked by them. But if you walk clockwise, then you'll push the walls forward, and you'll be able to make your way around the entire rectangle -- and pick up a Dwarven Key (#5) while you're there.
If you pull a nearby chain (#15a), then you'll stop the walls from moving, whether you're walking clockwise or not. If you stop the walls while one of them is over the Dwarven Key's location (#5), and if the Dwarvem Key is no longer there, then you'll complete the Special Quest for this level, which will earn you 3000 xp.
Note: The easiest way to put the walls into the correct position for the Special Quest is to start out at the northern entrance to the rectangle, make a complete circuit of the rectangle in the clockwise direction, and then exit out the northern entrance again.
16 - Taghor
At this spot, you'll meet a wounded dwarven fighter named Taghor. If you tend to his wounds, then he'll offer to join you. Taghor will tell you that he is looking for his people (who can be found on Level 5), but he'll stay with you permanently if you add him.
17 - Access Control Levers
These three access control levers -- aka gargoyle arms -- control the three pits in the northern part of the level (#18). Pulling the levers will open or close the pits.
18 - Pits
You can close these three pits by pulling nearby access control levers (#17). If you fall down into one of the pits, then you'll end up in an isolated part of
Level 5. To escape this area, you'll either need to move through an illusionary wall on the eastern side, or you'll need to press a button next to the wall, which will cause it to disappear.
19 - Pressure Plate
Stepping onto this pressure plate will toggle the pits to the east (#18).
20 - Gargoyle Lever
If you pull the lever here (#20), then you'll open a moveable wall to the east (#20a).
21 - Key and Potion
There are four doors to this location. No matter which one you go through, you'll find a Dwarven Key on the ground here. But if you open one of the doors while the other three are closed, then a Potion of Healing will also appear here. You can do this for all four doors to make four Potions of Healing appear. But you'll only get the one Dwarven Key.
22 - Treasure
On the ground here, you'll find a Robe and a Medallion of Adornment. Neither one is useful for anything.
23 - Moveable Wall
This wall (#23) will only disappear when the doors to the nearby side rooms (#23a) are both closed. With the wall out of the way, you'll find the axe Drow Cleaver +3 on the ground here. You'll also find a chain. Pulling the chain will eliminate a moveable wall to the north (#23b).
24 - Hidden Button
If you press the button on the western wall here (#24), then you'll eliminate a nearby moveable wall (#24a).
25 - Pressure Plate
Stepping onto the pressure plate here will toggle the pit to the east.
26 - Equipment
On the ground here, you'll find a Dwarven Helmet and a Dwarven Shield.
27 - Gargoyle Lever
If you pull the lever here, then you'll spawn a pair of spiders in the southeastern part of the level.
28 - Potion of Healing
You'll find a Potion of Healing on the ground here.
29 - Locked Door
You'll need a Dwarven Key to unlock this door.
30 - Loot
On the ground here, you'll find a Cleric Scroll of Slow Poison, a Mage Scroll of Flame Arrow, and a Potion of Healing.
Exits
- Ladders back up to
Level 3.
- Passage. This isn't a teleporter. The map just wraps around here.
- Stone door to
Level 7. You'll need a Stone Medallion (found on
Level 5) to activate this door.
- Stairs down to
Level 5.
- Stairs down to
Level 5.


