General Notes
A useful tool when playing Eye of the Beholder is the
All-Seeing Eye (ASE). It provides auto-mapping, save backups, item identification, and more. It makes Eye of the Beholder much friendlier to play, which might be a good thing or a bad thing depending on your point of view. We used ASE when writing the walkthrough.
If you're using DOSBox to play the game, then you can use it to remap the keys so you don't have to use the numpad for movement. Pressing control-F1 will bring up the DOSBox key remapper. We switched movement to the more common WASD keys, using the mapping shown below:
- A=7, S=2, D=9, Q=4, W=8, E=6
For the above mapping to work, you'll also need to map the reverse (7=A, 2=S, and so forth). Any changes you make will function for the entire game, including when you type in names for your characters, so we'd recommend creating your characters first and then remapping the keys.
Most doors require you to press a button, pull a lever, or step onto a pressure plate to open them. If this mechanic seemed obvious to us, then we didn't mention it in the walkthrough to reduce the amount of clutter on the walkthrough pages.
There isn't any time limit in the game. You can rest as much as you want without penalty. Early in the game, you have to be careful about resting to prevent characters from going hungry, but once you gain the (cleric level 3) Create Food spell, this is no longer an issue.
Speaking of the Create Food spell, once you gain it you no longer need to carry rations around, except for the Special Quest on
Level 5.
Each level except for
Level 12 has a Special Quest that can earn you useful equipment or experience. Some of these Special Quests are obvious, and some aren't. All of the Special Quests are labeled in the walkthrough.
Daggers look like melee weapons, but they can only be used as thrown weapons.
The interface makes it much easier to use melee weapons and ranged weapons rather than spells. And since ranged weapons force you to pick up your ammunition after each battle, you might want to focus on melee weapons, and learn how to dance around opponents so they don't hit you back. The dance is simple: just move to an open 2x2 region in the level, wait for your opponent to move adjacent to you, face them (if necessary) and attack, strafe to an open square, and then repeat.
Most magical items won't start out identified in the game. To identify them (without cheating), you have to use the Oracle of Knowledge on
Level 4 or the Oracle of Devouring on
Level 9.
To eat, select a set of rations and then click it on the plate in a character's inventory screen. To use an item -- for example, to drink a potion or read a scroll -- equip it in one of a character's hands and then right-click on the item in the adventure screen. To throw an item, select it and then click it on the upper half of the 3D view in the adventure screen.
Party Construction
Your characters will probably only earn enough experience to reach level 7 during the game, which means clerics won't be able to cast level 5 spells, and paladins won't be able to cast spells at all.
There is almost nothing for thieves to do in the game. Only a few locked doors can be picked open, and all doors have keys.
You can only create four characters at the start of the game, but there are friendly NPCs -- or at least their bones -- who can join you inside the dungeon. If you find bones, you have to take them to the Dwarven Cleric on
Level 5 to have the NPC resurrected and added to your party.
The available NPCs are mostly fighters. The lone cleric has bad stats, and the lone mage comes extremely late in the game, so you should plan on adding fighters to your party -- or not adding anyone; you can stay with four characters if you want. See the
NPCs page for a list of the characters you can meet.
We recommend starting with a Fighter, a Ranger, a Cleric, and a Mage.
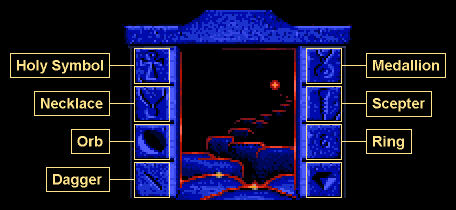
Stone Doors
There are several stone doors in the dungeon. Each door has eight icon bricks around it, with only seven of them filled. To use the doors, you need to find the item that would be represented by the blank brick, if that brick had an icon. Clicking the activating item onto the blank brick sends you to the door's partner, located on some other level of the dungeon. This allows you to move quickly in the dungeon, especially since
Level 7 has a hub of stone doors.
You can find seven stone door activators in the dungeon:
Their use is shown in the image below.