 Did we miss anything in this location? Is there something we didn't discover?
Let us know!
Note
Did we miss anything in this location? Is there something we didn't discover?
Let us know!
Note
- Mantis warriors, like the drow fighters before them, can paralyze you with their attacks. The main difference is that mantis warriors are much quicker than the drow, so it's best not to get into melee range with them at all. If you completed the Special Quest on
Level 8 and have a bunch of Adamantite Darts +5 on hand, mantis warriors are a good place to use them.
Enemies
Notable Loot
- Plate Mail (#23)
- Ring of Feather Fall (#5, #19)
- Ring of Protection +2 (#19)
- Ring of Sustenance (#19)
Special Quest
Annotations
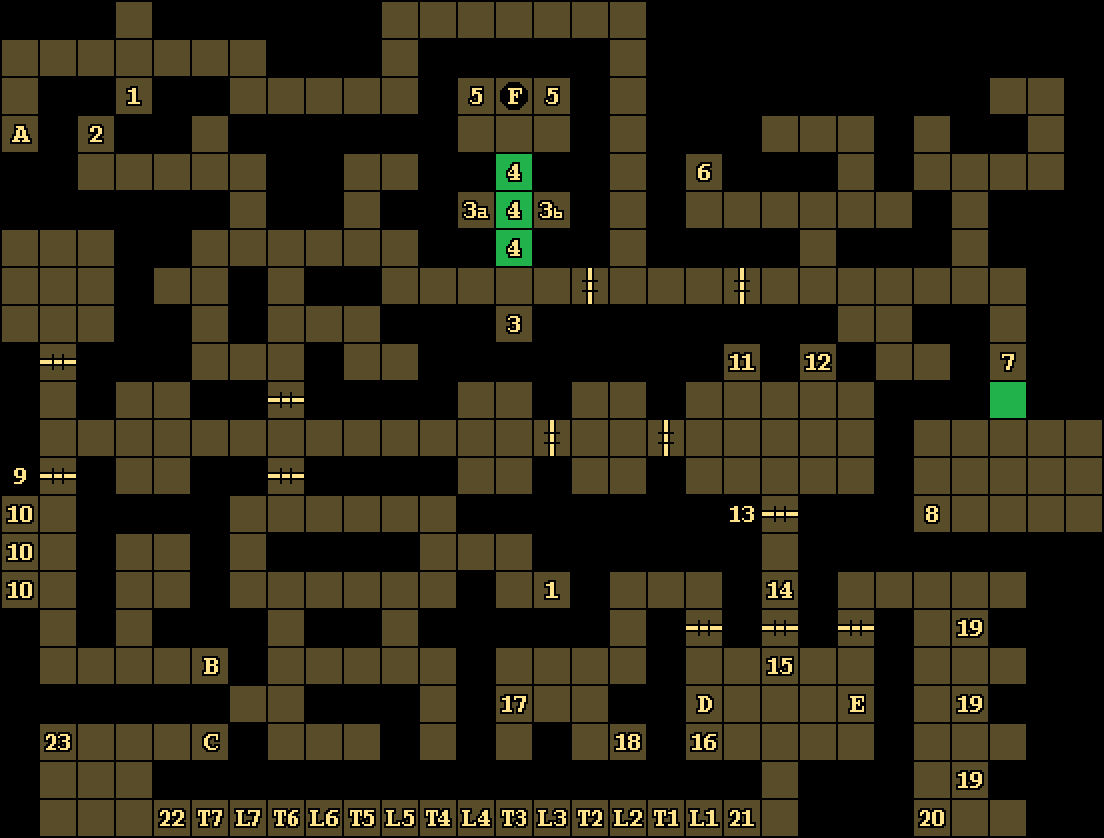
1 - Arrows
You'll find an Arrow at these two places.
2 - Skull Key / Tyrra's Bones
On the ground here, you'll find a Skull Key and the Human Bones belonging to
Tyrra, an elven ranger.
3 - Levers
These three levers will adjust the position of the nearby moveable wall (#4). Two of the levers (#3, #3b) will push the wall to the north, while the other one (#3a) will push the wall to the south. To reach the room past the wall, you'll need to interact with the southern lever (#3) twice to push the wall to its northernmost position, and then interact with the western lever (#3a) twice to push the wall to its southernmost position. Then to escape from the room, you'll just need to interact with the eastern lever (#3b) twice to push the wall back to its northernmost position. You can also escape the room by jumping into the pit (Exit F), which is the only way you'll be able to reach
Level 11 until you've tracked down the Stone Holy Symbol.
4 - Moveable Wall
A moveable wall here can sit in one of these three positions. You can move the wall by using the nearby levers (#3).
5 - Shelves
Inside these two shelves, you'll find a Potion of Giant Strength and a Ring of Feather Fall.
6 - Cleric Scroll
You'll find a Cleric Scroll of Neutralize Poison on the ground here.
7 - Hidden Button
If you press the hidden button on the western wall here, then you'll remove the moveable wall to the south.
8 - Mage Scroll
You'll find a Mage Scroll of Cone of Cold on the ground here.
9 - Door
This door can be opened in one of two ways. On the northern side, you can open it simply by pressing a button. But on the southern side, you'll need to place weapons onto the three nearby pressure plates (#10).
10 - Pressure Plates
If you place weapons onto the three pressure plates here, then you'll open the door to the north (#9). You'll need to keep the weapons on the pressure plates to keep the door open, so you'll need weapons that you don't care about.
11 - In Case of Fire
If you press the button here, then you'll get hit with an Ice Storm spell. So don't do it.
12 - In Case of Flood
If you press the button here, then you'll get hit with a Fireball spell. So don't do it.
13 - Locked Door
You'll need a Skull Key (#2) to open this door.
14 - Welcome Runes
If you read the runes on the wall here, then you'll get hit by a Fireball spell. So don't do it.
15 - Shindia
When you reach this spot, you'll meet Shindia, the drow who led the attack against the dwarves on
Level 5. If you "hear her out," then she'll tell you that you can cure the dwarven king Teirgoh by using a potion she hid in the "Room of Levers" on
Level 11. Regardless of your choice, Shindia will disappear from the game, and you won't see her again.
16 - Cleric Scrolls
In the shelf here, you'll find a Cleric Scroll of Flame Blade and a Cleric Scroll of Remove Paralysis.
17 - Wand / Ambush
If you click on one of the lower bricks of the western wall here, then a Mantis Warrior will appear behind you and attack. So if you trigger the attack, then be sure to turn around quickly. You'll also find a (worthless) Wand of Stick on the ground here.
18 - Prince Keirgar
You'll find
Prince Keirgar chained up here. If you free him, add him to your party, and take him to the dwarves on
Level 5, then he'll agree to stay with you, and he'll tell you about a secret door in the throne room on
Level 12. If you kill
Keirgar or let him leave on his own, then you'll never see him again.
19 - Shelves
If you loot these three shelves, then you'll find a Cleric Scroll of Cure Critical Wounds, a Cleric Scroll of Flame Blade, a Potion of Poison, and a Wand of Frost. After emptying the shelves, if you place a Kenku Egg (from Level 6) into each one, and if you finish with the northernmost shelf, then you'll complete the Special Quest for this level. For your reward, four mantis warriors will appear nearby and attack you. The mantis warriors are supposed to drop a Ring of Feather Fall, two Rings of Protection +2, and a Ring of Sustenance when they die, but they didn't drop anything for us.
20 - Secret Button
There's a secret button on the western wall here, but pressing it doesn't seem to do anything.
21 - Proper Sequence Puzzle
In the hallway to the west, you'll discover a bunch of levers (L) and teleporters (T). Toggling a lever will change the destination of the teleporter to its left. So you'll have to figure out the right sequence of teleporters and levers to reach the western side. Luckily, the solution is simple: Ignore L1 and step into T1. This will send you to L5. At L5, turn around and step into T4. This will take you to the end (#22).
If you're interested, the entire mapping is shown below:
- T1: If L1 is down, the destination is L2. If L1 is up, the destination is L5.
- T2: If L2 is down, the destination is L7. If L2 is up, the destination is L6.
- T3: If L3 is down, the destination is L4. If L3 is up, the destination is L6.
- T4: If L4 is down, the destination is L1. If L4 is up, the destination is #22.
- T5: If L5 is down, the destination is L2. If L5 is up, the destination is L3.
- T6: If L6 is down, the destination is L7. If L6 is up, the destination is L1.
- T7: If L7 is down, the destination is L1. If L7 is up, the destination is L6.
22 - Pressure Plate
When you step here, all of the teleporters to the east (L1-L7) will disappear.
23 - Plate Mail
You'll find Plate Mail on the ground here.
Exits
- Stairs up to
Level 9.
- Stairs up to
Level 9.
- Stairs up to an isolated part of
Level 9, where you'll find a Cleric Scroll of Raise Dead..
- Stone door to
Level 8. You'll arrive at the broken stone door on
Level 8. To get back, you'll have to explore
Level 8 and find the working stone door. This door requires the Stone Scepter.
- Stone door to
Level 6. This door requires the Stone Ring.
- Pit down to
Level 11. This is the only way to reach
Level 11 until you've picked up the Stone Holy Symbol, which will allow you to reach
Level 11 from a stone door on
Level 7. You'll find the Stone Holy Symbol on
Level 11, so you'll have to jump into this pit at least once.