Did we miss anything in this location? Is there something we didn't discover?
Let us know!
Enemies
Notable Loot
Did we miss anything in this location? Is there something we didn't discover?
Let us know!
Enemies
Notable Loot
- Backstabber +3 (#9)
- Chainmail (#29)
- Human Bones (#20)
- Long Sword (#20)
- Shield (#16, #29)
Special Quest
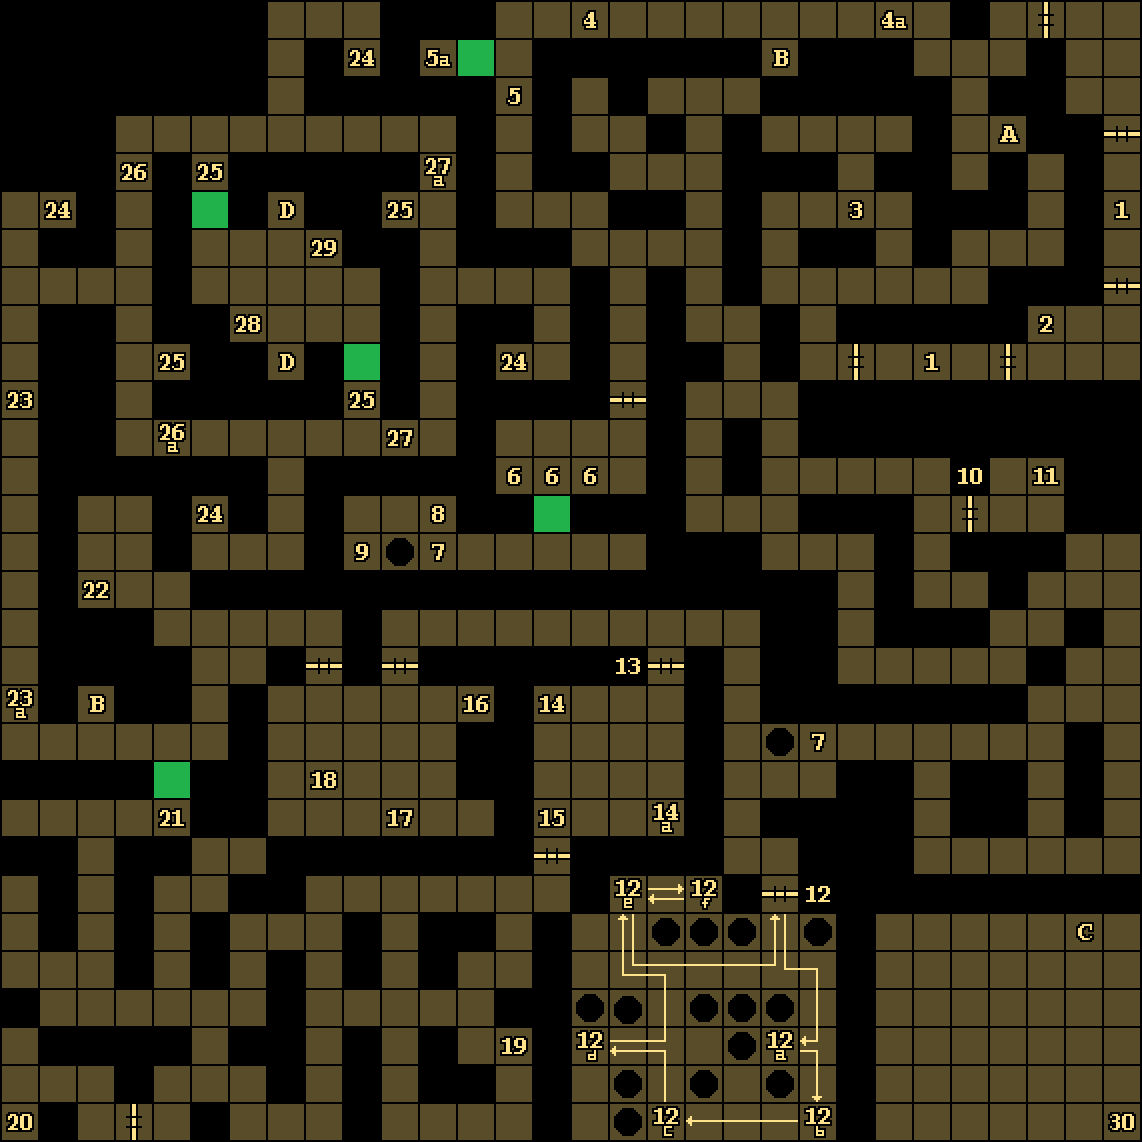
Overview
1 - Spinners
These squares will rotate you by 180 degrees. You'll feel dizzy when you leave them.
2 - Silver Key
You'll find a Silver Key on the ground here.
3 - Flind
Somewhere round here, you'll encounter a Flind. It will drop a Silver Key when it dies.
4 - Teleporter
If you travel east from here (#4), then you'll get sent to the eastern side of the tunnel (#4a).
5 - Button / Scroll
If you push the button on the western wall here (#5), then you'll remove the nearby moveable wall, which will grant you access to a Cleric Scroll of Cause Light Wounds (#5a).
6 - Silver Keyholes
You'll need Silver Keys (#2, #3) to unlock the three metal plates here. Here's what you'll find behind them:
- Behind the eastern and western plates, you'll find a red button. When you press it, a Kuo-Tua will appear behind you. It'll drop a Silver Key when it dies.
- Behind the middle plate, you'll find a blue button. When you press it, the moveable wall behind it will disappear.
You'll also find an Arrow on the ground next to the middle plate.
7 - Hidden Pressure Plate
Stepping here will cause a pit to appear to the west.
8 - Mage Scroll
You'll find a Mage Scroll of Detect Magic on the ground here.
9 - Treasure
On the ground here, you'll find a Red Gem and the dagger Backstabber +3.
10 - Locked Door
There are two silver keyholes for this door, but you'll only need to unlock one of them to open the door. If you use the keyhole just to the north, then two Kuo-Toa will spawn nearby. If you use the keyhole two squares to the south, then nothing will spawn. Either way, you'll encounter a Kuo-Toa in the room behind the door.
11 - Potions
At this spot, you'll find a Potion of Healing and a Potion of Extra Healing.
12 - Locked Door / Pit Puzzle Room
To open the door here, you'll need to place a Red Gem (#19) into the compartment next to it. Beyond the door, you'll discover a large room filled with pressure plates and pits. What you'll need to do in the room is walk onto the correct pressure plates so you clear a path to the treasure at the end (#12e). Here's how to do it:
- Walk to the pressure plate at #12a. This will clear the way to the pressure plate at #12b.
- Walk to the pressure plate at #12b. This will clear the way to the pressure plate at #12c.
- Walk to the pressure plate at #12c. This will clear the way to the pressure plate at #12d.
- Walk to the pressure plate at #12d. This will clear the way to the treasure at #12e.
- Collect the treasure at #12e. You'll find four Arrows, a Potion of Speed, and a Red Gem.
- If you deviated from our path and took the Rock near the entrance, then you'll need to walk to the pressure plate at #12f. This will clear the way to the exit. Otherwise, the way to the exit will already be clear.
- Exit the room, collecting the Rock along the way if you need it.
If you fall down into one of the pits, then you'll land in a sublevel, where you'll get attacked by a few Kuo-Toa, and where you'll find a Wand of Magic Missile (#30). To escape from the sublevel, you'll just need to head to the exit portal (Exit C), which will take you back to the entrance of the puzzle room (#12).
13 - Locked Door
To open the door here, you'll need to place a Red Gem (#12, #19) into the compartment next to it.
14 - Spinner / Teleporter
When you step here (#14), you'll be rotated by 180 degrees, and you'll be sent to the opposite corner of the room (#14a).
15 - Mage Scroll
You'll find a Mage Scroll of Fireball on the ground here.
16 - Shield
You'll find a Shield on the ground here.
17 - Cleric Scroll
You'll find a Cleric Scroll of Flame Blade on the ground here.
18 - Potion of Healing
You'll find a Potion of Healing on the ground here.
19 - Red Gem
You'll find a Red Gem on the ground here.
20 - Anya's Remains
At this spot, you'll discover the remains of a human fighter named
Anya: Human Bones, Leather Armor, a Long Sword, and a Spear. If you visit the Dwarven Cleric on
Level 5, then you'll be able to resurrect Anya and add her to your party.
21 - Button
At this spot, you'll find a button on the northern wall. Pressing it will eliminate the moveable wall behind it. You'll also find a Rock on the ground here.
22 - Rations
You'll find Rations at these spots.
23 - Teleporter
Every other time you reach this spot (#23), you'll get teleported to the other end of the passageway (#23a).
24 - Shelves
You'll find a Blue Gem in each of these four shelves.
25 - Cat Eyes
At these four spots, you'll find a pair of cat eyes on the wall. One of them will be glowing blue, and the other will be empty. If you fill all of the empty cat eyes with Blue Gems (#24), then you'll open the way to a central chamber, where you'll find some loot (#28, #29) plus two ladders leading to Level 4 (Exit D). Afterwards, if you remove all of the Blue Gems from the eyes, then you'll complete the Special Quest for the level, which will reward you with a Potion of Extra Healing (at #28) and a Potion of Giant Strength (at #29).
26 - Teleporter
This teleporter (#26) will rotate you by 270 degrees and send you to the south (#26a).
27 - Teleporter
This teleporter (#27) will rotate you by 270 degrees and send you to the north (#27a).
28 - Iron Rations
You'll find Iron Rations (x3) inside the shelf here.
29 - Treasure
At this spot, you'll find an Arrow, Chainmail, and a Shield.
30 - Wand
You'll find a Wand of Magic Missile on the ground here.
Exits
- Ladder back up to
Level 2.
- Rapid Access Teleport System (RATS).
- One-way out of the sublevel, back to the start of the pit puzzle room (#12).
- Ladders down to
Level 4.