 Did we miss anything in this location? Is there something we didn't discover?
Let us know!
Enemies
Neutrals
Notable Loot
Did we miss anything in this location? Is there something we didn't discover?
Let us know!
Enemies
Neutrals
Notable Loot
- Plate Mail (#10)
- Ring of Feather Fall (#9)
- Scale Mail (#2)
- Stone Medallion (#35)
- Stone Necklace (#34)
Special Quest
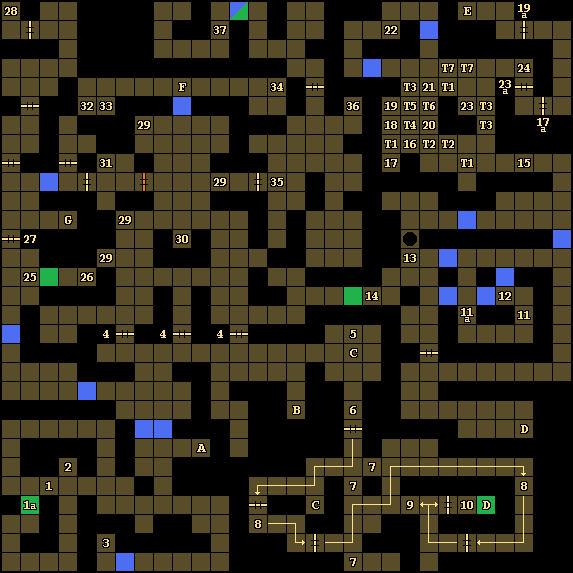
Annotations
1 - Hidden Button / Moveable Wall
Pressing the button here (#1) will remove a nearby moveable wall (#1a).
2 - Scale Mail / Dwarven Key
You'll find Scale Mail and a Dwarven Key on the ground here.
3 - Cleric Scroll
You'll find a Cleric Scroll of Prayer on the ground here.
4 - Locked Doors
These three doors can be unlocked using Dwarven Keys. You can also pick the locks if you have Lock Picks and a decent thief. Since there is only one Dwarven Key available on this level (#2), we'd recommend either picking open these doors or taking the long way around them, and saving the Dwarven Key for the locked door in the isolated part of
Level 4 (reached via Exit G).
5 - Gargoyle Lever
Pulling this lever will reset the pits in the greed puzzle (#6).
6 - Greed Puzzle
Beyond this door to the south, you'll discover the greed puzzle. Your goal in the puzzle is to pick up a pair of Keys (#8) and reach the treasure chamber (#10). However, for most of the locations in the puzzle, when you move forward, a pit will appear behind you, meaning you won't be able to backtrack. If you get cornered and have to jump into a pit, then you'll end up in
Level 6, but you'll find a staircase in the area, which allow you to come back up to this level (via Exit B). If you want to try the puzzle multiple times, then you can pull the gargoyle lever to the north (#5), which will reset all of the pits to their closed position.
7 - Junk Items
At these three places, you'll find a (worthless) pair of Boots, a Cursed Axe -3, and a Cursed Sling -3. There isn't any reason to pick up any of these items.
8 - Keys
You can use these two Keys to open the treasure chamber (#10) and an exit from the puzzle (Exit D).
9 - Ring of Feather Fall
On the ground here, you'll find a (blue) Ring of Feather Fall. Wearing such a ring will prevent a character from taking damage when jumping into pits.
10 - Treasure Chamber
To unlock the door to this room, you'll need a Key (#8). Once inside, you'll find a Mage Scroll of Invisibility 10' and Plate Mail on the ground. Then on the southern wall of the room, you'll find another keyhole. If you use a second Key (#8) on it, then you'll eliminate the moveable wall to the east, revealing a portal out of the greed puzzle (Exit D).
11 - Teleporter
This teleporter (#11) will rotate you by 180 degrees and send you to the west (#11a).
12 - Wand
You’ll find a Wand of Frost on the ground here.
13 - Pressure Plate
Stepping onto the pressure plate here will open the pit just to the north.
14 - Button
Pressing the button here will eliminate the moveable wall to the west.
15 - Teleporter Puzzle
In this puzzle area, you'll discover numerous teleporters (T), and you'll have to navigate your way through them to reach a staircase leading to Level 6 (Exit E). The mapping for the teleporters is shown below:
- T1 takes you to #15.
- T2 takes you to #16.
- T3 takes you to #18.
- T4 takes you to #20.
- T5 takes you to #17.
- T6 takes you to #21.
- T7 takes you to #24.
Starting at #15, you should head west twice and then north twice to T3, which will take you to #18. From #18, you should head north to #19 and pull the lever there. From #19, you should head east to T5, which will take you to #17. At #17, you should pull the lever on the western wall and then head north to T1. This will take you back to #15.
Back at #15, you should return to T3, which will take you to #18. But this time at #18 you should head east to T4, which will take you to #20. From #20, you should head north to T6, which will take you to #21. From #21, you can do some exploring and pick up some loot at #22, but eventually you should enter T7, which will take you to #24. From #24, you should walk over to #23 and pull the lever there. With all three levers pulled, the doors to Exit F will be open, allowing you to head right to it.
Note: While you're exploring the area, you might notice a couple of items on the ground that don't seem to be accessible. They're not, so don't worry about them.
16 - Destination
17 - Destination / Lever
Pulling the lever here (#17) will open a door to the east (#17a).
18 - Destination
19 - Lever
Pulling the lever here (#19) will open a door to the east (#19a).
20 - Destination
21 - Destination
22 - Loot
On the ground here, you'll find a Spear and Iron Rations.
23 - Lever
Pulling the lever here (#23) will open a door to the east (#23a).
24 - Destination
25 - Secret Button
Pressing the secret button here will eliminate the moveable wall to the east.
26 - Mage Scroll
You'll find a Mage Scroll of Dispel Magic on the ground here.
27 - Door
This door can only be opened from the north.
28 - Cleric Scroll
You'll find a Cleric Scroll of Hold Person on the ground here.
29 - Iron Rations
You'll find Iron Rations at these places.
30 - Pantry
If you place five regular Rations into the alcove here, then you'll complete the Special Quest for this level, and you'll receive five Iron Rations in return. You can only make this transaction once. You'll also find a Potion of Poison on the ground here. If you don't have enough Rations, you can get some from Armun (#35).
31 - Secret Button
Pressing the secret button here will open the door to the southwest.
32 - Cleric Scroll
You'll find a Cleric Scroll of Aid on the ground here.
33 - Mage Scroll
You'll find a Mage Scroll of Haste on the ground here.
34 - Stone Necklace
You'll find a Stone Necklace in the shelf here. You'll need the necklace to activate the stone door to the west (Exit F).
35 - Armun / Dwarven Camp / Stone Medallion
At this spot, you'll meet Armun, a spokesman for the dwarven clan living on this level. He'll tell you about stone doors (including Exit F), and how a group of drow led by Shindia used them to poison King Teirgoh and kidnap Prince Keirgar. If you agree to help the dwarves, then Armun will give you six Rations and a Stone Medallion (which you can use to activate the stone door on
Level 4), and a dwarf named
Dohrum will offer to join you.
Note:
Dohrum has better stats but a lower level than
Taghor from
Level 4.
Another Note: To talk to Armun again, just return to this location.
In the rest of this large chamber, you'll encounter lots of dwarves. They won't attack you unless you attack them. We'd recommend that you just leave the dwarves be. There are so many of them, if they turn hostile then they'll likely overwhelm and kill you. Besides Armun, the only dwarf of any importance is the Dwarven Cleric (#36).
36 - Dwarven Cleric
This cleric can heal your party or resurrect your characters, including any bones you might have found in other parts of the dungeon. Just be aware that each time the cleric helps you, you'll have to wait a while before he can help you again.
37 - Secret Button
Pressing the secret button here (on the eastern wall), will eliminate the nearby moveable / illusionary wall.
Exits
- Stairs back up to
Level 4.
- Stairs down to
Level 6.
- One-way portal out of the greed puzzle (#6).
- One-way portal out of the greed puzzle (#6).
- Stairs down to
Level 6.
- Stone door to
Level 7. To activate the door, you'll need to click the Stone Necklace (#34) onto the empty symbol slot on the door's frame.
- Stairs up to an isolated part of
Level 4.


