 Did we miss anything in this location? Is there something we didn't discover?
Let us know!
Notes
Did we miss anything in this location? Is there something we didn't discover?
Let us know!
Notes
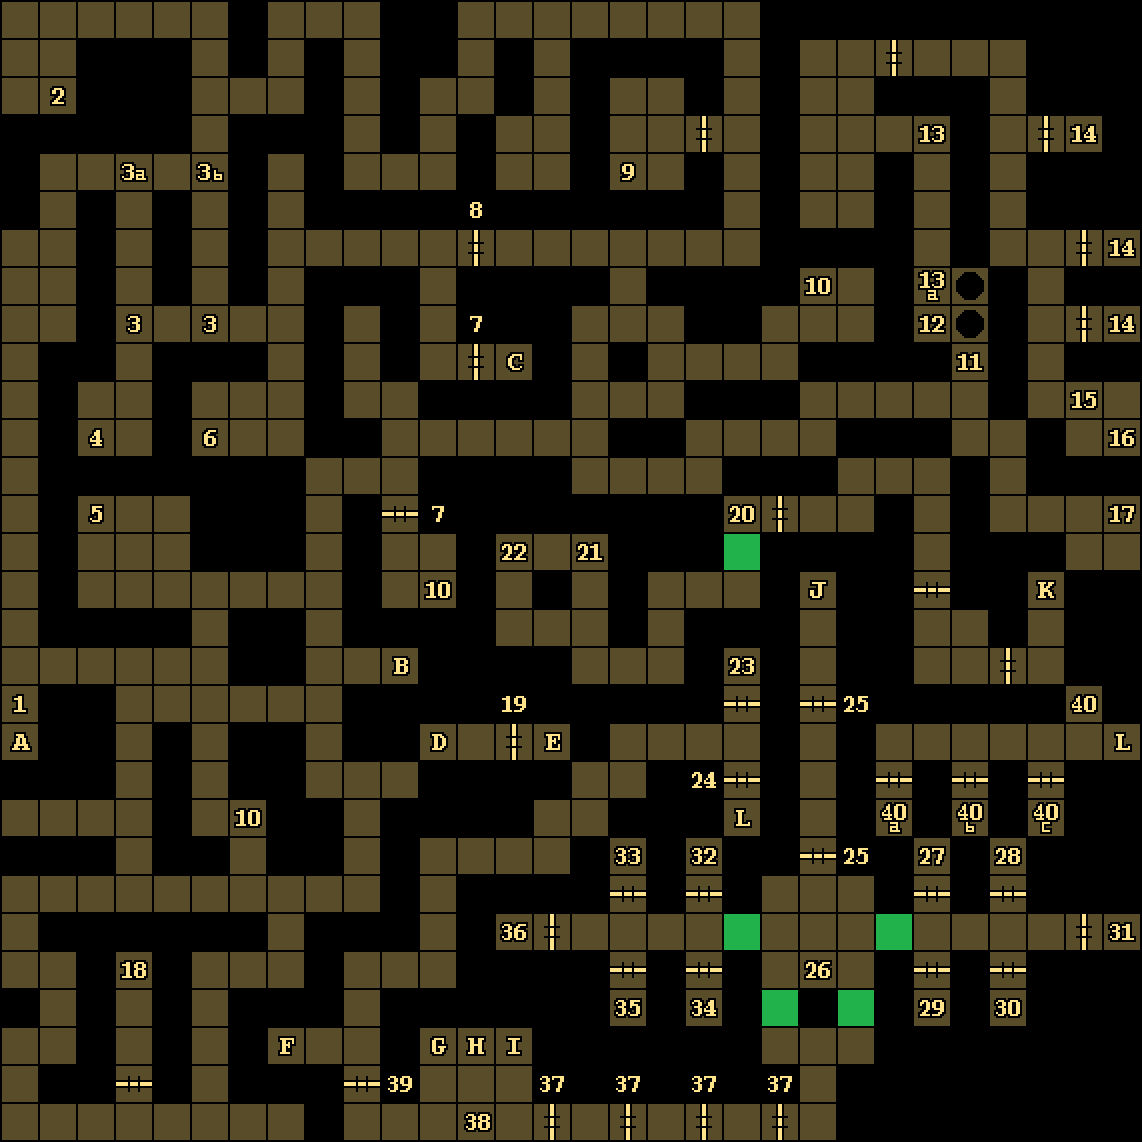
- This level is divided into two parts. You'll out start in the northwestern part. To reach the southeastern part, you'll have to visit the
inner parts of Levels 8 and 9. That is, you'll have to descend at Exit B, briefly pop up at exits D and E, and then finally emerge again at Exits J and K.
- The drow on this level will paralyze you with their attacks. The paralysis will only last for a minute or two, but still, it's best to avoid it during fights. So try to kill the drow with ranged attacks, or by attacking and moving away so they can't retaliate. Also make sure that your cleric(s) have the Remove Paralysis spell memorized.
Enemies
Notable Loot
- Adamantite Long Sword +1 (dropped by enemies)
- Banded Mail (#27)
- Bracers of Defense +3 (#40b)
- Ring of Protection +2 (#22)
- Ring of Wizardry (#40c)
- Rock +1 (#38)
- Slicer +3 (#40a)
Special Quest
Annotations
1 - Drow Patrol
When you first arrive on Level 7, a drow patrol will stop you. You'll be given two options for how to deal with them:
- You can bribe the patrol with a Kenku Egg (from
Level 6). The patrol will take all of your eggs, but they'll be happy with however many they get, meaning you can give them just one. You'll need three Kenku Eggs for the Special Quest on
Level 10, so as long as you leave that many behind, you should be fine.
Bribing the patrol will cause them to disappear, and all of the drow in the level will start out neutral to you. But when you reach the fireball pressure plates to the north (#3), any fireball that hits a drow will cause them to turn hostile, so you'll almost certainly end up fighting them eventually.
- You can fight the patrol. This fight can be rough since you won't be able to maneuver. But luckily the stairs (Exit A) will be right behind you, so you can flee and rest as needed.
2 - Mage Scroll
You'll find a Mage Scroll of Fireball on the ground here.
3 - Fireball Pressure Plates
Stepping onto any of these pressure plates (#3, #3a, #3b) will cause a fireball to shoot out of the wall. The fireball will start out at #3a, head east to #3b, and then head north. If you're quick, you can immediately move off the pressure plate and avoid getting hit. You can also use the pressure plates to lure some nearby drow to their deaths.
4 - Cleric Scroll
You'll find a Cleric Scroll of Slow Poison on the ground here.
5 - Luck Stone Medallion
You'll find a Luck Stone Medallion on the ground here. As far as we can tell, the medallion doesn't actually do anything.
6 - Cleric Scroll
You'll find a Cleric Scroll of Create Food on the ground here.
7 - Locked Doors
You'll need Keys (#16, #18) to open these doors.
8 - Door
This door can only be opened from the eastern side.
9 - Loot
You'll find a Cleric Scroll of Bless, Iron Rations, and a (worthless) Necklace of Adornment on the ground here.
10 - Arrows
You'll find one or more Arrows at each of these three locations.
11 - Spider Button / Pit
Pressing the button here will close the pit just to the north and also trigger a fireball (#13). The quickest way to reach the main part of
Level 8 is to jump into either of the nearby pits.
12 - Pressure Plate
Stepping onto this pressure plate will trigger the fireball to the north (#12).
13 - Fireball
When this fireball is triggered (at #11 or #12), it will travel south to #13a and then turn east. As long as you wait for it to pass, you should never get hit by it.
14 - Rooms
The only way to open the doors to these rooms is to step onto the pressure plate to the south (#15). Opening the rooms will release three skeletal lords. In the northernmost room, you'll find a Holy Symbol and the Human Bones belonging to the cleric
Ileria.
Ileria has really bad stats (including 9 Wisdom), so you might want to leave her where she is.
Note: Skeletons only take half damage from slashing and piercing attacks. So make sure one of your frontline fighters is using the Mace +3 from
Level 6.
15 - Pressure Plate
Stepping onto this pressure plate will open the rooms to the north (#14).
16 - Loot
In this square plus the one to the north, you'll find a Cleric Scroll of Protection from Evil 10', a Cleric Scroll of Remove Paralysis, and a Key. You'll need the Key for a pair of locked doors in the level (#7).
17 - Shield
You'll find an ordinary (but different-looking) Shield on the ground here.
18 - Key
You'll find a Key and a Potion of Healing on the ground here. You'll need the Key for a pair of locked doors in the level (#7).
19 - Locked Door
You'll need a Drow Key to open this door. You'll find one on
Level 8 (Inner).
20 - Shelf of Sacrifice
If you place any item into the shelf here and press the button next to it, then the item will disappear, but the moveable wall to the south will also disappear. So put in something you don't need, like a Rock or extra Rations.
21 - Pit
If you jump down into the pit here, then you'll land in a part of
Level 8 (Inner) where you'll find a Cleric Scroll of Raise Dead.
22 - Ring of Protection +2
You'll find a Ring (of Protection) +2 on the ground here.
23 - Skeletal Lords
You'll encounter two skeletal lords in this room, so be sure to have your blunt weapons ready. This room will disappear if you don't get to it quickly enough (see #39).
24 - Door
You won't be able to open this door directly. Instead, it will only open when you exit from the stone door chamber (#39).
25 - Doors
These doors can only be opened from the northern side. They'll close behind you after you've gone through them, cutting off your retreat.
26 - Button
When you press this button, you'll open passages to the east, west, and south. The eastern and western passages will lead you to a series of cells, where you'll encounter skeletal lords but find loot and keys. The southern passages will lead you to the exit doors (#37, #39), which you'll be able to unlock using the keys from the cells.
Note: For best results, try to lure the skeletal lords back to the chamber with the button, where you'll be able to dance around them and avoid damage.
27 - Cell
Inside this cell, you'll encounter a skeletal lord, but you'll find Banded Mail. When you enter the cell, you'll open the door to its partner cell (#34).
28 - Cell
Inside this cell, you'll encounter a skeletal lord, but you'll find three Arrows. When you enter the cell, you'll open the door to its partner cell (#35).
29 - Cell / Jeweled Key
Inside this cell, you'll find a Jeweled Key. When you enter the cell, you'll open the door to its partner cell (#32).
30 - Cell / Ruby Key
Inside this cell, you'll encounter two skeletal lords, but you'll find a Ruby Key. When you enter the cell, you'll open the door to its partner cell (#33).
31 - Cell
The script for this door is broken. If you press its button, nothing will happen. So to open this cell, you'll have to enter its partner cell (#36). Inside the cell, you'll encounter two skeletal lords, but you'll find a Mage Scroll of Lightning Bolt.
32 - Cell / Jeweled Key
Inside this cell, you'll find a Jeweled Key. When you enter the cell, you'll open the door to its partner cell (#29).
33 - Cell
Inside this cell, you'll encounter a skeletal lord, but you'll find a Mage Scroll of Fear. When you enter the cell, you'll open the door to its partner cell (#30).
34 - Cell
Inside this cell, you'll encounter a skeletal lord, but you'll find a Cleric Scroll of Cure Light Wounds. When you enter the cell, you'll open the door to its partner cell (#27).
35 - Cell / Drow Key
Inside this cell, you'll encounter a skeletal lord, but you'll find a Drow Key. When you enter the cell, you'll open the door to its partner cell (#28).
36 - Cell / Drow Key
Inside this cell, you'll encounter a skeletal lord, but you'll find a Drow Key. When you enter the cell, you'll open the door to its partner cell (#31).
37 - Exit Doors
You'll only be able to open these doors from the eastern side. You'll need two Drow Keys (#35, #36) and two Jeweled Keys (#29, #32) to open the doors.
38 - Shelves
Inside the three shelves along the southern wall of this chamber, you'll find a (red) Rock +1 and a (worthless) Wand of Stick. If you place a stone door activator (like the Stone Dagger or the Stone Necklace) into each of the shelves, then you'll complete the Special Quest for this level, and you'll receive three Scrolls in return (one in each shelf). The Scrolls will give you obscure hints about the game. To read the Scrolls, just equip them in a character's weapon- or off-hand, and then right click on them.
39 - Locked Door
This door can only be opened from the southern side. You'll need a Ruby Key (#30) to open the door. When you go through this doorway, you'll collapse a room (#23), but you'll open the way (Exit L) into the treasure vault (#40).
40 - Treasure Vault
Inside this treasure vault, you'll discover three doors, each one with a lever and a sign next to it. You'll only be able to open one of these doors (by pulling its lever). This is what you can get:
- Bracers of Defense +3 (#40b).
- Ring of Wizardry (#40c). This ring will double the number of 4th and 5th level spells a mage can memorize. It's not wildly useful in this game, but it will become much more powerful if you carry it with you through Eye of the Beholder 2 and Eye of the Beholder 3.
- Slicer +3 (#40a). This is a short sword.
Exits
- Stairs up to
Level 6.
- Stairs down to
Level 8 (Inner).
- Stairs up to an isolated part of
Level 6.
- Stairs down to
Level 8 (Inner).
- Stairs down to
Level 8 (Inner).
- Stairs down to
Level 8.
- (Northern wall) Stone door to
Level 5. It requires the Stone Necklace.
(Western wall) Stone door to
Level 11. It requires the Stone Holy Symbol.
- Stone door to
Level 9. It requires the Stone Dagger.
- (Northern wall) Stone door to
Level 4. It requires the Stone Medallion.
(Eastern wall) There isn't an activator for the stone door here.
- Stairs down to
Level 8 (Inner).
- Stairs down to
Level 8 (Inner).
- Portals. These two portals aren't directly linked, but they'll take you into or out of the treasure vault (#40).