 Did we miss anything on this map? Is there something we didn't discover? Let us know!
1 - The Tests Begin
Did we miss anything on this map? Is there something we didn't discover? Let us know!
1 - The Tests Begin
After arriving here from the
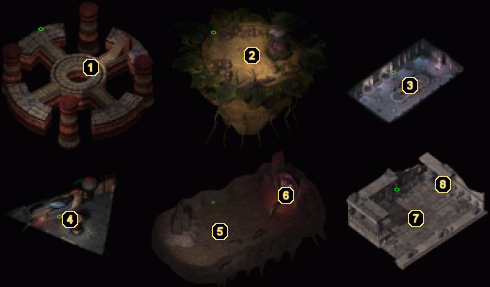
Asylum Dungeon 3, you'll be required to kill a handful of Kobold Commandos and a couple of Goblin Commandos. You'll be forced to use ranged combat or magic spells to reach some of them, but once they're all dead, you'll be confronted by an apparition on the stairs who will teleport you to a second test (area #2).
2 - Second Test
When you arrive at the second test area, you must kill a Spore Colony, after which the apparition will once again appear to ask you a riddle. The answer to this riddle is "A Splinter", and after answering correctly, the you'll be teleported to area #3.
3 - Third Test
The third test area is actually a small room with a large banquet table. Before doing anything, search the table to find the
Cloak of Reflection, a powerful cloak that reflects electrical damage back to its source. Don the cloak, then speak to the apparitions sitting in chairs around the room to be presented with more riddles. The answers to the four questions posted to your party are: "Nothing", "A River", "Fear", and "Memory". If you fail on any of the first few questions, you will be teleported to area #7. If you fail on the final question (Memory), you will be teleported to area #4. If you answer all questions correctly, you will be teleported to area #5.
4 - Fourth Test
The fourth test is only accessed if you answered the fourth question wrong during the third test. This area doesn't really have a test for your party, but instead it does house a strange machine that you can manipulate. Grab the lever from the corpse lying on the ground and use it to configure the machine in this order: Mithril, Ruby, Emerald, Sandalwood, Jade, Onyx. This will net you some
Bracers of Defense AC 5.
5 - Fifth Test
The fifth test area is only accessed if you answered all questions correctly during the third test. As soon as you arrive, you'll be confronted by two Trolls and a Spectral Troll, so prepare some fire or acid to take them down permanently. Once they're dead, grab a head from one of their corpses and proceed to area #6.
6 - Troll Altar
When you arrive at the altar, the apparition will appear and want to take you to the next area. Tell him that you're not finished yet and place the Troll head onto the altar. The room will shake a bit, after which a
Bone Club +2, +3 vs. Undead will appear on the altar. After looting the club, tell the apparition you're ready to leave and you'll be teleported to area #7.
7 - Judgement
At this point, the apparition will judge your performance during the tests. If you did well, you'll be awarded 51,250 experience points. If you did poorly, the apparition will teleport in a Mind Flayer for you to battle and you'll only be awarded 41,250 experience points. Either way, head to area #8 to exit the tests.
8 - Exit
Head through this exit to return to
the second floor of the Asylum.


