 Did we miss anything in this section? Is there something we didn't discover?
Let us know!
Overview
Did we miss anything in this section? Is there something we didn't discover?
Let us know!
Overview
To make your way through this building, you'll need to deal with the security robots on each floor:
- Main Floor. This is the easiest floor. The robots will leave you alone if you visit between 10am and 5pm, or if you have
Jenny Millet's Security Keycard (#6). For the security office (#7), you'll need to have
Jenny Millet's Security Keycard, or you'll need to hack the "average" terminal in the office and add your face to the first floor database, or you'll need to pass a Speech 60 check.
- 2nd Floor. To bypass the security on this floor, you'll need to have
Jenny Millet's Security Keycard (#6), or you'll need to pass an Intelligence 7 check, or you'll need to hack a "very easy" terminal (#11) and add your face to the second floor database, or you'll need to pick up the
REPCONN Second Floor Security Card (#12).
- Top Floor. To bypass the security on this floor, you'll need to have a
REPCONN Third Floor Security Card (#12 or #17), or you'll need to pass a Luck 7 check, or you'll need to have Intelligence less than 3.
The robots in the building aren't especially difficult to kill, so it's not a big deal if you trip the alarms. The main downside is that you'll then have to listen to the alarms for the remainder of your time inside. If you're interested in the Demise of the Machines challenge (which asks you to kill robots), then you should definitely trip the alarms, since it will cause sentry bots (#3) to wake up and attack you. If you don't want to deal with the sentry bots, then a Repair score of 65 will allow you to jam their compartments closed.
Note: Setting off the alarms on one floor won't set off the alarms on the other floors.
If you can make it past all of the security, then you'll find some good loot in the headquarters: the
Q-35 Matter Modulator (#10), a
Big Book of Science (#4), and two copies of
Nikola Tesla and You (#10 and #11).
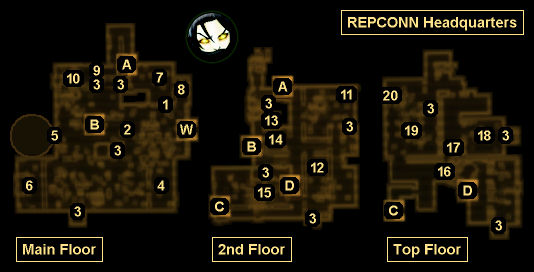
1 - Locked Door
You can open this door by picking its "average" lock, by hacking the "average" terminal next to it, or by picking up
Jenny Millet's Security Keycard (#6). On the floor by the door you'll find four dead fiends with some random equipment.
2 - Tour Guide
If you talk to the tour guide robot during business hours (10am to 5pm), then it will offer to show you around the Main Floor of the headquarters. The tour will include the robot opening up a locked door (#5), and so it's useful if you're not good at lockpicking.
3 - Hidden Doors
With 65 Repair, you'll be able to detect these hidden doors, which hide sentry robots. If you activate the doors, then you'll get an option to jam them closed (to prevent the sentry robots from responding to alarms) or leave them be.
4 - Gift Shop
Inside the main room of the gift shop, you'll find a
Sunset Sarsaparilla Star Bottle Cap (on the counter) and a
Rocket Souvenir (in a shelf). In the "hard" locked back room of the shop, you'll find some
Nuka-Cola Quartz and
Nuka-Cola Victory (on a table), more
Rocket Souvenirs (on another table), a
Big Book of Science (in a shelf), and an "average" locked safe (on the floor).
Note: You'll actually find two "average" locked safes right on top of each other, but both can be picked open and looted.
5 - Door to Planetarium
To get this door open, you'll need to pick its "average" lock, or take the tour from the tour guide (#2), or kill the tour guide for the key.
6 - Maintenance Room
On a machine here you'll find
Jenny Millet's Security Keycard. The keycard will allow you to move around on the Main Floor and 2nd Floor without setting off the alarms.
7 - Security Office
A mobile facial recognition scanner will patrol through this office and the 2nd Floor (via Exit A). If you have
Jenny Millet's Security Keycard, or if you hack the "average" terminal in the office and add your face to the first floor database, or if you pass a Speech 60 check, then the scanner will allow you to stay in the office. Otherwise you'll have to leave within 30 seconds to avoid setting off the alarms.
Inside the office you'll find 60
Microfusion Cells (on a desk) and a
Sunset Sarsaparilla Star Bottle Cap (on a different desk).
8 - Locked Storage Room
If you can pick open the "average" lock on the door, then inside the storage room you'll find a
Plasma Pistol, a
Plasma Rifle, three ammunition boxes, a first aid box, and 300
Microfusion Cells.
9 - Locked Door
To open this door, you'll need to pick its "very hard" lock, or hack the "very hard" terminal next to it, or acquire the
REPCONN Third Floor Security Card (#12 or #17). If you make your way into the storage room (#10) behind the door without going through the door (by going through Exit B instead), then you'll be able to use the terminal on the other side of the door to open it up.
10 - Storage Room
Inside this storage room you'll find the
Q-35 Matter Modulator (in a special display case), a first aid box, an unlocked safe, a copy of
Nikola Tesla and You (on the safe), and 220
Microfusion Cells (also on the safe). The debris in the room will allow you to climb up to the 2nd Floor (via Exit B).
11 - Terminal
If you can hack into this "very easy" terminal, then you'll be able to add your face to the second floor database, which will allow you to move around on the 2nd Floor without setting off the alarms. Next to the terminal you'll find a copy of
Nikola Tesla and You.
12 - Office
Inside this office, you'll find a
Sunset Sarsaparilla Star Bottle Cap (on a desk), a
REPCONN Second Floor Security Card (on another desk), and a "hard" terminal. Hacking the terminal will allow you to print out a
REPCONN Third Floor Security Card.
13 - Storage Room
If you can pick open the storage room's "average" lock, then inside you'll find three ammunition boxes and a first aid box.
14 - Office
If you can pick open the office's "average" lock, then inside you'll find an "easy" terminal with some information about the
Q-35 Matter Modulator (#10) plus the password for Isley's terminal (#19).
15 - Kitchen
You can use the debris here to climb up a level (and reach Exit D).
16 - BOS Paladins
You'll find a pair of Brotherhood of Steel paladin corpses among the debris here. Both corpses will have
Laser Rifles and
Brotherhood T-51b Power Armor, and one will also have a Brotherhood of Steel Mission Holotape. The holotape is needed for the quest
Still in the Dark.
17 - Isley's Briefcase
You'll discover Isley's briefcase on the floor here (next to a skeleton). Inside you'll find a bunch of
Pre-War Money plus a
REPCONN Third Floor Security Card.
18 - Steeple's Office
In this office you'll find a "very hard" terminal and a
Sunset Sarsaparilla Star Bottle Cap (on the counter near the terminal). Hacking the terminal will allow you to disable the robots in the building.
19 - Isley's Office
In this office you'll find an "easy" terminal and a
Sunset Sarsaparilla Star Bottle Cap (on the ground next to a shelf). Hacking the computer will allow you to open the nearby safe (#20). If you don't want to hack the terminal, you can get the password for it from an office on the 2nd Floor (#14).
20 - Safe
You'll find some random loot inside this "easy" safe.
Exits:
- Stairs between the Main Floor and the 2nd Floor.
- Stairs between the Main Floor and the 2nd Floor. To use this exit, you'll need to pick its "hard" lock or acquire a
REPCONN Third Floor Security Card (#12 or #17). You won't be able to access this exit from the main part of the Main Floor, but if you take the exit from the 2nd Floor side, then you'll be able to climb down some debris into a storage room (#10).
- Stairs between the 2nd Floor and the Top Floor. Directly beneath this exit on the 2nd Floor you'll find a hidden door containing a sentry robot (see #3).
- Stairs between the 2nd Floor and the Top Floor. To use this exit, you'll need to pick its "hard" lock or acquire a
REPCONN Third Floor Security Card (#12 or #17).
- Wasteland exit.


