 Did we miss anything in this section? Is there something we didn't discover?
Let us know!
Overview
Did we miss anything in this section? Is there something we didn't discover?
Let us know!
Overview
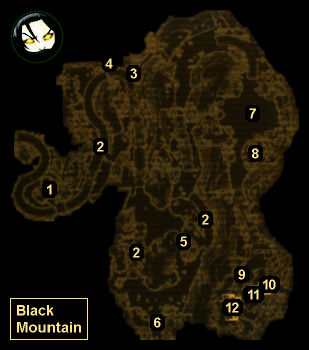
This part of the wasteland is heavily involved in the quest
Crazy, Crazy, Crazy, which you can trigger at Neil's Shack (#1). For more information about the quest, please refer to the quest entry. This section simply lists where to find the important NPCs and the interesting pieces of equipment.
1 - Neil's Shack
You'll meet a friendly super mutant named Neil here. He'll give you the quest
Crazy, Crazy, Crazy. You'll also find a couple of
Frag Grenades (in a shelf), plus a bed you can sleep on.
2 - Blockades
You'll usually find some supermutants or a nightkin at these three blockade points. You'll also find some minor gear, including a
Frag Grenade (on a shelf at the third blockade) and some ammunition boxes.
3 - Shortcut Trail
This trail will take you to the top of the mountain, but you'll have to deal with several traps (including an Indiana Jones style boulder trap) to use it. You'll find a dead NCR trooper at the base of the trail.
4 - Gore Bag
On the ridge north of the path here you'll find a gore bag with a
Combat Helmet, a
Hunting Revolver, and more on the ground next to it. You can reach the ridge via the shortcut trail to the east (#3).
5 - Suitcase
At this spot you'll find a suitcase containing
Pre-War Money. Next to the suitcase you'll find some
Turbo and
Cateye.
6 - Path to Scorpion Gulch
You can reach Scorpion Gulch by heading south from this point. Along the way, you'll pass by a radioactive crater guarded by a handful of centaurs, including a centaur named Moe. Inside the crater, you'll discover two dead Brotherhood of Steel paladins. On their corpses you'll find
Laser Rifles,
Brotherhood T-51b Power Armor, and a Brotherhood of Steel Mission Holotape (which you'll need for the quest
Still in the Dark). Listening to the holotape will mark the location of
Hidden Valley on your map, and also give you the password to enter the Brotherhood of Steel bunker there.
7 - Crater
The radiation in the area will come from the crater, so try to keep away from it as much as possible.
8 - Dwelling
Inside this structure you'll find three trunks (two of them locked with "average" locks) containing hundreds of caps, a
Minigun, and some
5mm Rounds. You'll also find a campfire and a radio transceiver. If you use the transceiver, then you'll start up a conversation with Tabitha (#12), and you might be able to convince her (with 75 Speech) that a revolt is starting up, which will draw away her remaining nightkin guards. Or you might just alert all of the nightkin to your presence.
9 - Radio Transmitter
You'll encounter a nightkin sniper on the transmitter platform. It will drop
Annabelle and a
Hunting Rifle when it dies. Also on the platform you'll find four radio transmitter control panels. If you activate them, then their lights will flip from red to green, but nothing else will happen.
10 - Prison
In the first room of the prison, you'll find two terminals, a workbench, and
Cuddles' Toy Car (on a table). If you read the entries on the repair log terminal, then you'll learn a few things about Tabitha, Raul, and Cuddles, and you'll also receive the password for the second terminal in the room, which would otherwise require "very hard" hacking. Logging into the second terminal will allow you to open the door to the second room of the prison, where you'll meet Raul, a potential companion. If you free Raul but don't offer to let him join you, then he'll head over to Raul's Shack (located east of New Vegas).
11 - Storage Building
When you enter the building, you'll find a Treasure Hunt note hanging on the target dummy next to the door. The items on the list can be found in the following places: various ammunition (in crates and buckets), three
C-4 Plastic Explosives (one behind a trunk, a second on the floor next to the broken Mr. Handy, and a third on the vending machine), a
Missile Launcher (in the back corner behind some tires), three
Missiles (one inside a traffic cone, a second inside a cinder block, and a third behind a gnome in the gnome shelf), five
Frag Grenades (four inside unmovable metal baskets, and one on top of the light fixture next to the broken Mr. Handy), and a
Super Stimpak (under an upside down pot). You won't get anything for completing the hunt.
You can also find some other objects in the building: a
Baseball Bat (on the floor next to the gnomes), a
Nuka-Cola Victory (at the bottom of a broken shelf), a
Sunset Sarsaparilla Star Bottle Cap (on a shelf next to some crates of
Empty Sunset Sarsaparilla Bottles), three locked trunks containing random guns and ammunition (which require
Tabitha's Equipment Key to open), and a broken Mr. Handy robot named Rhonda (which is involved in the quest
Crazy, Crazy, Crazy).
12 - Broadcast Building
On the first floor of this building, you'll find a pair of "easy" terminals that will give you some background information on the site. To reach the second floor, you'll need to exit the first floor via the back door, and then loot
Tabitha's Room Key from behind the stairs that you'll find outside. You can also get the key by luring Tabitha out of the building (by repairing Rhonda at #11 or by freeing Raul from #10) and getting it from her. You'll need the key to unlock the door to the second floor.
On the second floor, you'll find two locked trunks containing random guns and ammunition (which require
Tabitha's Equipment Key to open), Repair Note #3 (on a broken server), and a
Sheet Music Book (on the music stand). You'll probably also encounter Tabitha here. She's involved in the quest
Crazy, Crazy, Crazy. If you kill Tabitha, then she'll drop a
Super Sledge,
Tabitha's Equipment Key, and
Tabitha's Room Key.
Note: The
Sheet Music Book isn't used for anything. Feel free to sell it.


