 Did we miss anything in this section? Is there something we didn't discover?
Let us know!
Walkthrough
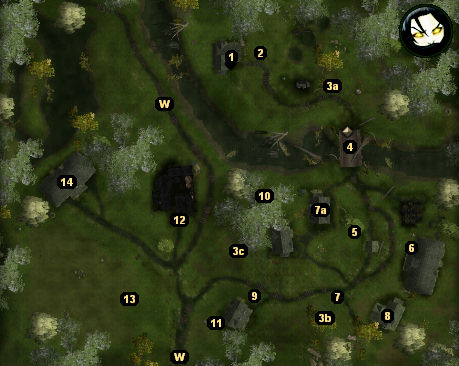
1 - Your House
Did we miss anything in this section? Is there something we didn't discover?
Let us know!
Walkthrough
1 - Your House
Just like in the tutorial, you'll begin Act I in your house, except this time you'll start upstairs in your bedroom. Bevil and Amie will immediately rush in (and join your party, if you skipped the tutorial), and they'll let you know that the town is under attack. You can find some basic equipment in the chest next to your bed, and, if you go into your foster father's room, you can loot a chest there for the book
Exotic Weaponry and
Arvoreen's Amulet of Aid.
When you arrive downstairs, three gray dwarves will break down the door to your house, and
they'll attack you. One of the dwarves will drop a
Club +1.
2 - Brother Merring
When you exit your house (#1), Brother Merring will come up to you and suggest that you meet with Georg at the bridge (#4). He'll also heal and bless you. If you get wounded during the battle, you can return to Brother Merring as often as you'd like for more healings and blessings.
Note: Nothing will happen if you heal the wounded villagers next to Brother Merring.
3 - Mossfeld Brothers
You'll find the Mossfeld brothers -- Ward (#3a), Wyl (#3b), and Webb (#3c) -- scattered
around the town. For two of them, you can kill them or let them die (to become more evil), or you can help them and recruit them for the town's defense (for xp and to become more good).
When you talk to Ward, you'll find that he's heavily wounded. If you can't heal him yourself, then you can go back to Brother Merring (#2) and receive some
swamp moss from him. Giving
swamp moss to Ward will heal him enough that he'll be able to fight for the town.
Wyl will be wounded just like Ward was, and you'll receive the same options for dealing with him. Next to Wyl, you'll discover Lewy Jons and his pet pig, both dead. Remember kids, this is what happens if you cheat.
Finally, you'll find Webb battling some bladelings, but when you talk to him, he'll be healthy enough to fight, and you'll automatically recruit him for the town's defense.
4 - Bridge
The first time you approach the bridge, you'll find Georg there with a couple of harbormen, and they'll be fighting some gray dwarves. After the battle, if you talk to Georg, he'll give you your main quest for this area: rally the militia and send them to the wheat field to the southwest (#13). To complete the quest, you'll need to send five soldiers to the field, so that you can battle the gray dwarves head-on the next time they attack. There are eight possible people (#3, #5, #6, #8-10) you can send to the field. For the most part, just talking to them will do the job. Each time you recruit a soldier, you'll receive 50 xp, even if you've already completed the quest.
5 - Lazlo Buckman
Talking to Lazlo will send him to the wheat field (#13).
6 - Ian Harmon
Ian won't be too enthusiastic about the battle, so he'll need some convincing to go to the wheat field (#13). You'll receive a bunch of dialogue options for this. If none of them work, you can always hit him. That will start a fight, but after you've damaged him enough, he'll agree to stand up to the raiders.
7 - Tarmas
You'll find Tarmas here (#7) battling a Githyanki mage. He'll warn you to stay out of the battle, but Amie will try to help him out, and she'll get herself killed. The Githyanki mage will then leave, but he'll summon some giant spiders to attack you before departing.
After the battle, Tarmas won't exactly mourn for Amie's death, but he'll tell you that you might find some useful supplies in his house (#7a), and then he'll rush off to the wheat field (#13). Tarmas won't count towards your quest to rally the militia.
Inside Tarmas' house, you'll find three containers that you can loot: a footlocker, a (trapped) cabinet, and a desk. Between them, you'll find some basic items, plus the book
The Crafts-Work of Evermeet and a
Fochluchan Bandore.
8 - Pierson's House
Pierson will be hiding inside his house, and he won't want to come out to help with the town's defense. If you pick open or bash down his door, then you'll be able to enter his house and talk to him. You won't have to make any skill checks in the conversation with Pierson; no matter what you say he'll agree to go to the wheat field (#13) and help out. Once Pierson leaves, you can loot his house if you want.
You'll find three containers inside Pierson's house, including a locked chest. If you bash open the chest, then you'll probably break something inside. So if you're not playing a rogue character, you might want to deal with Pierson before approaching Tarmas (#7), so that you'll still have Amie available to cast "Knock" on the chest (assuming you had her learn the spell).
9 - Pitney Lannon
You'll find Pitney wounded, just like Ward and Wyl Mossfeld (#3a and #3b). You can use a regular healing spell or feat to heal Pitney, or you can use
swamp moss from Brother Merring (#2). Either way, if you heal him he'll join up with the militia.
10 - Militiaman
It's actually a militia woman, and she'll move on to the wheat field (#13) after you've helped her defeat the raiders around her, and after you've talked to her.
11 - Wagon
You'll find a pair of
torches in the wagon, which you might find useful while running around the town in the dark.
12 - Dying Gray Dwarf
The dying gray dwarf can give you some insight about why West Harbor came under attack -- for example, "We were
told to come here, to search for something silver" -- but really he's just there to give you a moral choice. If you want to become more evil, then slit his throat. If you want to become more good, then offer to heal him and, after he refuses, let him die.
13 - Wheat Field
This is where the soldiers will go after you've recruited them to help in the town's defense. Georg should also end up here, but sometimes he'll wander over to help out in the encounters with Webb Mossfeld (#3c) or the female militiaman (#10), and so you might find him in those places as well.
When you're ready to face a new wave of attackers, simply talk to Georg. The soldiers you recruited will line up in the field, and then the gray dwarves and bladelings will attack (you might need to move into the middle of the field to get the attack to start).
After two waves of attacks, you'll witness a cutscene where some of the dwarves will run into the Starling house (#14), and you'll be given a choice: to run in there and rescue Bevil's family, or to stay and make sure that the next wave of attacks is defeated.
If you decide to rescue the Starlings, you'll find yourself inside their house, right next to Retta Starling, Bevil's mother. She'll tell you that two of her children are inside the house, but that there is a large group of gray dwarves between you and them. She'll ask you to help, but she'll also let you use her three guard dogs, and between you, Bevil, and the dogs, you shouldn't have any trouble defeating the six gray dwarves in the living room. After the battle, when you talk to the children, you'll receive 75 xp no matter what you say to them, although if you're nice you'll also become more good. Then to re-enter the battle outside, just leave the house. You'll find yourself in the middle of the wave that started in your absence.
"Yaaaaay! We heard them screaming for mercy as they died! Is there any blood? Can we see?"
Note: You can rest inside the Starling house, so it's a convenient interruption in the middle of the attack waves. You can also loot a couple of locked containers in the house.
If you decide not the rescue the Starlings, then Bevil will leave for his house on his own, and you'll have to face the next wave of attacks by yourself. Bevil will rescue his siblings, and he won't hold a grudge against you, but there isn't any way for the next wave to overrun the militia (since people like Georg and Tarmas can't be killed), so there isn't really any reason not to try and rescue the children.
Regardless of what you decide, in the fourth and final wave of attacks, your foster father Daeghun will finally show up, and between him and the remaining militia, you should be able to mop up the attackers. After the fighting, Daeghun will reveal that the gray dwarves were probably after a
silver shard that he hid in the nearby
Swamp Ruins, and he'll ask you to retrieve it. He'll also order Bevil to accompany you (so Bevil will re-join your party, if you left him on his own to rescue his siblings). You can access the ruins using either exit (W) from the town.
Note: If you've acquired quite a few items during the attacks, or if you need more ammunition, you might want to talk to Tarmas before heading to the ruins. He'll act as a shopkeeper.
14 - Starling Residence
The Starling residence will play a role during the town's defense (see #13 for details). You won't be able to enter it either before or after the attacks.
Exits:
- World exit.


