 Did we miss anything in this section? Is there something we didn't discover?
Let us know!
Area Note
Did we miss anything in this section? Is there something we didn't discover?
Let us know!
Area Note
On the western side of the district you'll see map notes for an Armorsmith and a Weaponsmith. When we played through the campaign, we didn't find anything there. What we suspect is that if you failed to recruit an armorsmith or a weaponsmith for
Crossroad Keep in Act II, then this is where you'll find them in Act III.
Walkthrough
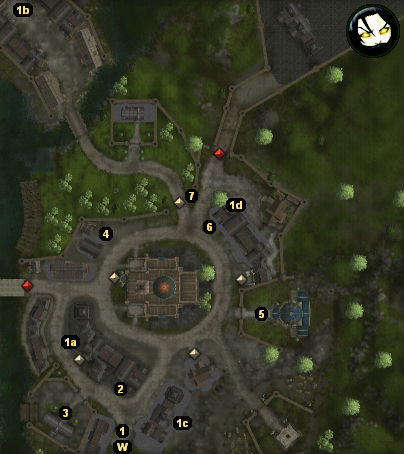
1 - Starting Point
2 - Light of Heavens
Light of Heavens is a potential sergeant for you at
Crossroad Keep. You'll have to meet her three times to recruit her (see the
Light of Heavens section for the locations), and each time you meet her, she'll test you in a one-on-one duel. The best way to deal with the duel is to prepare for it beforehand. Since you'll know when and where the fight will take place, you can cast spells like acid fog and haste and regenerate before talking to her, and in that way make the battle easier for yourself. Once you've defeated Light of Heavens, she'll leave.
If you identify yourself as evil, then instead of testing you, Light of Heavens will simply attack you. If that happens, then defeating her will kill her, and you won't be able to recruit her for your keep. Light of Heavens will drop a
Bastard Sword +3, a
Heavy Shield +5, and a
Greater Cloak of Protection vs Evil when she dies.
3 - Axle's Office
If you joined with Axle and Moire, then at some point in Act III, Uncus at
Crossroad Keep will tell you that Axle would like to meet with you. Until that time, you won't be allowed to enter Axle's office. If you joined the City Watch, then you'll never be allowed inside.
When you meet with Axle, he'll quiz you about some of your decisions at
Crossroad Keep, and then he'll ask you to kill Moire. (This conversation can be a little odd, as if a step were skipped somewhere along the line. It's likely that Axle will think he's asked you to kill Moire before he actually has.)
If you kill Moire, then Axle will probably attack you when you return (he always attacked us, but we didn't treat him very well once we took control of
Crossroad Keep). Meanwhile, if you talk to Moire, then she'll ask you to kill Axle, and if you do the job, then she'll reward you with 50,000 gp and the dagger
Leech. You can also kill both of the Shadow Thief leaders if you want.
Finding Moire
In order to deal with Moire (one way or the other), you'll have to find her hideout. The only way to do this is to have her thieves tell you where it is -- either on purpose or by mistake.
You'll find three groups of Moire's thieves in the Merchant Quarter. The group to the north of Axle's Office (#1a) won't tell you anything; they'll simply attack you. In the northwestern corner of the district (#1b), you'll witness some thieves trying to break into a warded house. When their plans go awry, two of the thieves will go running off to the south. If you follow the blond one, he'll lead you to Moire's Hideout (#1d), which used to be Leldon's Hideout, and you'll learn the pass phrase: "The Whole of Neverwinter."
The final group of thieves (#1c) can be found behind a house near the Tomb of the Betrayers. They'll attack you when they see you, but one of the thieves should turn neutral during the battle and then tell you what you need to know once the fighting has stopped. However, as of version 1.03, this conversation has never worked for us (the thief never says anything), and so we've only been able to learn the location and the pass phrase from the northern thieves.
Note: If you're not able to learn Moire's whereabouts, you can always return to Axle and kill him instead.
Another Note: If you kill Axle the first time you talk to him, then Moire's thieves won't appear in the Merchant Quarter, and you won't be able to get into her hideout.
Killing Moire
Moire is pretty straightforward to kill. When the battle starts, she'll disappear, and you'll have to fight your way to the back room of the hideout to reach her. Moire is only a melee fighter, and just about every spell and weapon will work against her. When Moire dies, she'll drop the dagger
Leech, but you probably won't find anything else of use in her hideout, on the remains of the Shadow Thieves or in the three chests, unless you're in need of some crafting gems.
Killing Axle
Every time you talk to Axle, you'll be escorted into the room with him, and your companions will be left in the foyer. When the fighting starts, several Shadow Thieves will appear and surround you. If you're playing a spellcaster, then you probably won't make it through the first round of combat, and your companions will have to do the bulk of the work.
Shadow Thieves aren't particularly difficult to kill, and some acid fog or fireballs or other spells will knock them out pretty quickly. Once the Shadow Thieves next to your companions have been killed, you might need to loot their bodies to pick up a
key. If you read the description for the key, it will mention the "Hamme Room" of the Ironfist Stronghold, but really it unlocks the door to Axle's office, allowing you to continue the fight (it's also possible that the Shadow Thieves in Axle's office will open the door themselves so they can get to your companions).
Axle can be tough to kill because he'll have time to buff himself up while you're trying to get to him. Oddly, he never seemed to do much other than buff himself up, so as long as you can do some damage to him, he'll eventually go down. We found that bigby's grasping hand and acid fog were pretty effective against him.
When the fighting is over, you'll find a lot of loot in the hideout. Axle will drop
Bracers of Armor +4, the
Dark Companion, a
Cloak of Displacement, a key (which will allow you to leave the hideout), and more. You'll also find a
Ring of the Wood Elves, a
Lesser Robe of Eyes, and
Anhur's Favored Blade in the two chests in the hideout, and one of the Shadow Thieves will drop the
Codex Necromantica.
4 - Bill Logan
Bill Logan will offer you a fairly unexciting selection of weapons.
5 - Temple of Tyr
The temple will be closed up, but you'll find Hlam standing outside, in case you still need to finish up
Khelgar's monk quest.
6 - Randolph
Randolph will offer you a reasonable selection of armor, jewelry and crafting supplies.
7 - Joy
Joy is Light of Heavens' (#2) sister. If you talk to her, then she'll agree to dance at
Crossroad Keep, and you'll earn 100 xp. If you're evil, then you might need to pass a bluff or diplomacy check to convince her to join you.
Exits:
- World exit.


