 Did we miss anything in this section? Is there something we didn't discover?
Let us know!
Area Note
Did we miss anything in this section? Is there something we didn't discover?
Let us know!
Area Note
On your way to Old Owl Well, you'll meet up with Grobnar, a gnome bard, who will then become available as a companion.
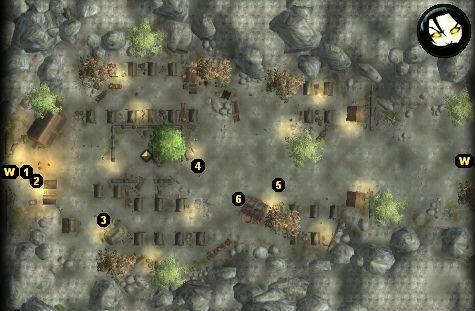
Walkthrough
1 - Starting Point
If you joined Moire and Axle in Neverwinter, then as soon as you enter the area and take a couple of steps forward, you'll begin a conversation with Karina (#2).
2 - Karina
Karina will only appear here if you joined Moire and Axle in Neverwinter. For that case, she'll give you some
forged council missives, which will basically allow you to run around the area as if you had decided to join the City Watch instead of Moire and Axle.
3 - Simmy
Simmy will have a variety of items for sale, including three weapons that can do fire or acid damage:
Desert Wind +1,
Will of Atar, and the
Biting Sword. In the near future you'll have to deal with some trolls, and so if you don't have any spellcasters who can do fire or acid damage, then you should make sure you have a weapon that can.
4 - Callum
Callum will tell you that he sent a scout out to look for the emissary, but that he hasn't heard anything back yet. Then an orc raiding party will attack. You'll only get xp for the orcs where you land the killing blow, so feel free to let loose with your most powerful area spells.
After the skirmish, Callum will mention that somebody else is fighting the orcs as well. The orcs call this person "Katalmach" (which Khelgar will inform you means someone who has lost himself to battle), but Callum will tell you that he hasn't been able to contact this person, and that the person doesn't seem to want to be found.
Then the scout will finally show up. He'll report that he found the remains of the emissary's guards but not the emissary himself, and that it looks like the orcs did it. That will cause Callum to give you your main quest for the area -- to rescue the emissary -- and he'll suggest that you start your search with the
Bonegnasher Clan. Callum will also hint that he wouldn't mind if you killed Logram Eyegouger, the orc leader, since that would cause the orcs in the area to start fighting amongst themselves. Finally, at the end of the conversation, Callum will mark the location of the
Bonegnasher Clan on the world map.
After you've rescued the emissary, when you return to Callum, he'll reward you with 1000 gp, the greataxe
Re's Redemption, and perhaps 500 xp (if you're holding Logram's "banner," which we think refers to the
orcish medallion you should have found on Logram's corpse).
If you've been working for the City Watch, then you'll next need to report to Captain Brelaina in the
Merchant Quarter, who will give you your next quest: to deal with the Luskan spies aboard the
Sea Ghost.
If you've been working for Moire and Axle, then you should first talk to Karina (#2), and then you should report to Axle in his office in the
Merchant Quarter. Axle will pay you 500 gp for your work at
Old Owl Well, and then he'll give you a new mission: to silence the traitor Fihelis at
his estate in the
Merchant Quarter.
5 - Pentin
After rescuing Pentin from the
Bonegnasher Clan, this is where you'll find him. You can get up to 300 gp from him if you ask him for a reward. Eventually you'll be able to hire Pentin to mine ore deposits for you, but that won't happen until Act II.
6 - Katriona
Katriona will show up here after you've met Casavir, and after you've rescued the Waterdeep emissary, but you won't be able to do anything with her until Act II.
Exits:
- World exit.


