 Did we miss anything in this section? Is there something we didn't discover?
Let us know!
Walkthrough
Did we miss anything in this section? Is there something we didn't discover?
Let us know!
Walkthrough
When you return to Crossroad Keep, you'll be named its Captain, and you'll be given control over its people and lands. The keep will function as your new Sunken Flagon, and you'll be able to use it to set your party composition.
The keep is sort of a mini-game, and it will use a different timeline than the rest of the campaign. If you give an order to somebody and then leave the area where that person is, then when you return to the person the order will usually be completed, even if you simply stepped out of and then back into the area. That means you can build up the keep as quickly or as slowly as you'd like.
The keep won't play a role in the campaign until Act III, and even then you won't need to have finished renovating it, and so most of the activities at the keep are optional. Still, many of the activities are beneficial (such as adding new shopkeepers for you to visit), and so it's worthwhile to play around with the keep and advance it as much as you can.
Master Veedle
Master Veedle (#9) is the stonemason in charge of renovating the keep and the surrounding lands. Each time you give him an order to build something, it will cost you gold. Veedle will take gold out of the keep's treasury first, but if you don't have enough there then you'll have to use your own funds. Each time you leave the courtyard and then return to it, Veedle will have completed whatever project you last gave him, so it's possible to build up the keep very quickly.
Here are the structures and improvements that you can build:
| Section
| Improvement
| Cost
|
| Keep
| Personal Suite (#13)
| 15,000
| | Library (#14)
| 15,000
| | West Wing (#15)
| 15,000
|
| Courtyard
| Smithy (#7)
| 10,000
| | Merchant's Shop (#4)
| 10,000
|
| Fortifications
| Repair the Walls
| 25,000
| | Reinforce the Walls
| 50,000
| | Towers
| 75,000
|
| Surrounding Areas
| Widen the Trail
| 10,000
| | Cobble the Trail
| 35,000
| | Improve Nearby Roads
| 50,000
| | Bridges and Watch Towers
| 100,000
|
| Tower (#5)
| Guard Tower
| 50,000
| | Wizard Tower
| 100,000
|
| Church (#6)
| Temple of Tyr
| 50,000
| | Monastery of the Sun Soul
| 75,000
| | | | | | |
Kana
Kana (#10) is your chief of staff. Just about everything involving people will go through her. Specifically, you'll need to talk to her to control your troops. From what we've seen, it's better to recruit soldiers and train them and improve their gear (see #7), before you send them out patrolling the roads. It's also better to use the highest standards when recruiting.
Here are some of the special events and missions that you'll learn about from Kana:
Torio Claven. Kana will tell you that Torio was found guilty of treason, which warrants a death sentence, but that Sir Nevalle interceded and announced that you should decide her fate. If you let Torio live, then she'll act as an advisor to you (she'll stand in the foyer at #12). If you let her die, then you'll never hear about her again.
Daerred's Adventuring Troupe. A group of adventurers will show up from time to time looking for work. If you want to get rid of them, then just lie to them, either in a good or bad way. Otherwise, ask Kana for her advice, or ask them if they've heard of something, and they'll rush off to seek their fortune. If the adventurers survive, then they'll forward you (funny) letters about what they've found (informing you, among other things, that the King of Shadows is a vegetarian), and they'll eventually send you a
Ring of Positive Thinking.
Old Man Morris. You won't be given any options for this mission, just to accept it or not. If you protect Old Man Morris from the bandits, then you'll receive 500 xp and
Old Man Morris' Necklace.
Leeves. This mission will appear once you've improved the fortifications of the keep. If your troops aren't in good shape by this point, then you'll probably fail the mission, even if you send half of your men to the town. So let your men train a little, improve their gear, and send Katriona along to them help out, and they should succeed. If you protect Leeves, then you'll improve the morale of your troops, but nothing else will happen.
Doman the Ogre. This is another event where you won't be given any options for how to handle it. It will also take a while to complete, but if your men are successful in defeating the ogre, then you'll receive 3000 gp and the club
Will of the Lost.
Tax Collection. Supposedly, this is an event where you can earn some gold for your keep by sending out tax collectors. Depending on the decisions you make, plus things like your diplomacy and bluff skills, your people will either like you more or less as a result. However, we've never seen any gold actually appear at the keep after the return of your tax collectors, and without any new gold you might as well keep your peasants as happy as possible.
Raven's Allies. The decision for this event won't make a huge difference. If you accept the mercenaries, then you'll add 50 new greycloaks to your ranks, but you might take a hit to greycloak civility or to morale.
Ziffer the Bailiff. Once you've started improving the areas surrounding the keep, a man named Ziffer will show up and ask to start a new town on your lands. There isn't any downside to this. If you can maintain a high enough land security then the town will provide you with gold through taxes, and if you can't then they won't. Later, Ziffer should send you some recruits for your keep.
Bugbears. We've never seen a resolution for this event, but we've heard that you'll
receive 5000 gp for fending off the bugbears. If you completely wipe them out,
you might also receive
Nasher's Ring of Strength.
Mere of Dead Men. We've never seen a resolution for this event, but we've heard that you'll earn 2000 xp and a
Watchman's Helm for defeating the undead.
Merchant Costers. Once you've made merchant travel safe enough, and once enough time has passed, Kana will tell you that there are three merchant costers who wish to set up a caravan outpost in the keep: the Circle of Friends, the Forgotten Lords, and the Fated Winds. If you have a high enough appraise skill, then you'll learn some information about each group; otherwise you'll have to go by their names. If you choose the Circle of Friends then you'll become more lawful. If you choose the Forgotten Lords then you'll become more chaotic. If you choose the Fated Winds then you'll become more evil and chaotic. The alignment shift is the only ramification that we noticed.
Sergeants and Greycloaks
You can use sergeants to improve your troops and help them in their missions. Listed below are the sergeants that you can recruit for your keep.
- Katriona. You can contact Katriona right away at
Old Owl Well. It's best to use her for recruiting and special missions.
- Bevil. Bevil will appear next to the tower (#5) at the start of Act III. It's best to use him on patrols.
- Jalboun. You'll meet Jalboun during the
True Name Meeting, where you'll be able to lure him away from Sydney Natale and recruit him to be a sergeant. He'll actually hurt your recruiting efforts, so don't use him there. Instead, use him on special missions.
- Light of Heavens. You'll need to spar with Light of Heavens three times, including once at the keep (#21), before she'll agree to be your sergeant. See the
Light of Heavens section for the other locations. Light of Heavens is best at recruiting.
You can also improve your greycloaks by telling Kana to have them train and garrison at the keep, and by upgrading their equipment at the smithy (#7). If you only accept the best possible candidates, then eventually Kana should ask you to form the Captain's Company, and the greycloak training level will increase to "best of the best." At that point you won't need to train your greycloaks any further, and you should start sending out patrols.
Time
When Kana gives you a report on Crossroad Keep, you'll see an entry called "Time Passed," expressed as a percentage. This entry is sort of misleading. You won't ever run out of time while working on the keep. Time will simply advance each time you enter the keep and talk to Kana, and it's this time that will control when special events occur (such as Daerred's arrivals and letters).
At certain points, time will stop flowing at the keep. That will prevent you from outpacing the plot. Listed below are the stopping points, and how far time can advance before reaching them.
| Event / Location
| Maximum Time Passed
|
| Arvahn
| 25%
|
| Ammon Jerro's Haven
| 62%
|
| True Name Meeting
| 72%
|
| Shadow Reaver Camp
| 82%
|
| Reform the Sword
| 92%
|
| War
| 100%
|
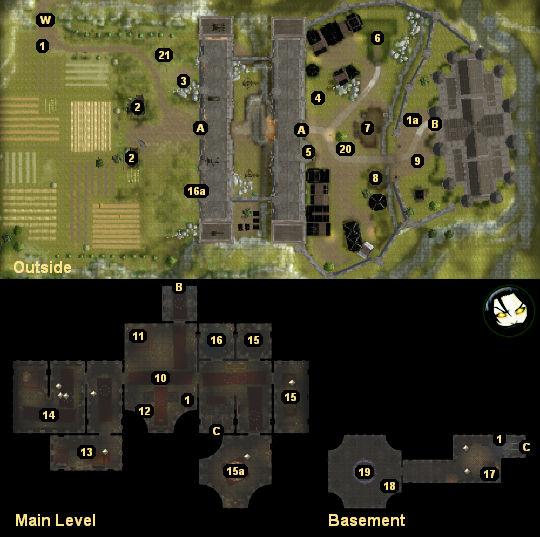
1 - Wolf and His Minions
You'll be able to use Wolf (#1a) and his minions (#1) to teleport around the keep.
2 - Farms
Even though there are two farms, we only found one farmer that you can recruit: Orlen from
West Harbor. You won't need to rebuild the farms yourself -- the farmers will do that for you -- but it's not clear what benefit you'll gain from having farmers around.
3 - Miners
When you hire Pentin from
Old Owl Well and Calindra from
Port Llast, this is where they'll appear. Each time you discover a vein of ore (see the
Ore section for the exact locations), you'll need to report it to one of these two miners so that the ore will become available to your blacksmiths (#7). From what we can tell, it doesn't make any difference which miner you talk to. Both will give you some gold when you report a vein, and then they'll give you some ore when they return.
Note: At some point Pentin might threaten to leave. As of version 1.03 there's a bug in this encounter, and it's possible that Pentin will turn hostile, but you won't be able to damage him. So try to intimidate him into staying rather than attacking him.
4 - Merchant's Shop
Building the merchant's shop will allow you to recruit two shopkeepers. You'll be able to add Deekin right away. You'll find him in the
Neverwinter Merchant Quarter. Later, in Act III, you'll meet Caelryna Seerar on
Mount Galardrym. If you rescue her from the fire giants, then she'll agree to come and work for you, and she'll offer you a wide selection of goods, including
Bracers of Armor +5, a
Helm of Darkness, and a
Chime of Opening. Caelryna is one of the few merchants who will offer to sell you a
Mortar and Pestle and a
Smith Hammer in Act III.
5 - Tower
You won't be able to do anything with the tower in Act II, but in Act III you'll be able to convert it either into a base of operations for the Neverwinter Nine, or into a wizard's tower for a mysterious archmage named Startear. You might also hear rumblings that the tower can be converted into a gambling den -- Torio (#12), for example, will mention it -- but this option appears to have been taken out of the game.
To convert the tower into a guard tower for the Neverwinter Nine, you'll first need to talk to Sir Nevalle in front of the tower. He should appear there at the start of Act III. To convert the tower into a wizard's tower for Startear, you'll first need to talk to Startear in front of the tower. He should appear there shortly after the start of Act III (if you don't see him, just go into and out of the keep a couple of times, and he should show up).
If you build a guard tower for the Neverwinter Nine, then they'll provide a shopkeeper, and he will sell you things like
Balduran's Armor and
Red Dragon Armor, plus a variety of different metal ingots. You can also pick up the recipe book
Abjurative Enchantments from inside the tower. Sir Nevalle himself will stay outside the tower. If you ask him to teach you something, then you'll receive the message "Sparring with Nevalle has given you a slight bonus to attack," but we didn't notice any change on our character sheet.
If you build the wizard tower, then a shopkeeper will appear inside of it, and he'll offer to sell you things like the
White Robe of the Archmagi and the
Staff of Valmaxian. Startear will also appear in the tower. It's possible that he can give you a bonus if you're playing a wizard character, but all we can say for sure at this point is that he won't give you a bonus if you're playing a sorcerer. You can also pick up the recipe book
The Lore of the Master Alchemist inside the tower.
Finally, Bevil should appear next to the tower at the start of Act III. When you talk to him, he'll automatically become one of your sergeants.
6 - Church
In Act III, you'll be allowed to convert the church into a Temple of Tyr (headed by Ivarr) or into a Monastery for the Sun Soul (headed by Rolan). In both cases, a shopkeeper will appear in the church. The temple shopkeeper will sell you things like the
Shield of Prator and the quarterstaff
Thornshield. Meanwhile, the monastery shopkeeper will offer you items like
Boots of the Sun Soul +5 and the
Eye of the Sun. If you build the temple, then you'll also find the recipe book
A Study of the Fantastical Vestments of the Priests of the Realms inside.
Unlike the tower (#5), the church can lead to some quests. If you build the monastery, and if you're playing a monk, then Rolan will give you a quest involving elementals. Depending on how you play the quest, you'll earn a history feat, such as Master of the Sun Soul.
If you build the temple, and if you're playing a paladin, a cleric, or an evil character, then Ivarr will give you a quest to kill Tholapsyx the red dragon on
Mount Galardrym (you might need to talk to him twice to get the quest). If you complete the quest, then paladins will receive the
Holy Avenger, clerics will receive the
Loremaster's Mace, and evil characters will shift their alignment towards good.
7 - Smithy
Once you've built the smithy, you'll be allowed to recruit two craftsmen to run it: Jacoby the weaponsmith from
Fort Locke and Edario the armorer from
Highcliff. Edario will require that you have a miner (#3) working for you before he'll agree to come over. Jacoby is less picky; he'll join you right away.
Both Jacoby and Edario will act as shopkeepers, and they'll also allow you to upgrade the weapons and armor of your troops, provided that you have enough gold and ore to get the job done. Listed below are the upgrades that you can purchase.
| Upgrade
| Cost
|
| Basic Weapons
| 5000
| | Good Weapons
| 15,000
| | Best Weapons
| 35,000
|
| Basic Armor
| 3500
| | Decent Armor
| 15,000
| | Good Armor
| 30,000
| | Best Armor
| 50,000
| | |
8 - Phoenix Tail Inn
Thankfully, the inn will start out constructed, so you won't have to spend any gold to get it going. Inside you'll meet the proprietor Sal, who you might remember from the Sunken Flagon. He'll tell you that a bard is willing to send you an apprentice for the inn, if only you could find somebody to dance to his music. You'll have to wait until Act III to find the dancer: Joy from the
Neverwinter Merchant Quarter. (You might think that Teelah from the Moonstone Mask would be willing to dance in your tavern, but you'll never get a dialogue option to invite her.)
If the inn is successful enough (which probably requires that you recruit Joy), then Sal will eventually give you a
Ring of the Ram as a gift of thanks.
9 - Master Veedle
10 - Kana
11 - Uncus Riverdweller
Uncus Riverdweller is a Shadow Thief. If you joined Axle and Moire, then he'll pretty much just set up shop in your keep, and he'll keep you updated on Shadow Thief matters. Most of the events related to Uncus will happen in Act III, but we're not sure what the ramifications of those events might be, if any. Generally, your decisions will either make Axle happy or mad, and eventually Uncus will tell you that Axle would like to meet with you in his office in the
Neverwinter Merchant Quarter.
If you joined the City Watch, then you'll have to decide if you want Uncus to hang out at your keep or not. He's sort of unsavory, and he's a fence, but there doesn't appear to be any downside to allowing him to stay.
Besides possibly triggering some special events, Uncus will also function as a shopkeeper, and he'll offer you a variety of items, including the powerful
Bloodletter and the odd
Katana of the Mummylord. He'll probably give you better prices than most other shopkeepers.
12 - Torio Claven
If you decide to prevent Torio from being executed in Neverwinter, then she'll come to your keep and act as an advisor, and she'll tell you more about Luskan and Garius and the
Tome of Iltkazar.
Torio will also advise you on people you can recruit and things you can do with the tower (#5) and the church (#6), but it appears that every conversation you have with her is optional. For example, she'll recommend that you meet up with a scout named Guyven of the Road (#16), but Guyven will simply show up at the keep after you've met him three times during your travels. Talking to Torio about him isn't required.
Note: When you ask Torio about the tower, she'll mention that you might talk to Uncus (#11) about turning it into a gambling den. From what we can tell, this option was removed from the game, and it's only possible to convert the tower into a guard tower or a wizard's tower.
13 - Personal Suite
You'll find a locked cabinet in your personal suite. The cabinet can't be picked or knocked, but you'll find the key for it when you renovate the "west" wing of the keep (#15). Inside the cabinet, you'll find a
Bag of Holding.
14 - Library
You'll find several scrolls and recipe books scattered around the library, including
Marvellous Artefacts for the Resistance of Sorcery,
The Book of Ice,
Alazzabner's Grand Ensorcelments of the Mind,
On the Refinement of the Alchemist's Craft,
Fundamentals of Terrible Destruction, and
The Quiet Deaths of the Brotherhood of Assassins.
Also, just in case you missed it during your first visit to the keep, you can pick up another copy of
The Ancient Art of Golemcraft here. It's one of the three items required to reactivate the Construct. See
Grobnar's character page for more information.
Finally, you'll also find Aldanon in the library. He'll give you some background information on a variety of topics, including the
Tome of Iltkazar, the King of Shadows, and the githyanki.
15 - "West" Wing Rooms
When you pay Master Veedle (#9) to renovate the "west" wing of the keep, these three rooms on the east side will become available. However, only the War Room (#15a) will really be useful. Inside a desk there, you'll discover the
Crossroad Keep key, which you'll be able to use to open the cabinet in your personal suite (#13).
16 - Guyven of the Road
Guyven is an explorer. You should have met him three times during your travels before reaching the keep (see the
Guyven of the Road section for the locations). If you talked to him at all three places, and if you were polite to him at those times, then he should show up in this room of your keep.
Guyven will tell you that he knows secrets, but that he still needs to complete a great map before he'll reveal them. As you explore the world during Acts II and III, you'll sometimes receive notice that you've just visited an area that Guyven would like to hear about. These areas are:
Once you've told Guyven about two of these areas, you'll receive the history feat "Pathstalker." Guyven will then take the opportunity to reveal to you that there is a cache of equipment buried near the "second tower north" of the keep (#16a). When you examine the dirt mound there, you'll find a
Crossbow of the Unicorn.
Once you've told Guyven about all four areas, he'll replace the "Pathstalker" feat with the "Explorer" feat, but nothing else will happen, and neither history feat will give you any sort of actual bonus. Guyven will never give you a map or name you his successor, or do anything to really resolve his presence.
17 - Workbenches / Construct
You'll find three workbenches and the Construct here. See
Grobnar's character page for information about how to reactivate the Construct.
18 - Kistrel
If you befriended the giant spider Kistrel in the
Glowstone Caverns, then this is where you'll find her. Eventually, at some point in Act III, Kistrel will knit for you
Kistrel's Cloak, and she'll give it to you when you talk to her.
19 - Summoning Circle (Act III)
If you walk into the summoning circle in Act III, then Ammon Jerro will warn you to be careful, but eventually he'll give you a
Gold Filigree Charm Recipe so that you can summon Mephasm (the devil from the Githyanki Base and Ammon Jerro's Haven). For this recipe you'll need:
You'll have to use the nearby magician's workbench (#17) to craft the charm, and the crafter will need to have the wondrous items crafting feat. If you don't have the crafting feats and skills on your character, then you can use a companion to create the charm.
Once you've created the
Gold Filigree Charm, simply walk back to the summoning circle. A cutscene will start up, resulting in Mephasm appearing in the circle. You'll also receive 500 xp. From that point on, any time you want to summon Mephasm, you'll just need to walk into the summoning circle, and he'll appear.
When you talk to Mephasm, the topic of bargaining will come up. Mephasm will refuse to bargain with you at first, but once you've talked to him three times, he'll relent, and he'll give you the book of
Infernal Focus Recipes. The three recipes in the book will produce the same thing -- an
Infernal Focus -- and this is what you'll need to give Mephasm when you bargain with him.
Here are the items you can get from Mephasm:
The Angry Soul (weapon), a
Mask of Death (armor),
Boots of the Shifting Sands (something else), and 5000 gp (riches).
You can also bargain for a stat-boosting item from Mephasm. We've never seen it, but apparently you'll need to trade a powerful weapon to receive it.
Each time you bargain with Mephasm, you'll become more chaotic. After you've bargained with him three times, you'll gain the "Infernal Bargaining" history feat.
Note: If you learned Zaxis' true name while at
Ammon Jerro's Haven, then you can ask Ammon about summoning him as well, but Ammon will flatly refuse.
20 - Daeghun (Act III)
Daeghun will show up here in Act III. The first time you talk to him, he'll inform you that some of Elanee's Circle might still be alive, and he'll mark the
Circle of the Mere on the world map.
21 - Light of Heavens (Act III)
After meeting and dueling with Light of Heavens in
Port Llast and the
Neverwinter Merchant Quarter, she'll show up here. If you can best her a third time, then she'll agree to work for you as a sergeant.
Exits:
- Main gate.
- Front entrance.
- Stairs between the main level and the basement.
- World exit.


