 Did we miss anything in this section? Is there something we didn't discover?
Let us know!
Walkthrough
Did we miss anything in this section? Is there something we didn't discover?
Let us know!
Walkthrough
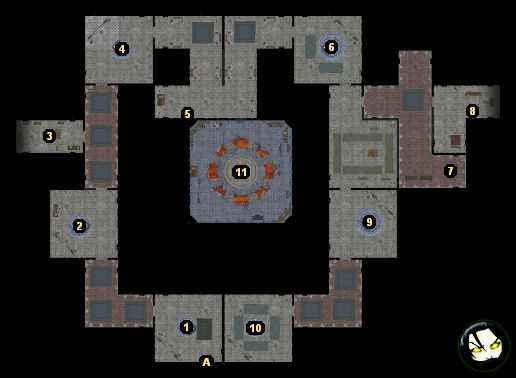
When you enter the haven, you'll immediately run into the demon Mephasm (#1). He'll tell you that the mysterious warlock rules this place, and that he uses Mephasm plus five other demons (#2, #4, #6, #9, #10) to feed his power. In order to defeat the warlock, you'll need to reach his laboratory in the center of the haven (#11), but to do that, you'll need to convince three of the five other demons to help you.
When you reach the demons, you'll discover that they don't like each other very much, but that you can use this to your advantage. Some of the demons will require you to have certain skills or to be able to solve puzzles, but others will just ask you to fight, and so it should be straightforward to convince three of them to help you. But if you get stuck, the demon tasks are described below.
Note: We've convinced four demons to help us -- by skipping Baalbisan (#2) and Hezebel (#4) and heading straight for Blooden (#10) -- but there doesn't appear to be any way to get all five to help.
Once you've convinced enough demons to help you, going through any of the portals in the haven (you'll find one next to each demon) should transport you to the laboratory (#11). Nothing will happen when you first arrive, so you can use this time to buff up your party, but as soon as you start moving around, the warlock will confront you and attack you.
The warlock will summon a devil to help him, and the spikes surrounding you will shoot laser beams (or something) at you, but mostly you should ignore these things and concentrate on the warlock. Warlocks get many damage resistances, and so the warlock here can be tough to kill, but once you've done enough damage to him, you'll start up an extended cutscene where Shandra will sacrifice herself to save you, and where you'll learn that the warlock is really Ammon Jerro, Shandra's grandfather. Shandra will then stop being available as a companion, but Ammon Jerro will join you.
After the cutscene, you'll find yourself in the Phoenix Tail Inn in
Crossroad Keep. However, as soon as you attempt to leave the inn, Sir Nevalle will come up to you and command you to visit Lord Nasher in
Castle Never. No matter what you say, you'll be transported to the castle.
Note: Once you're able to add companions to your party again, you'll find Shandra's equipment in Ammon's inventory. He'll also be carrying a
Ring of Elemental Resistance, a
Cloak of Blackflame, a
Greater Amulet of Health, the scimitar
The Forsaken Path, and a
Silver Shard: Fire and Cold Resistance.
1 - Mephasm
If the name doesn't sound familiar, Mephasm is the demon you met in the
Githyanki Base. You had to free him to bring down a barrier. He'll agree to help you when you talk to him.
2 - Baalbisan
Baalbisan doesn't like females. If you're a female (and you tell him so), then he won't deal with you. If you have Neeshka in your party, then he won't like her (and vice versa), and you'll have to muffle her a little as you make your way through the conversation.
"I hope that circle fits you nice and tight, you bone-gnawing, ichor-drinking glutton!"
If Baalbisan decides to work with you, then he'll ask you to weaken the female devil Hezebel (#4) by slaying her erinyes. You'll have to kill five erinyes, but this should be fairly easy, and when you return to Baalbisan, he'll agree to help you, and you'll earn 1000 xp.
Note: Even if you totally botch your conversation with Baalbisan, if you kill the erinyes, then he'll agree to help you.
3 - Storage Room
If you loot the containers in this room, you'll find
Kossuth's Belt of Priestly Might and Warding and the recipe books
Accoutrements of Masterful Wizardry and Their Construction and
The Tome of Alchemy.
4 - Hezebel
Hezebel will ask you to anger Baalbisan (#2) and trick him into revealing the true name of his mother. To do this, you'll need to talk to him and pass a taunt check. A taunt skill of 16 is enough to pass the check. If you accomplish this task and return to Hezebel, then she'll agree to help you, and you'll earn 1000 xp.
If your taunt skill isn't high enough to anger Baalbisan, then there are two things you can do. If you anger Hezebel instead (by lying to her, for example) then she'll order her erinyes to attack you, and killing them will fulfill Baalbisan's quest, even if you didn't agree to it. You'll just need to go back to him to gain his support. You can also learn Baalbisan's mother's name from Blooden (#10), and gaining the information that way will work just as well.
5 - Chest
Inside this chest you'll find the
Nightthief's Claw, an
Adamantine Morningstar, and the recipe book
Advanced Arcanery of Personal Defense.
6 - Zaxis
Like Mephasm (#1), Zaxis is another demon you met previously in the
Githyanki Base -- only he'll remember you far less fondly than Mephasm did. When you first approach Zaxis, he won't want to help you, and he'll send three hezrou demons to attack you. Later, if Blooden (#10) tells you his true name, then you'll be able to command him to help you, and that will earn you 1000 xp.
7 - Racks
At this spot you'll find two weapon racks and two armor racks. If you loot them all then you'll pick up the
Hammer of the Wisp, the bastard sword
Nameless Light,
Rainbow Armor, and the
Mask of the Skull.
8 - Frozen Imp
If you examine the imp, you'll see that it is "looking intently at the bookcase in front of it." If you loot the bookcase, you'll find an
Ancient Book plus the recipe book
The Wondrous Potions of the Brothers of Ilmater inside.
The
Ancient Book is a special item that you can use. If you activate it on yourself, then you'll read the book and discover that it contains an assortment of magical phrases. With 20 points in spellcraft, you'll learn that the book is warped and that its phrases will do the opposite of what they're supposed to do. With 20 points in lore, you can translate the phrases to learn more about them. Both skill checks will net you 500 xp if you can pass them.
Listed below are the phrases and their meanings.
| Phrase | Translation | Result
|
| Ziloth u meran | Focus | Confuses the entire party
|
| Athkaton kal olan | Freedom | Your skin tingles but nothing happens (this is what the imp read)
|
| Tilo ut lon | Imprison | Frees the imp
|
| Koba tal fass | Loyalty | Dominates one character in the party
|
| Verba ne kun | Clarity | Blinds the entire party
|
| Malso yen | Mercy | Damages the entire party (magical damage)
|
| Jakk lo zeff | Invigoration | Damages the entire party (cold damage)
|
After freeing the imp, when you talk to it, you'll receive 500 xp. If you loot the other containers in the room, then you'll find some random +2 equipment.
9 - Koraboros
Koraboros will ask you to locate his missing imp (#8). After doing so, Koraboros will agree to help you, and you'll earn 500 xp.
10 - Blooden
After defeating the succubi in the room, when you talk to Blooden, she'll make you a deal: if you can convince Koraboros (#9) to send his hellhounds against her succubi and liven things up, then she'll agree to help you. Koraboros won't require much convincing, and although you'll have to take sides in the battle, it doesn't make any difference which side you pick or which side wins. After the battle, Blooden will agree to help you, and you'll receive 1000 xp.
After helping Blooden, if you still need to convince a demon to help you, then she'll assist you further. She'll tell you that Zaxis (#6) was once a marilith (a female demon), that his/her true name is Bethshiva, and that he/she is the mother of Baalbisan (#2). You can use this information to get support from Zaxis and Hezebel (#4).
11 - Laboratory
Once you've convinced enough demons to help you, all of the portals in the haven will transport you here.
Exits:
- Front door. We're calling this an exit, but it will close and lock after you've entered the haven, and you'll never be able to go through it.


